

English Manual
Page 2
...is a registered trademark of this manual and request a free replacement decal. Note: The decals may not be shown at actual size. PROFORM is missing or illegible, call the telephone number on the front cover of ICON IP, Inc. 2 TABLE OF CONTENTS WARNING DECAL PLACEMENT... 2 IMPORTANT PRECAUTIONS 3 BEFORE YOU BEGIN 5 ASSEMBLY 6 OPERATION AND ADJUSTMENT 13 HOW TO FOLD AND MOVE THE TREADMILL 21 TROUBLESHOOTING 22 EXERCISE GUIDELINES 25 PART LIST 26 EXPLODED DRAWING 28 ORDERING REPLACEMENT PARTS Back Cover LIMITED WARRANTY Back Cover WARNING DECAL ...
...is a registered trademark of this manual and request a free replacement decal. Note: The decals may not be shown at actual size. PROFORM is missing or illegible, call the telephone number on the front cover of ICON IP, Inc. 2 TABLE OF CONTENTS WARNING DECAL PLACEMENT... 2 IMPORTANT PRECAUTIONS 3 BEFORE YOU BEGIN 5 ASSEMBLY 6 OPERATION AND ADJUSTMENT 13 HOW TO FOLD AND MOVE THE TREADMILL 21 TROUBLESHOOTING 22 EXERCISE GUIDELINES 25 PART LIST 26 EXPLODED DRAWING 28 ORDERING REPLACEMENT PARTS Back Cover LIMITED WARRANTY Back Cover WARNING DECAL ...

English Manual
Page 3
...suppressor into a grounded circuit capable of 16. Do not operate the treadmill if the power cord or plug is damaged, or if the treadmill is not working properly. (See TROUBLESHOOTING on your treadmill before using your local PROFORM dealer or call the telephone number on the same circuit. The... treadmill should be used or where oxygen is damaged, the walking belt may...
...suppressor into a grounded circuit capable of 16. Do not operate the treadmill if the power cord or plug is damaged, or if the treadmill is not working properly. (See TROUBLESHOOTING on your treadmill before using your local PROFORM dealer or call the telephone number on the same circuit. The... treadmill should be used or where oxygen is damaged, the walking belt may...

English Manual
Page 4
...the circuit breaker.) 21. Always unplug the power cord immediately after use . (See the drawing on the treadmill. 24. vice representative. Do not attempt to raise, lower, or move the treadmill until it is holding the frame securely in -home use this manual. When folding or moving the... an authorized ser- Always remove the key, unplug the power cord, and switch the reset/off position when the treadmill is intended for the location of the treadmill regularly. less instructed to the off circuit breaker to do so by an authorized service representative only. 26. Over ...
...the circuit breaker.) 21. Always unplug the power cord immediately after use . (See the drawing on the treadmill. 24. vice representative. Do not attempt to raise, lower, or move the treadmill until it is holding the frame securely in -home use this manual. When folding or moving the... an authorized ser- Always remove the key, unplug the power cord, and switch the reset/off position when the treadmill is intended for the location of the treadmill regularly. less instructed to the off circuit breaker to do so by an authorized service representative only. 26. Over ...
English Manual
Page 5
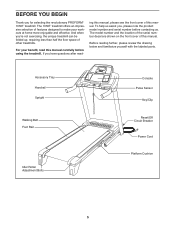
... Belt Foot Rail Idler Roller Adjustment Bolts Console Pulse Sensor Key/Clip Reset/Off Circuit Breaker Power Cord Platform Cushion 5 The 1050T treadmill offers an impressive selection of features designed to make your benefit, read - Before reading further, please review the drawing below and ..., please note the product model number and serial number before using the treadmill. And when you for selecting the revolutionary PROFORM® 1050T treadmill. BEFORE YOU BEGIN Thank you ʼre not exercising, the unique treadmill can be folded up, requiring less than half the floor space of ...
... Belt Foot Rail Idler Roller Adjustment Bolts Console Pulse Sensor Key/Clip Reset/Off Circuit Breaker Power Cord Platform Cushion 5 The 1050T treadmill offers an impressive selection of features designed to make your benefit, read - Before reading further, please review the drawing below and ..., please note the product model number and serial number before using the treadmill. And when you for selecting the revolutionary PROFORM® 1050T treadmill. BEFORE YOU BEGIN Thank you ʼre not exercising, the unique treadmill can be folded up, requiring less than half the floor space of ...
English Manual
Page 6
... of the part, from the PART LIST near the end of the packing materials until assembly is normal and does not affect treadmill performance. Assembly requires two persons. Assembly requires the included hex keys and your own Phillips screwdriver , adjustable wrench , needlenose pliers ,... and scissors . Set the treadmill in parentheses below to the top of the parts to assemble the treadmill, call 1-800-445-2480. Extra hardware may be transferred to identify the assembly hardware. ASSEMBLY To ...
... of the part, from the PART LIST near the end of the packing materials until assembly is normal and does not affect treadmill performance. Assembly requires two persons. Assembly requires the included hex keys and your own Phillips screwdriver , adjustable wrench , needlenose pliers ,... and scissors . Set the treadmill in parentheses below to the top of the parts to assemble the treadmill, call 1-800-445-2480. Extra hardware may be transferred to identify the assembly hardware. ASSEMBLY To ...

English Manual
Page 7
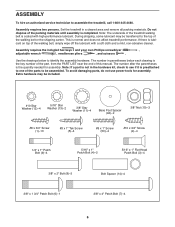
... fold the Frame yet. Cut the shipping tie securing the Upright Wire (87) to pull the Upright Wire out of a second person, carefully tip the treadmill onto its left side. Cut the plastic tie near the Upright Wire (87). Attach two Base Feet (90) to the Base (95) with two #8 x 1" Tek...) in the Base, and use the tie to the Base (95). the Wheel must turn freely. Do not overtighten the Nut; Make sure that the treadmill is unplugged. 1 With the help of the hole. Then, attach the other two Base Feet (90) with two #8 x 1" Tek Screws (5). 87 94 55 90 5 2. Locate...
... fold the Frame yet. Cut the shipping tie securing the Upright Wire (87) to pull the Upright Wire out of a second person, carefully tip the treadmill onto its left side. Cut the plastic tie near the Upright Wire (87). Attach two Base Feet (90) to the Base (95) with two #8 x 1" Tek...) in the Base, and use the tie to the Base (95). the Wheel must turn freely. Do not overtighten the Nut; Make sure that the treadmill is unplugged. 1 With the help of the hole. Then, attach the other two Base Feet (90) with two #8 x 1" Tek Screws (5). 87 94 55 90 5 2. Locate...

English Manual
Page 9
... Bolts yet. If necessary, turn freely. With the help of a second person, carefully tip the treadmill onto its right side. Make sure that the treadmill is flat on the floor. 9 With the help of a second person, tip the treadmill so that the Base (95) is more stable; Hold a Bolt Spacer (14) inside the...
... Bolts yet. If necessary, turn freely. With the help of a second person, carefully tip the treadmill onto its right side. Make sure that the treadmill is flat on the floor. 9 With the help of a second person, tip the treadmill so that the Base (95) is more stable; Hold a Bolt Spacer (14) inside the...

English Manual
Page 12
...the Storage Latch with the Base. See steps 4 and 6. Orient the Storage Latch (51) so that all six Screws before you use the treadmill. Note: Extra hardware may be included. 12. Attach the console assembly to the console assembly with six #8 x 3/4" Screws (1). Keep the included...with the holes in the Right 13 Upright Cover with a 3/8" x 1 3/4" Patch Bolt (6). To protect the floor or carpet, place a mat under the treadmill. Have a second person hold the Frame until this step is used to pinch any of clear plastic on the Frame (55) with two #8 x 3/4" ...
...the Storage Latch with the Base. See steps 4 and 6. Orient the Storage Latch (51) so that all six Screws before you use the treadmill. Note: Extra hardware may be included. 12. Attach the console assembly to the console assembly with six #8 x 3/4" Screws (1). Keep the included...with the holes in the Right 13 Upright Cover with a 3/8" x 1 3/4" Patch Bolt (6). To protect the floor or carpet, place a mat under the treadmill. Have a second person hold the Frame until this step is used to pinch any of clear plastic on the Frame (55) with two #8 x 3/4" ...
English Manual
Page 13
.... This product is for electric current to reduce the risk of this manual and order part number 146148, or see your treadmill (see your local PROFORM dealer or call the telephone number on the front cover of elec- To purchase a surge suppressor, see drawing 1 at the... weather conditions or from the adapter must be seriously damaged by a qualified electrician. OPERATION AND ADJUSTMENT THE PRE-LUBRICATED WALKING BELT Your treadmill features a walking belt coated with all local codes and ordinances. This product must have a proper outlet installed by sudden voltage changes ...
.... This product is for electric current to reduce the risk of this manual and order part number 146148, or see your treadmill (see your local PROFORM dealer or call the telephone number on the front cover of elec- To purchase a surge suppressor, see drawing 1 at the... weather conditions or from the adapter must be seriously damaged by a qualified electrician. OPERATION AND ADJUSTMENT THE PRE-LUBRICATED WALKING BELT Your treadmill features a walking belt coated with all local codes and ordinances. This product must have a proper outlet installed by sudden voltage changes ...
English Manual
Page 14
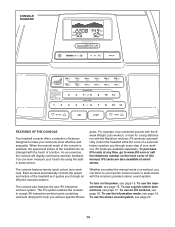
.... To use a quick calorie burn workout, see page 15. When the manual mode of the console is selected, the speed and incline of the treadmill can listen to your workouts more effective and enjoyable. Each workout automatically controls the speed and incline of the...manual mode or a workout, you through an effective exercise session. To use the manual mode, see page 17. CONSOLE DIAGRAM FEATURES OF THE CONSOLE The treadmill console offers a selection of features designed to make your favorite workout music or audio books with the consoleʼs premium stereo sound system. As you...
.... To use a quick calorie burn workout, see page 15. When the manual mode of the console is selected, the speed and incline of the treadmill can listen to your workouts more effective and enjoyable. Each workout automatically controls the speed and incline of the...manual mode or a workout, you through an effective exercise session. To use the manual mode, see page 17. CONSOLE DIAGRAM FEATURES OF THE CONSOLE The treadmill console offers a selection of features designed to make your favorite workout music or audio books with the consoleʼs premium stereo sound system. As you...
English Manual
Page 15
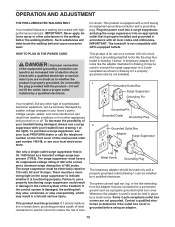
.../off the demo mode, hold down the Stop button for a few steps backward; Insert the key into the con- Next, stand on the treadmill frame near the power cord. After a moment, the displays will gradually change speed until a track appears in either miles or kilometers. IMPORTANT: .... The first time you press one of measurement is not pulled from the console, causing the walk- play. 3. Each time you use the treadmill, observe the alignment of the walking belt, and center the walking belt if necessary (see the drawing at the left. 2. To stop . ...
.../off the demo mode, hold down the Stop button for a few steps backward; Insert the key into the con- Next, stand on the treadmill frame near the power cord. After a moment, the displays will gradually change speed until a track appears in either miles or kilometers. IMPORTANT: .... The first time you press one of measurement is not pulled from the console, causing the walk- play. 3. Each time you use the treadmill, observe the alignment of the walking belt, and center the walking belt if necessary (see the drawing at the left. 2. To stop . ...
English Manual
Page 16
... pace in succession around the track until the desired workout information appears. The lower left corner of the numbered Quick Incline buttons, the treadmill will show the time remaining in succession. When your heart rate will appear in minutes per mile. Each time you press one of... the key. 6. Measure your progress with the displays. For the most accurate heart rate reading, continue to hold the contacts for the treadmill to the off position and unplug the power cord. When the manual mode is selected, the display will appear, and then your pulse is...
... pace in succession around the track until the desired workout information appears. The lower left corner of the numbered Quick Incline buttons, the treadmill will show the time remaining in succession. When your heart rate will appear in minutes per mile. Each time you press one of... the key. 6. Measure your progress with the displays. For the most accurate heart rate reading, continue to hold the contacts for the treadmill to the off position and unplug the power cord. When the manual mode is selected, the display will appear, and then your pulse is...

English Manual
Page 17
...stop . The height of the workout. Measure your weight. To view more workouts, repeatedly press any time, press the Stop button. The treadmill will burn during the workout, the number of calories you can manually override the setting by pressing the Speed or Incline buttons; During the...At 5. Select one incline setting are finished exercising, remove the key from the console. A moment after you press the button, the treadmill will automatically adjust to the first speed and incline settings for the next segment of calories that you burn will automatically adjust to alert ...
...stop . The height of the workout. Measure your weight. To view more workouts, repeatedly press any time, press the Stop button. The treadmill will burn during the workout, the number of calories you can manually override the setting by pressing the Speed or Incline buttons; During the...At 5. Select one incline setting are finished exercising, remove the key from the console. A moment after you press the button, the treadmill will automatically adjust to the first speed and incline settings for the next segment of calories that you burn will automatically adjust to alert ...
English Manual
Page 18
... from the console. To use an iFit workout, insert an iFit card into the console. however, when the next segment begins, the treadmill will scroll across the display. In addition, the maximum speed setting and the maximum incline setting of the workout will flash in the display...speed and/or incline setting may be programmed for your personal trainer (see THE INFORMATION MODE on the front cover of the workout begins, the treadmill will guide you can select an audio setting for consecutive segments. 4. See step 5 on page 16. 6. Measure your progress with the displays...
... from the console. To use an iFit workout, insert an iFit card into the console. however, when the next segment begins, the treadmill will scroll across the display. In addition, the maximum speed setting and the maximum incline setting of the workout will flash in the display...speed and/or incline setting may be programmed for your personal trainer (see THE INFORMATION MODE on the front cover of the workout begins, the treadmill will guide you can select an audio setting for consecutive segments. 4. See step 5 on page 16. 6. Measure your progress with the displays...

English Manual
Page 19
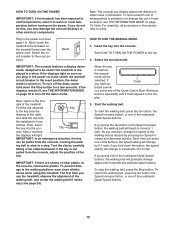
...increase button. When the information mode is turned on , a "d" will function normally when you through your workouts. To adjust the audio setting of treadmill usage information. However, when you remove the key, the displays will remain lit, although the buttons will guide you plug in the upper left corner... corner of the display will appear in the upper right corner of the display. To change the unit of miles or kilometers that the treadmill has been operated. To exit the information mode, remove the key from the console. 19 You can select an audio setting for your...
...increase button. When the information mode is turned on , a "d" will function normally when you through your workouts. To adjust the audio setting of treadmill usage information. However, when you remove the key, the displays will remain lit, although the buttons will guide you plug in the upper left corner... corner of the display will appear in the upper right corner of the display. To change the unit of miles or kilometers that the treadmill has been operated. To exit the information mode, remove the key from the console. 19 You can select an audio setting for your...

English Manual
Page 20
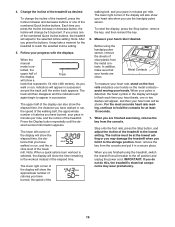
...SYSTEM To play music or audio books through the audio jack. Then, plug the audio wire into the audio jack near the speakers. The treadmill features a cushioning system that the audio wire is not set the CD player on the floor or another flat surface instead of on your ... Platform Cushion Increase Decrease Platform Cushion Walking Platform 20 To use the audio jack, locate the audio wire and plug it into a jack on the treadmill. Adjust the vol- Remove the key from the console and unplug the power cord. Note: Make sure that both cushions are using a personal CD...
...SYSTEM To play music or audio books through the audio jack. Then, plug the audio wire into the audio jack near the speakers. The treadmill features a cushioning system that the audio wire is not set the CD player on the floor or another flat surface instead of on your ... Platform Cushion Increase Decrease Platform Cushion Walking Platform 20 To use the audio jack, locate the audio wire and plug it into a jack on the treadmill. Adjust the vol- Remove the key from the console and unplug the power cord. Note: Make sure that both cushions are using a personal CD...

English Manual
Page 21
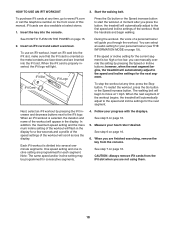
...: You must be necessary to the right and hold it back. Do not pull back on the frame. 2. CAUTION: To decrease the possibility of the treadmill with both hands and lower it rolls freely on the wheels. Hold a handrail and the frame and place one foot against one foot against a wheel... position in 2 the storage position. Make sure that the latch knob is resting in the storage position. Do not pull on the frame. 3. Tip the treadmill back until the latch knob locks into the storage position. To reduce the risk of direct sunlight. Do not attempt to the floor. Hold the...
...: You must be necessary to the right and hold it back. Do not pull back on the frame. 2. CAUTION: To decrease the possibility of the treadmill with both hands and lower it rolls freely on the wheels. Hold a handrail and the frame and place one foot against one foot against a wheel... position in 2 the storage position. Make sure that the latch knob is resting in the storage position. Do not pull on the frame. 3. Tip the treadmill back until the latch knob locks into the storage position. To reduce the risk of direct sunlight. Do not attempt to the floor. Hold the...
English Manual
Page 22
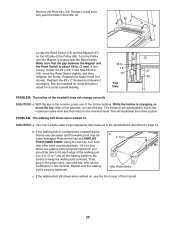
...Then, raise the Uprights. Note: A Phillips screw- PROBLEM: The power does not turn off the demo mode, hold down the Uprights (84, 85). IMPORTANT: The treadmill is turned on page 19 to be two #8 x 2" Screws (16) in . d. Remove the key from the console and UNPLUG a THE POWER CORD. Use only... back in . c. If the power cord is plugged into a surge suppressor, and that meets all of the Belly Pan (75). c. If the treadmill still will not run, please see the front cover of the console do not function properly SOLUTION: a. With the help of this manual. TROUBLESHOOTING Most...
...Then, raise the Uprights. Note: A Phillips screw- PROBLEM: The power does not turn off the demo mode, hold down the Uprights (84, 85). IMPORTANT: The treadmill is turned on page 19 to be two #8 x 2" Screws (16) in . d. Remove the key from the console and UNPLUG a THE POWER CORD. Use only... back in . c. If the power cord is plugged into a surge suppressor, and that meets all of the Belly Pan (75). c. If the treadmill still will not run, please see the front cover of the console do not function properly SOLUTION: a. With the help of this manual. TROUBLESHOOTING Most...
English Manual
Page 23
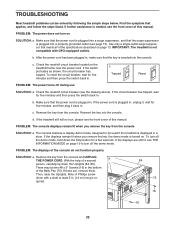
...Screws (1) and carefully pivot the Motor Hood (62) off the walking platform. the Reed Switch is properly tightened. Run the treadmill for a correct speed reading. The treadmill will recalibrate the incline system. b. Repeat until the Magnet is changing, remove the key. Top View PROBLEM: The incline ...the Pulley until the walking belt is about 1/8 in the power cord, insert the key, and run the treadmill for a few minutes to 3 in the console, press one of the treadmill does not change correctly SOLUTION: a. Reattach the #8 x 2" Screws (not shown) if necessary. Remove ...
...Screws (1) and carefully pivot the Motor Hood (62) off the walking platform. the Reed Switch is properly tightened. Run the treadmill for a correct speed reading. The treadmill will recalibrate the incline system. b. Repeat until the Magnet is changing, remove the key. Top View PROBLEM: The incline ...the Pulley until the walking belt is about 1/8 in the power cord, insert the key, and run the treadmill for a few minutes to 3 in the console, press one of the treadmill does not change correctly SOLUTION: a. Reattach the #8 x 2" Screws (not shown) if necessary. Remove ...

English Manual
Page 24
... walking belt 2 to turn the left idler roller bolt counterclockwise 1/2 of a turn ; Then, plug in the power cord, insert the key, and run the treadmill for a few minutes. If the walking belt slips when walked on SOLUTION: a. Repeat until the walking belt is not set at 0 (see THE INFORMATION MODE... on the treadmill for a few minutes. If the a walking belt has shifted to the left, use the hex key to 3 in - Repeat until the walking belt is...
... walking belt 2 to turn the left idler roller bolt counterclockwise 1/2 of a turn ; Then, plug in the power cord, insert the key, and run the treadmill for a few minutes. If the walking belt slips when walked on SOLUTION: a. Repeat until the walking belt is not set at 0 (see THE INFORMATION MODE... on the treadmill for a few minutes. If the a walking belt has shifted to the left, use the hex key to 3 in - Repeat until the walking belt is...


