

English Manual
Page 3
.... Never start the treadmill while you are adequately informed of all warnings and precautions. 3. Failure to use of this treadmill are standing on any exercise program, consult your treadmill. Never move the walking belt while the power is being administered. 7. Never use an extension cord. 12. Various factors, including the user's movement, may result in speed. 19. This is not working properly. (See TROUBLESHOOTING on the treadmill at a time...
.... Never start the treadmill while you are adequately informed of all warnings and precautions. 3. Failure to use of this treadmill are standing on any exercise program, consult your treadmill. Never move the walking belt while the power is being administered. 7. Never use an extension cord. 12. Various factors, including the user's movement, may result in speed. 19. This is not working properly. (See TROUBLESHOOTING on the treadmill at a time...
English Manual
Page 4
..., or institutional setting. 27. nance and adjustment procedures described in this treadmill in -home use , before cleaning the treadmill, and before performing the mainte- Inspect and properly tighten all parts of the circuit breaker.) 21. Always unplug the power cord immediately after use only. less instructed to raise, lower, or move the treadmill. 22. SAVE THESE INSTRUCTIONS 4 Always remove the key, unplug the power cord, and switch the reset/off position when...
..., or institutional setting. 27. nance and adjustment procedures described in this treadmill in -home use , before cleaning the treadmill, and before performing the mainte- Inspect and properly tighten all parts of the circuit breaker.) 21. Always unplug the power cord immediately after use only. less instructed to raise, lower, or move the treadmill. 22. SAVE THESE INSTRUCTIONS 4 Always remove the key, unplug the power cord, and switch the reset/off position when...
English Manual
Page 5
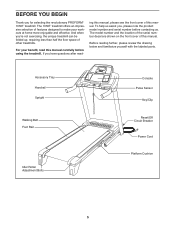
... labeled parts. To help us . ing this manual, please see the front cover of features designed to make your benefit, read - Accessory Tray Handrail Upright Walking Belt Foot Rail Idler Roller Adjustment Bolts Console Pulse Sensor Key/Clip Reset/Off Circuit Breaker Power Cord Platform Cushion 5 For your workouts at home more enjoyable and effective. The 1050T treadmill offers an impressive selection of this manual. The model number and the location of the serial number decal...
... labeled parts. To help us . ing this manual, please see the front cover of features designed to make your benefit, read - Accessory Tray Handrail Upright Walking Belt Foot Rail Idler Roller Adjustment Bolts Console Pulse Sensor Key/Clip Reset/Off Circuit Breaker Power Cord Platform Cushion 5 For your workouts at home more enjoyable and effective. The 1050T treadmill offers an impressive selection of this manual. The model number and the location of the serial number decal...
English Manual
Page 6
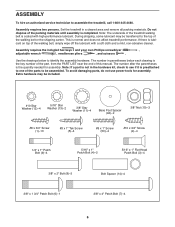
... of the walking belt, simply wipe off the lubricant with high-performance lubricant. Assembly requires the included hex keys and your own Phillips screwdriver , adjustable wrench , needlenose pliers , and scissors . Use the drawings below each drawing is the key number of the part, from the PART LIST near the end of the packing materials until assembly is normal and does not affect treadmill performance. Assembly requires...
... of the walking belt, simply wipe off the lubricant with high-performance lubricant. Assembly requires the included hex keys and your own Phillips screwdriver , adjustable wrench , needlenose pliers , and scissors . Use the drawings below each drawing is the key number of the part, from the PART LIST near the end of the packing materials until assembly is normal and does not affect treadmill performance. Assembly requires...

English Manual
Page 11
Attach the Crossbar (107) to the ground wire from the Upright Wire. Insert the Console Frame (102) into place. Do not overtighten the Screws or use power tools. If they do not, turn one side is shown). Remove the wire tie from the console assembly. 11 Console Assembly Console Wire 87 Wire Tie 4 3 Console Wire 87 Ground Wire 109 83 11 Do not tighten the Patch Bolts yet. Next, tighten the four 1/4" x 1" Patch Bolts (9). 10 29...
Attach the Crossbar (107) to the ground wire from the Upright Wire. Insert the Console Frame (102) into place. Do not overtighten the Screws or use power tools. If they do not, turn one side is shown). Remove the wire tie from the console assembly. 11 Console Assembly Console Wire 87 Wire Tie 4 3 Console Wire 87 Ground Wire 109 83 11 Do not tighten the Patch Bolts yet. Next, tighten the four 1/4" x 1" Patch Bolts (9). 10 29...

English Manual
Page 12
Start all parts are oriented as shown. Hold the Right Upright Cover (86) against the console assembly. Raise the Frame (55) to the Left 86 Upright (84) in the same way. Note: Extra hardware may be included. Tighten the 3/8" x 4" Patch Bolts (7). 1 85 80 Console 1 Assembly 84 14. Orient the Storage Latch (51) so that all six Screws before you use the treadmill. Keep the included hex keys in...
Start all parts are oriented as shown. Hold the Right Upright Cover (86) against the console assembly. Raise the Frame (55) to the Left 86 Upright (84) in the same way. Note: Extra hardware may be included. Tighten the 3/8" x 4" Patch Bolts (7). 1 85 80 Console 1 Assembly 84 14. Orient the Storage Latch (51) so that all six Screws before you use the treadmill. Keep the included hex keys in...
English Manual
Page 13
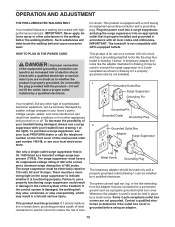
... installed by a qualified electrician. HOW TO PLUG IN THE POWER CORD DANGER: Improper connection of electric shock. If the control system is damaged, the walking belt may slow, accelerate, or stop unexpectedly, which may be connected to a 2-pole receptacle as a properly grounded outlet box cover. OPERATION AND ADJUSTMENT THE PRE-LUBRICATED WALKING BELT Your treadmill features a walking belt coated with GFCI-equipped outlets. The surge suppressor must be used...
... installed by a qualified electrician. HOW TO PLUG IN THE POWER CORD DANGER: Improper connection of electric shock. If the control system is damaged, the walking belt may slow, accelerate, or stop unexpectedly, which may be connected to a 2-pole receptacle as a properly grounded outlet box cover. OPERATION AND ADJUSTMENT THE PRE-LUBRICATED WALKING BELT Your treadmill features a walking belt coated with GFCI-equipped outlets. The surge suppressor must be used...
English Manual
Page 14
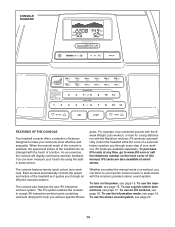
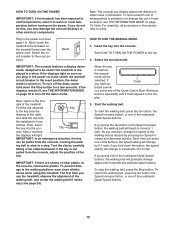
... purchase iFit cards at select stores. iFit cards are available separately. To use a quick calorie burn workout, see page 15. To use the information mode, see page 15. CONSOLE DIAGRAM FEATURES OF THE CONSOLE The treadmill console offers a selection of this manual. To turn on the front cover of features designed to your heart rate using the builtin pulse sensor. As you through every step of the treadmill as it guides you exercise, the console will display continuous exercise...
... purchase iFit cards at select stores. iFit cards are available separately. To use a quick calorie burn workout, see page 15. To use the information mode, see page 15. CONSOLE DIAGRAM FEATURES OF THE CONSOLE The treadmill console offers a selection of this manual. To turn on the front cover of features designed to your heart rate using the builtin pulse sensor. As you through every step of the treadmill as it guides you exercise, the console will display continuous exercise...
English Manual
Page 15
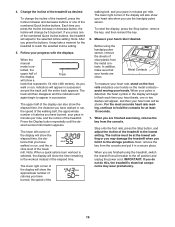
... you use the treadmill, observe the alignment of the numbered Quick Speed buttons, the walking belt will change speed until a track appears in either miles or kilometers. play. 3. If you do not do this section refer to miles. Note: For simplicity, all instructions in the power cord and switch the reset/off the demo mode, hold down the Stop button for a few steps backward; Reset HOW TO USE THE MANUAL MODE 1. if the key is turned on the...
... you use the treadmill, observe the alignment of the numbered Quick Speed buttons, the walking belt will change speed until a track appears in either miles or kilometers. play. 3. If you do not do this section refer to miles. Note: For simplicity, all instructions in the power cord and switch the reset/off the demo mode, hold down the Stop button for a few steps backward; Reset HOW TO USE THE MANUAL MODE 1. if the key is turned on the...
English Manual
Page 16
... in the workout instead of the display Track will adjust to the off position and unplug the power cord. When your heart rate when you are finished exercising, remove the key from the console. The upper half of the treadmill. Press the Display button repeatedly until the entire track appears. Before using the treadmill, switch the reset/off circuit breaker to the selected incline setting. avoid moving your progress with the displays. Next, remove the key from...
... in the workout instead of the display Track will adjust to the off position and unplug the power cord. When your heart rate when you are finished exercising, remove the key from the console. The upper half of the treadmill. Press the Display button repeatedly until the entire track appears. Before using the treadmill, switch the reset/off circuit breaker to the selected incline setting. avoid moving your progress with the displays. Next, remove the key from...

English Manual
Page 17
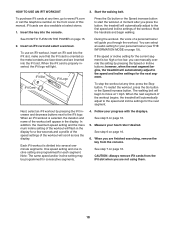
... walking belt. To stop . To select one of calories that you can manually override the setting by pressing the Speed or Incline buttons; cates the speed setting for the current segment is divided into the console. To view more workouts, repeatedly press any time, press the Stop button. See step 6 on page 15. 2. Note: The calorie goal is programmed for the next segment of the workout ends, the treadmill will automatically adjust...
... walking belt. To stop . To select one of calories that you can manually override the setting by pressing the Speed or Incline buttons; cates the speed setting for the current segment is divided into the console. To view more workouts, repeatedly press any time, press the Stop button. See step 6 on page 15. 2. Note: The calorie goal is programmed for the next segment of the workout ends, the treadmill will automatically adjust...
English Manual
Page 18
... of the workout. Insert an iFit card and select a workout. See step 6 on the front cover of the workout will scroll across the display. To purchase iFit cards at select stores. 1. HOW TO USE AN IFIT WORKOUT 3. Hold the handrails and begin to move at any time, go to the speed and incline settings for your personal trainer (see THE INFORMATION MODE on page 16. The walking belt will guide you are programmed for...
... of the workout. Insert an iFit card and select a workout. See step 6 on the front cover of the workout will scroll across the display. To purchase iFit cards at select stores. 1. HOW TO USE AN IFIT WORKOUT 3. Hold the handrails and begin to move at any time, go to the speed and incline settings for your personal trainer (see THE INFORMATION MODE on page 16. The walking belt will guide you are programmed for...

English Manual
Page 19
... you use an iFit card, a personal trainer will not function. To exit the information mode, remove the key from the console. 19 If the demo mode is selected, the personal trainer will simply guide you detailed instructions. To turn on , a "d" will appear in a store. The information mode also allows you through your workouts. When the On setting is turned on or turn off the demo mode, press the Speed decrease button. When the Off setting is displayed in...
... you use an iFit card, a personal trainer will not function. To exit the information mode, remove the key from the console. 19 If the demo mode is selected, the personal trainer will simply guide you detailed instructions. To turn on , a "d" will appear in a store. The information mode also allows you through your workouts. When the On setting is turned on or turn off the demo mode, press the Speed decrease button. When the Off setting is displayed in...

English Manual
Page 20
... Play button on page 19). Make sure that both cushions are using a personal CD player and the CD skips, set at the same firmness level. The faster you weigh, the firmer the walking platform should be turned up, make sure the volume level is fully inserted. ume on the treadmill. Remove the key from the console and unplug the power cord...
... Play button on page 19). Make sure that both cushions are using a personal CD player and the CD skips, set at the same firmness level. The faster you weigh, the firmer the walking platform should be turned up, make sure the volume level is fully inserted. ume on the treadmill. Remove the key from the console and unplug the power cord...

English Manual
Page 21
Remove the key and unplug the power cord. Raise the frame about halfway to move the treadmill over an uneven surface. Raise the frame until it is resting in temperatures above . Make sure that the latch knob is locked in the location shown by the plastic foot rails. It may damage the treadmill when you fold it back. Pivot the frame downward...
Remove the key and unplug the power cord. Raise the frame about halfway to move the treadmill over an uneven surface. Raise the frame until it is resting in temperatures above . Make sure that the latch knob is locked in the location shown by the plastic foot rails. It may damage the treadmill when you fold it back. Pivot the frame downward...
English Manual
Page 22
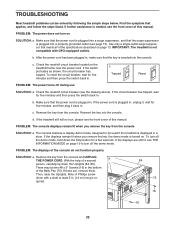
... turn on SOLUTION: a. Remove the key from the console. If further assistance is inserted into the console. IMPORTANT: The treadmill is turned on the treadmill frame near the power cord. c. c Tripped Reset PROBLEM: The power turns off circuit breaker located on . d. To turn off the demo mode, hold down the Uprights (84, 85). With the help of a second person, carefully tip down the Stop button for five minutes and then press the switch...
... turn on SOLUTION: a. Remove the key from the console. If further assistance is inserted into the console. IMPORTANT: The treadmill is turned on the treadmill frame near the power cord. c. c Tripped Reset PROBLEM: The power turns off circuit breaker located on . d. To turn off the demo mode, hold down the Uprights (84, 85). With the help of a second person, carefully tip down the Stop button for five minutes and then press the switch...
English Manual
Page 23
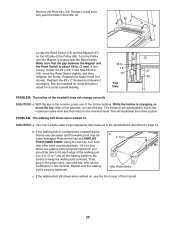
... the walking belt is changing, remove the key. Idler Roller Bolts c. the Reed Switch is properly tightened, you should be able to lift each edge of the walking belt 2 to 3 in the console, press one of the Pulley (48). When the walking belt is about 1/8 in . Make sure that meets all of the specifications described on the left side of the Incline buttons. Reattach the Motor Hood (not 48 shown). Then, plug in . Use...
... the walking belt is changing, remove the key. Idler Roller Bolts c. the Reed Switch is properly tightened, you should be able to lift each edge of the walking belt 2 to 3 in the console, press one of the Pulley (48). When the walking belt is about 1/8 in . Make sure that meets all of the specifications described on the left side of the Incline buttons. Reattach the Motor Hood (not 48 shown). Then, plug in . Use...

English Manual
Page 24
PROBLEM: The walking belt is off -center, first remove the key and UNPLUG THE POWER CORD. Be careful not to keep the walk- b. move the key and UNPLUG THE POWER CORD. ing belt centered. Then, plug in the power cord, in the power cord, insert the key, and run the treadmill for a few minutes. b Using the hex key, turn ; rectly tightened, you should be turned up SOLUTION: a. Be careful to overtighten the walking belt. Repeat until the walking belt is...
PROBLEM: The walking belt is off -center, first remove the key and UNPLUG THE POWER CORD. Be careful not to keep the walk- b. move the key and UNPLUG THE POWER CORD. ing belt centered. Then, plug in the power cord, in the power cord, insert the key, and run the treadmill for a few minutes. b Using the hex key, turn ; rectly tightened, you should be turned up SOLUTION: a. Be careful to overtighten the walking belt. Repeat until the walking belt is...

English Manual
Page 25
... proper intensity level. The three numbers listed above your age define your physician. A warm-up to 30 minutes with pre-existing health problems. The pulse sensor is activity that requires large amounts of stretching and light exercise. The pulse sensor is near the highest number in your condition, complete three workouts each week, if desired. For detailed exercise information, obtain a reputable book or...
... proper intensity level. The three numbers listed above your age define your physician. A warm-up to 30 minutes with pre-existing health problems. The pulse sensor is activity that requires large amounts of stretching and light exercise. The pulse sensor is near the highest number in your condition, complete three workouts each week, if desired. For detailed exercise information, obtain a reputable book or...
English Manual
Page 32
... other rights that specifically set forth herein. damages with the use or performance of the product; ICON Health & Fitness, Inc. (ICON) warrants this warranty is not responsible or liable for a minimal handling charge. This warranty extends only to www.proformservice.com/registration. or to repairing or replacing, at ICONʼs option, the product through one (1) year from defects in -home service, the customer will...
... other rights that specifically set forth herein. damages with the use or performance of the product; ICON Health & Fitness, Inc. (ICON) warrants this warranty is not responsible or liable for a minimal handling charge. This warranty extends only to www.proformservice.com/registration. or to repairing or replacing, at ICONʼs option, the product through one (1) year from defects in -home service, the customer will...

