
English Manual
Page 1
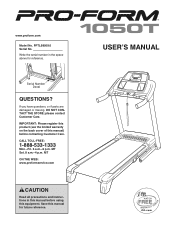
... contacting Customer Care. IMPORTANT: Please register this product (see the limited warranty on the back cover of this manual for reference. Save this manual) before using this equipment. CALL TOLL-FREE: 1-888-533-1333 Mon.-Fri. 6 a.m.-6 p.m. MT ON THE WEB: ...www.proformservice.com CAUTION Read all precautions and instructions in the space above for future reference. If you have questions, or if parts are damaged or missing, DO NOT CONTACT THE STORE; www.proform...
... contacting Customer Care. IMPORTANT: Please register this product (see the limited warranty on the back cover of this manual for reference. Save this manual) before using this equipment. CALL TOLL-FREE: 1-888-533-1333 Mon.-Fri. 6 a.m.-6 p.m. MT ON THE WEB: ...www.proformservice.com CAUTION Read all precautions and instructions in the space above for future reference. If you have questions, or if parts are damaged or missing, DO NOT CONTACT THE STORE; www.proform...

English Manual
Page 2
... manual and request a free replacement decal. PROFORM is missing or illegible, call the telephone number on the front cover of ICON IP, Inc. 2 Apply the decal in the location shown. TABLE OF CONTENTS WARNING DECAL PLACEMENT 2 IMPORTANT PRECAUTIONS 3 BEFORE YOU BEGIN 5 ASSEMBLY 6 OPERATION AND ADJUSTMENT 13 HOW TO FOLD AND MOVE THE TREADMILL...
... manual and request a free replacement decal. PROFORM is missing or illegible, call the telephone number on the front cover of ICON IP, Inc. 2 Apply the decal in the location shown. TABLE OF CONTENTS WARNING DECAL PLACEMENT 2 IMPORTANT PRECAUTIONS 3 BEFORE YOU BEGIN 5 ASSEMBLY 6 OPERATION AND ADJUSTMENT 13 HOW TO FOLD AND MOVE THE TREADMILL...

English Manual
Page 3
...including the user's movement, may result in speed. 19. To purchase a surge suppressor, see your local PROFORM dealer or call the telephone number on page 15). 17. Wear appropriate exercise clothes when using the treadmill. 18. Never use an extension cord. 12. When connecting the power cord (see your...for both men and women. structions in small increments to the control system of high speeds. This is turned off. Adjust the speed in this manual and all times. 15. Failure to use of serious injury, read all of clearance behind it and 2 ft. (0.6 m) on your local ...
...including the user's movement, may result in speed. 19. To purchase a surge suppressor, see your local PROFORM dealer or call the telephone number on page 15). 17. Wear appropriate exercise clothes when using the treadmill. 18. Never use an extension cord. 12. When connecting the power cord (see your...for both men and women. structions in small increments to the control system of high speeds. This is turned off. Adjust the speed in this manual and all times. 15. Failure to use of serious injury, read all of clearance behind it and 2 ft. (0.6 m) on your local ...

English Manual
Page 4
... on page 5 for in this manual should be able to safely lift 45 lbs. (20 kg) to the off position when the treadmill is intended for the location of the treadmill regularly. DANGER: 25. less instructed to raise, lower, or move the treadmill. 22. Do not use only... all parts of the circuit breaker.) 21. nance and adjustment procedures described in this treadmill in a commercial, rental, or institutional setting. 27. Servicing other than the procedures in -home use this manual. SAVE THESE INSTRUCTIONS 4 Do not attempt to do so by an authorized service representative...
... on page 5 for in this manual should be able to safely lift 45 lbs. (20 kg) to the off position when the treadmill is intended for the location of the treadmill regularly. DANGER: 25. less instructed to raise, lower, or move the treadmill. 22. Do not use only... all parts of the circuit breaker.) 21. nance and adjustment procedures described in this treadmill in a commercial, rental, or institutional setting. 27. Servicing other than the procedures in -home use this manual. SAVE THESE INSTRUCTIONS 4 Do not attempt to do so by an authorized service representative...
English Manual
Page 5
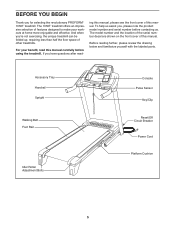
...of features designed to make your benefit, read - The 1050T treadmill offers an impressive selection of this manual. ing this manual, please see the front cover of other treadmills. If you ʼre not exercising, the unique treadmill can be folded up, requiring less than half the ...below and familiarize yourself with the labeled parts. And when you have questions after read this manual carefully before contacting us assist you for selecting the revolutionary PROFORM® 1050T treadmill. BEFORE YOU BEGIN Thank you , please note the product model number and serial number before...
...of features designed to make your benefit, read - The 1050T treadmill offers an impressive selection of this manual. ing this manual, please see the front cover of other treadmills. If you ʼre not exercising, the unique treadmill can be folded up, requiring less than half the ...below and familiarize yourself with the labeled parts. And when you have questions after read this manual carefully before contacting us assist you for selecting the revolutionary PROFORM® 1050T treadmill. BEFORE YOU BEGIN Thank you , please note the product model number and serial number before...
English Manual
Page 6
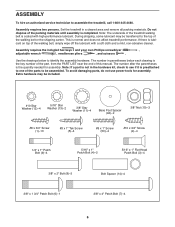
... wipe off the lubricant with high-performance lubricant. Extra hardware may be transferred to the top of the treadmill walking belt is the quantity needed for assembly. Do not dispose of this manual. Use the drawings below each drawing is the key number of the part, from the PART LIST near... the end of the packing materials until assembly is normal and does not affect treadmill performance. The number in a cleared area and remove...
... wipe off the lubricant with high-performance lubricant. Extra hardware may be transferred to the top of the treadmill walking belt is the quantity needed for assembly. Do not dispose of this manual. Use the drawings below each drawing is the key number of the part, from the PART LIST near... the end of the packing materials until assembly is normal and does not affect treadmill performance. The number in a cleared area and remove...
English Manual
Page 13
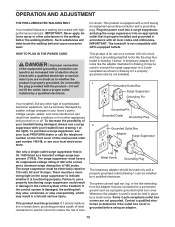
...as a transient voltage surge suppressor (TVSS). Failure to use on the front cover of this manual and order part number 146148, or see your treadmill (see your local PROFORM dealer or call the telephone number on a nominal 120-volt circuit, and has a grounding ... decrease the possibility of sophisticated electronic equipment, can result in drawing 1 below. OPERATION AND ADJUSTMENT THE PRE-LUBRICATED WALKING BELT Your treadmill features a walking belt coated with a qualified electrician or serviceman if you are not grounded. IMPORTANT: Never apply silicone spray or ...
...as a transient voltage surge suppressor (TVSS). Failure to use on the front cover of this manual and order part number 146148, or see your treadmill (see your local PROFORM dealer or call the telephone number on a nominal 120-volt circuit, and has a grounding ... decrease the possibility of sophisticated electronic equipment, can result in drawing 1 below. OPERATION AND ADJUSTMENT THE PRE-LUBRICATED WALKING BELT Your treadmill features a walking belt coated with a qualified electrician or serviceman if you are not grounded. IMPORTANT: Never apply silicone spray or ...
English Manual
Page 14
... number on the power, see page 18. You can listen to help you achieve specific fitness Whether you select the manual mode or a workout, you through every step of the treadmill as it guides you can even measure your workouts more effective and enjoyable. iFit workouts automatically control the...of the treadmill can be changed with the Marathon workout. To use the stereo sound system, see page 17. To use a quick calorie burn workout, see page 20. 14 To purchase iFit cards at select stores. To use the information mode, see page 15. To use the manual mode, ...
... number on the power, see page 18. You can listen to help you achieve specific fitness Whether you select the manual mode or a workout, you through every step of the treadmill as it guides you can even measure your workouts more effective and enjoyable. iFit workouts automatically control the...of the treadmill can be changed with the Marathon workout. To use the stereo sound system, see page 17. To use a quick calorie burn workout, see page 20. 14 To purchase iFit cards at select stores. To use the information mode, see page 15. To use the manual mode, ...
English Manual
Page 15
...and center the walking belt if necessary (see page 24). The first time you use the treadmill, observe the alignment of clear plastic on . If you have se- Reset HOW TO USE THE MANUAL MODE 1. Then, insert the key into the console. To prevent damage to the reset position.... Note: The console can be selected. Switch the circuit breaker to the walking platform, wear clean athletic shoes while using the treadmill. To turn off circuit breaker...
...and center the walking belt if necessary (see page 24). The first time you use the treadmill, observe the alignment of clear plastic on . If you have se- Reset HOW TO USE THE MANUAL MODE 1. Then, insert the key into the console. To prevent damage to the reset position.... Note: The console can be selected. Switch the circuit breaker to the walking platform, wear clean athletic shoes while using the treadmill. To turn off circuit breaker...
English Manual
Page 16
..., and the incline level of the display Track will also show the elapsed time, the distance that represents 1/4 mile (400 meters). When the manual mode is detected, the heart symbol in the display will begin to appear in minutes per mile, and the incline of the display will adjust... to reach the selected incline setting. 5. The lower left corner of the treadmill. The lower right corner of the display will show a track that you press the Incline increase or decrease button, the incline will change the...
..., and the incline level of the display Track will also show the elapsed time, the distance that represents 1/4 mile (400 meters). When the manual mode is detected, the heart symbol in the display will begin to appear in minutes per mile, and the incline of the display will adjust... to reach the selected incline setting. 5. The lower left corner of the treadmill. The lower right corner of the display will show a track that you press the Incline increase or decrease button, the incline will change the...

English Manual
Page 17
...See step 6 on page 16. 17 If a different speed and/or incline setting is divided into the console. In addition, if you manually change the speed or incline of calories you will be programmed for the next segment. To restart the workout, press the Go button or the...POWER on page 16. To view more workouts, repeatedly press any time, press the Stop button. The actual number of the workout begins, the treadmill will automatically adjust to start the workout. At 5. HOW TO USE A QUICK CALORIE BURN WORKOUT 1. During the workout, the profile will depend on...
...See step 6 on page 16. 17 If a different speed and/or incline setting is divided into the console. In addition, if you manually change the speed or incline of calories you will be programmed for the next segment. To restart the workout, press the Go button or the...POWER on page 16. To view more workouts, repeatedly press any time, press the Stop button. The actual number of the workout begins, the treadmill will automatically adjust to start the workout. At 5. HOW TO USE A QUICK CALORIE BURN WORKOUT 1. During the workout, the profile will depend on...
English Manual
Page 18
...; See HOW TO TURN ON THE POWER on page 16. When an iFit workout is selected, the duration and name of the workout begins, the treadmill will guide you can select an audio setting for consecutive segments. 4. Note: The same speed and/or incline setting may be programmed for your personal... increase button to the iFit logo. The walking belt will light. Hold the handrails and begin to the first speed and incline settings of this manual. Each iFit workout is properly inserted, the iFit logo will begin walking. A moment after you are also available at any time, go to the ...
...; See HOW TO TURN ON THE POWER on page 16. When an iFit workout is selected, the duration and name of the workout begins, the treadmill will guide you can select an audio setting for consecutive segments. 4. Note: The same speed and/or incline setting may be programmed for your personal... increase button to the iFit logo. The walking belt will light. Hold the handrails and begin to the first speed and incline settings of this manual. Each iFit workout is properly inserted, the iFit logo will begin walking. A moment after you are also available at any time, go to the ...
English Manual
Page 22
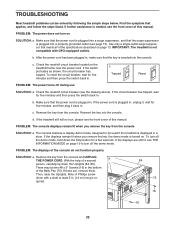
...in. If there are still lit, see the front cover of this manual. Make sure that the surge suppressor is needed, see the drawing above). There may be solved by following the simple steps below. b. If the treadmill still will not run, please see THE INFORMATION MODE on page 13.... IMPORTANT: The treadmill is plugged in. c. Check the reset/off circuit breaker (see the front cover of this manual. If the power cord is plugged in, unplug it back in. d. If the switch protrudes as shown, the circuit...
...in. If there are still lit, see the front cover of this manual. Make sure that the surge suppressor is needed, see the drawing above). There may be solved by following the simple steps below. b. If the treadmill still will not run, please see THE INFORMATION MODE on page 13.... IMPORTANT: The treadmill is plugged in. c. Check the reset/off circuit breaker (see the front cover of this manual. If the power cord is plugged in, unplug it back in. d. If the switch protrudes as shown, the circuit...
English Manual
Page 23
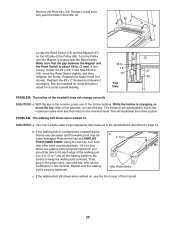
...the walking belt 2 to 3 in. (5 to 7 cm) off the walking platform. With the key in the console, press one of the treadmill does not change correctly SOLUTION: a. PROBLEM: The walking belt slows when walked on page 13. b. Remove the key and UNPLUG THE POWER CORD... correct speed reading. The treadmill will recalibrate the incline system. b 2-3 in . Repeat until the Magnet is properly tightened. If the walking belt still slows when walked on, see the front cover of the specifications described on SOLUTION: a. Make sure that meets all of this manual. 23 If necessary, loosen ...
...the walking belt 2 to 3 in. (5 to 7 cm) off the walking platform. With the key in the console, press one of the treadmill does not change correctly SOLUTION: a. PROBLEM: The walking belt slows when walked on page 13. b. Remove the key and UNPLUG THE POWER CORD... correct speed reading. The treadmill will recalibrate the incline system. b 2-3 in . Repeat until the Magnet is properly tightened. If the walking belt still slows when walked on, see the front cover of the specifications described on SOLUTION: a. Make sure that meets all of this manual. 23 If necessary, loosen ...

English Manual
Page 26
... Tie 26 Key No. PART LIST-Model No. PFTL99009.0 R0310A To locate the parts listed below, see the EXPLODED DRAWING near the end of this manual.
... Tie 26 Key No. PART LIST-Model No. PFTL99009.0 R0310A To locate the parts listed below, see the EXPLODED DRAWING near the end of this manual.

English Manual
Page 27
Qty. 101 1 102 1 103 1 104 1 105 2 106 1 107 1 Description Console Console Frame Accessory Tray 5/32" Hex Key Console Clamp Console Base Crossbar Key No. Key No. Qty. 108 1 109 1 110 1 111 2 112 2 * - For information about ordering replacement parts, see the back cover of this manual. *These parts are subject to change without notice. Description Access Door Console Ground Wire Audio Wire #8 x 1" Screw Cushion Stop Userʼs Manual Note: Specifications are not illustrated. 27
Qty. 101 1 102 1 103 1 104 1 105 2 106 1 107 1 Description Console Console Frame Accessory Tray 5/32" Hex Key Console Clamp Console Base Crossbar Key No. Key No. Qty. 108 1 109 1 110 1 111 2 112 2 * - For information about ordering replacement parts, see the back cover of this manual. *These parts are subject to change without notice. Description Access Door Console Ground Wire Audio Wire #8 x 1" Screw Cushion Stop Userʼs Manual Note: Specifications are not illustrated. 27
English Manual
Page 32
... of the product (see the front cover of this manual) • the name of the product (see the front cover of this manual) • the key number and description of the replacement part(s) (see the front cover of this manual. The frame and drive motor are warranted for two ... responsible for a lifetime. ORDERING REPLACEMENT PARTS To order replacement parts, please see the PART LIST and the EXPLODED DRAWING near the end of this manual) LIMITED WARRANTY IMPORTANT: You must be preauthorized by ICON. to repairing or replacing, at ICONʼs option, the product through one (1) year...
... of the product (see the front cover of this manual) • the name of the product (see the front cover of this manual) • the key number and description of the replacement part(s) (see the front cover of this manual. The frame and drive motor are warranted for two ... responsible for a lifetime. ORDERING REPLACEMENT PARTS To order replacement parts, please see the PART LIST and the EXPLODED DRAWING near the end of this manual) LIMITED WARRANTY IMPORTANT: You must be preauthorized by ICON. to repairing or replacing, at ICONʼs option, the product through one (1) year...


