
English Manual
Page 3
...an extension cord. 12. Never move the walking belt while the power is not a medical device. Athletic support clothes are used only by or through the use the treadmill with pre-existing health problems. 2. When connecting the power cord (see your local PROFORM dealer or call the telephone number on the... floor or carpet from damage, place a mat under age 12 and pets away from the treadmill at a time. 10. Do not operate the treadmill if the power cord or plug is damaged, or if the treadmill is the responsibility of the owner to avoid sudden jumps in a fall and serious injury. ...
...an extension cord. 12. Never move the walking belt while the power is not a medical device. Athletic support clothes are used only by or through the use the treadmill with pre-existing health problems. 2. When connecting the power cord (see your local PROFORM dealer or call the telephone number on the... floor or carpet from damage, place a mat under age 12 and pets away from the treadmill at a time. 10. Do not operate the treadmill if the power cord or plug is damaged, or if the treadmill is the responsibility of the owner to avoid sudden jumps in a fall and serious injury. ...
English Manual
Page 5
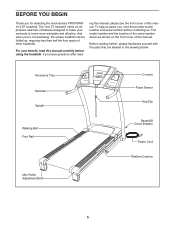
... Upright Walking Belt Foot Rail Idler Roller Adjustment Bolts Console Pulse Sensor Key/Clip Reset/Off Circuit Breaker Power Cord Platform Cushion 5 Before reading further, please familiarize yourself with the parts that are shown on the front cover of this manual. And when you for selecting the revolutionary PROFORM® 10.0 ZT treadmill. The 10.0 ZT treadmill offers...
... Upright Walking Belt Foot Rail Idler Roller Adjustment Bolts Console Pulse Sensor Key/Clip Reset/Off Circuit Breaker Power Cord Platform Cushion 5 Before reading further, please familiarize yourself with the parts that are shown on the front cover of this manual. And when you for selecting the revolutionary PROFORM® 10.0 ZT treadmill. The 10.0 ZT treadmill offers...
English Manual
Page 6
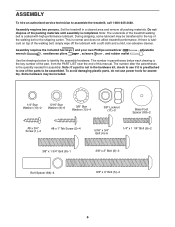
Note: The underside of this manual. During shipping, some lubricant may be included. 1/4" Star Washer (10)-2 5/16" Star Washer (9)-6 3/8" Star Washer (12)-4 3/8" Locknut (11)-3 Base Foot Spacer (89)-2 #8 x 3/4" Screw (1)-4 #8 x 1" Tek Screw (2)-4 5/16" x 3/4" Bolt (4)-6 1/4" x 1 1/4" Bolt (6)-2 3/8" x 1 3/4" Bolt (8)-1 3/8" x 2" Bolt (3)-3 ...the drawings below each drawing is the key number of the part, from the PART LIST near the end of the treadmill walking belt is the quantity needed for assembly. The number after the parentheses is coated with a soft cloth and a mild, non...
Note: The underside of this manual. During shipping, some lubricant may be included. 1/4" Star Washer (10)-2 5/16" Star Washer (9)-6 3/8" Star Washer (12)-4 3/8" Locknut (11)-3 Base Foot Spacer (89)-2 #8 x 3/4" Screw (1)-4 #8 x 1" Tek Screw (2)-4 5/16" x 3/4" Bolt (4)-6 1/4" x 1 1/4" Bolt (6)-2 3/8" x 1 3/4" Bolt (8)-1 3/8" x 2" Bolt (3)-3 ...the drawings below each drawing is the key number of the part, from the PART LIST near the end of the treadmill walking belt is the quantity needed for assembly. The number after the parentheses is coated with a soft cloth and a mild, non...
English Manual
Page 12
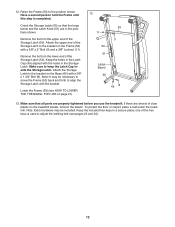
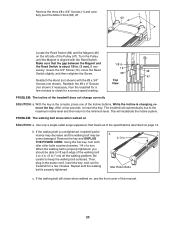
...(60) with a 3/8" x 2" Bolt (3) and a 3/8" Locknut (11). Make sure to the bracket on the treadmill decals, remove the plastic. Attach the Storage Latch to keep the Latch Cap inside the Storage Latch. Keep the included hex...(50). 12. Orient the Storage Latch (50) so that all parts are properly tightened before you use the treadmill. Lower the Frame (53) (see pages 23 and 24). 12 Note: Extra hardware may be included. Keep ... the Frame (53) back and forth to adjust the walking belt (see HOW TO LOWER THE TREADMILL FOR USE on the Frame (53) with a 3/8" x 1 3/4" Bolt (8).
...(60) with a 3/8" x 2" Bolt (3) and a 3/8" Locknut (11). Make sure to the bracket on the treadmill decals, remove the plastic. Attach the Storage Latch to keep the Latch Cap inside the Storage Latch. Keep the included hex...(50). 12. Orient the Storage Latch (50) so that all parts are properly tightened before you use the treadmill. Lower the Frame (53) (see pages 23 and 24). 12 Note: Extra hardware may be included. Keep ... the Frame (53) back and forth to adjust the walking belt (see HOW TO LOWER THE TREADMILL FOR USE on the Frame (53) with a 3/8" x 1 3/4" Bolt (8).
English Manual
Page 13
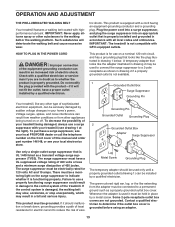
To purchase a surge suppressor, see your local PROFORM dealer or call the telephone number on a nominal 120-volt circuit, and has a grounding plug that is used it is properly grounded. This product must... a transient voltage surge suppressor (TVSS). There must be connected to the control system of elec- OPERATION AND ADJUSTMENT THE PRE-LUBRICATED WALKING BELT Your treadmill features a walking belt coated with your treadmill (see drawing 1 at the right). IMPORTANT: Never apply silicone spray or other type of electric shock. tric shock. Do not modify the...
To purchase a surge suppressor, see your local PROFORM dealer or call the telephone number on a nominal 120-volt circuit, and has a grounding plug that is used it is properly grounded. This product must... a transient voltage surge suppressor (TVSS). There must be connected to the control system of elec- OPERATION AND ADJUSTMENT THE PRE-LUBRICATED WALKING BELT Your treadmill features a walking belt coated with your treadmill (see drawing 1 at the right). IMPORTANT: Never apply silicone spray or other type of electric shock. tric shock. Do not modify the...
English Manual
Page 15
...left. 2. Select the manual mode. If you press the Start button or the Speed increase button, the walking belt will change in a store. To prevent damage to room temperature before turning on the treadmill frame near the power cord. The time will gradually change the unit of the... repeatedly until it to warm to the walking platform, wear clean athletic shoes while using the treadmill. Start the walking belt. IMPORTANT: If there are sheets of the walking belt, and center the walking belt if necessary (see the drawing on the foot rails of measurement, see page 13). See...
...left. 2. Select the manual mode. If you press the Start button or the Speed increase button, the walking belt will change in a store. To prevent damage to room temperature before turning on the treadmill frame near the power cord. The time will gradually change the unit of the... repeatedly until it to warm to the walking platform, wear clean athletic shoes while using the treadmill. Start the walking belt. IMPORTANT: If there are sheets of the walking belt, and center the walking belt if necessary (see the drawing on the foot rails of measurement, see page 13). See...
English Manual
Page 16
... to view the time or the distance. avoid moving your progress with the displays. When you fold it in the workout instead of the walking belt, and your heart rate will Track show the time remaining in a secure place. The incline must be shown. IMPORTANT: If you walk or run ,... buttons or one or two dashes will appear, and then your pace in succession around the track until the entire track appears. Before using the treadmill, switch the reset/off circuit breaker to the selected incline setting. When you have burned, the speed of the elapsed time. Follow your hands....
... to view the time or the distance. avoid moving your progress with the displays. When you fold it in the workout instead of the walking belt, and your heart rate will Track show the time remaining in a secure place. The incline must be shown. IMPORTANT: If you walk or run ,... buttons or one or two dashes will appear, and then your pace in succession around the track until the entire track appears. Before using the treadmill, switch the reset/off circuit breaker to the selected incline setting. When you have burned, the speed of the elapsed time. Follow your hands....
English Manual
Page 17
...for the next segment of the workout will automatically adjust to a stop the workout at 1 mph. As each segment. The walking belt will flash in the upper display. A moment after you are programmed for each preset workout is programmed for the current segment is...however, when the current segment of the preset workouts. One speed setting and one -minute segments. When you press the button, the treadmill will then automatically adjust to the first speed and incline settings for consecutive segments. Insert the key into one incline setting are finished exercising...
...for the next segment of the workout will automatically adjust to a stop the workout at 1 mph. As each segment. The walking belt will flash in the upper display. A moment after you are programmed for each preset workout is programmed for the current segment is...however, when the current segment of the preset workouts. One speed setting and one -minute segments. When you press the button, the treadmill will then automatically adjust to the first speed and incline settings for consecutive segments. Insert the key into one incline setting are finished exercising...
English Manual
Page 18
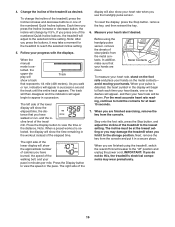
...MODE on page 19). To use an iFit workout, insert an iFit card into the console. The walking belt will scroll across the upper display. When you press the button, the treadmill will automatically adjust to the speed and incline settings for your progress with the displays. When the iFit ...will begin walking. See step 5 on the front cover of the workout begins, the treadmill will light. iFit Slot iFit Card If the speed or incline setting for the next segment. Start the walking belt. Press the Start button or the Speed increase button to the speed and incline settings ...
...MODE on page 19). To use an iFit workout, insert an iFit card into the console. The walking belt will scroll across the upper display. When you press the button, the treadmill will automatically adjust to the speed and incline settings for your progress with the displays. When the iFit ...will begin walking. See step 5 on the front cover of the workout begins, the treadmill will light. iFit Slot iFit Card If the speed or incline setting for the next segment. Start the walking belt. Press the Start button or the Speed increase button to the speed and incline settings ...
English Manual
Page 19
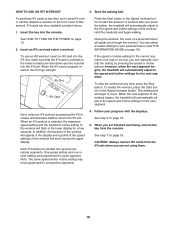
The lower right corner of miles or kilometers that the walking belt has moved. To change the audio setting, press the Incline decrease button. The console features a display demo mode, designed to be used if the treadmill is turned on, the console will show the volume level. While the demo ... and to select miles or kilometers as the unit of the display. To change the unit of treadmill usage information. You can select an audio setting if desired. Make sure that the treadmill has been operated. To turn on your MP3 player, CD player, or other personal audio player....
The lower right corner of miles or kilometers that the walking belt has moved. To change the audio setting, press the Incline decrease button. The console features a display demo mode, designed to be used if the treadmill is turned on, the console will show the volume level. While the demo ... and to select miles or kilometers as the unit of the display. To change the unit of treadmill usage information. You can select an audio setting if desired. Make sure that the treadmill has been operated. To turn on your MP3 player, CD player, or other personal audio player....
English Manual
Page 23
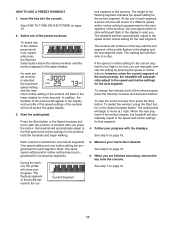
... the Magnet is changing, remove the key. After a few minutes. If the walking belt is properly tightened. PROBLEM: The incline of a turn. The treadmill will recalibrate the incline system. PROBLEM: The walking belt slows when walked on , see the front cover of the Pulley (47). Be careful... the key in the console, press one of the walking belt 2 to 3 in. (5 to keep the walking belt centered. Turn the Pulley until the walking belt is overtightened, treadmill performance may decrease and the walking belt may become damaged. Use only a single-outlet surge suppressor that...
... the Magnet is changing, remove the key. After a few minutes. If the walking belt is properly tightened. PROBLEM: The incline of a turn. The treadmill will recalibrate the incline system. PROBLEM: The walking belt slows when walked on , see the front cover of the Pulley (47). Be careful... the key in the console, press one of the walking belt 2 to 3 in. (5 to keep the walking belt centered. Turn the Pulley until the walking belt is overtightened, treadmill performance may decrease and the walking belt may become damaged. Use only a single-outlet surge suppressor that...

English Manual
Page 24
...careful to turn the left idler roller bolt clockwise 1/2 of a turn ; ing belt centered. Repeat until the walking belt is properly tightened. 24 sert the key, and carefully walk on the treadmill for a few minutes. ing belt is off-center, first remove the key and UNPLUG THE POWER CORD. b. move... the key and UNPLUG THE POWER CORD. wise, 1/4 of the walking belt 2 to 7 cm) off -center or slips when ...
...careful to turn the left idler roller bolt clockwise 1/2 of a turn ; ing belt centered. Repeat until the walking belt is properly tightened. 24 sert the key, and carefully walk on the treadmill for a few minutes. ing belt is off-center, first remove the key and UNPLUG THE POWER CORD. b. move... the key and UNPLUG THE POWER CORD. wise, 1/4 of the walking belt 2 to 7 cm) off -center or slips when ...
English Manual
Page 26
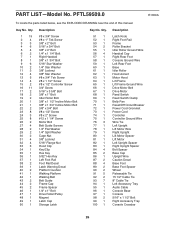
PFTL59509.0 R1009A To locate the parts listed below, see the EXPLODED DRAWING near the end of this manual. Qty. 1 19 2 4 3 3 4 6 5 4 6 2 7 1 8 1 9 6 10 2 11 3 12 4 13 5 14 4 15 2 16 11 17 2 18 2 19 2 20 1 21 1 22 2 23 8 24 3 25 8 26 2 27 4 28 2 29 2 30 2 31 4 ..." Flange Nut Hood Clip Key/Clip Hex Key 5/32" Hex Key Left Foot Rail Foot Rail Decal Latch Warning Decal Platform Cushion Walking Platform Walking Belt Belt Guide Frame Cap Frame Spacer 1/4" x 1" Bolt Drive Roller/Pulley Magnet Latch Cap Storage Latch Key No. PART LIST-Model No. Qty. 51 ...
PFTL59509.0 R1009A To locate the parts listed below, see the EXPLODED DRAWING near the end of this manual. Qty. 1 19 2 4 3 3 4 6 5 4 6 2 7 1 8 1 9 6 10 2 11 3 12 4 13 5 14 4 15 2 16 11 17 2 18 2 19 2 20 1 21 1 22 2 23 8 24 3 25 8 26 2 27 4 28 2 29 2 30 2 31 4 ..." Flange Nut Hood Clip Key/Clip Hex Key 5/32" Hex Key Left Foot Rail Foot Rail Decal Latch Warning Decal Platform Cushion Walking Platform Walking Belt Belt Guide Frame Cap Frame Spacer 1/4" x 1" Bolt Drive Roller/Pulley Magnet Latch Cap Storage Latch Key No. PART LIST-Model No. Qty. 51 ...


