Service Manual
Page 3
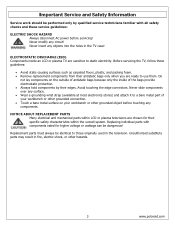
... components from their antistatic bags only when you are sensitive to those originally used in the TV case! Replacement parts must always be identical to static electricity. Before servicing the TV, follow these service guidelines: ELECTRIC SHOCK HAZARD Always disconnect AC power before touching any surface...ELECTROSTATIC DISCHARGE (ESD) Components inside of antistatic bags because only the inside an LCD or plasma TV are ready to a bare metal part of your workbench or other hazards. 3 www.polaroid.com Never modify any objects into the holes in the television. Do not...
... components from their antistatic bags only when you are sensitive to those originally used in the TV case! Replacement parts must always be identical to static electricity. Before servicing the TV, follow these service guidelines: ELECTRIC SHOCK HAZARD Always disconnect AC power before touching any surface...ELECTROSTATIC DISCHARGE (ESD) Components inside of antistatic bags because only the inside an LCD or plasma TV are ready to a bare metal part of your workbench or other hazards. 3 www.polaroid.com Never modify any objects into the holes in the television. Do not...
Service Manual
Page 12
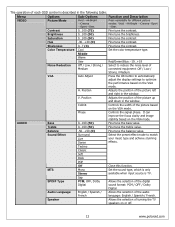
... Noise Reduction Off / Low / Strong / Medium Select to reduce the noise level of the picture based on or off. 12 www.polaroid.com It can improve the focus clarity and image stability based on the VGA mode. Sound Effect Surround Live Dance Select the preset effect .../ Low / Strong / Medium. The operation of the picture up and down in the window. H. Position Adjusts the position of each OSD control is TV. Sharpness 0...7 (4) Fine tune the contrast. Hue -30...+30 (0) Fine tune the contrast. Sap SPDIF Type PCM, OFF, Dolby Digital Allows the selection ...
... Noise Reduction Off / Low / Strong / Medium Select to reduce the noise level of the picture based on or off. 12 www.polaroid.com It can improve the focus clarity and image stability based on the VGA mode. Sound Effect Surround Live Dance Select the preset effect .../ Low / Strong / Medium. The operation of the picture up and down in the window. H. Position Adjusts the position of each OSD control is TV. Sharpness 0...7 (4) Fine tune the contrast. Hue -30...+30 (0) Fine tune the contrast. Sap SPDIF Type PCM, OFF, Dolby Digital Allows the selection ...
Service Manual
Page 13
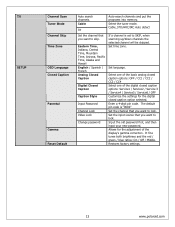
... gamma correction. Set the input source that you want to lock. Input the old password first, and then input your new password. TV SETUP Channel Scan Tuner Mode Channel Skip Time Zone OSD Language Closed Caption Parental Gamma Reset Default Auto search channels. Restores factory settings. ...13 www.polaroid.com Cable Air Auto-search channels and put the programs into memory. The default pin code is set to skip. Set language. Enter...
... gamma correction. Set the input source that you want to lock. Input the old password first, and then input your new password. TV SETUP Channel Scan Tuner Mode Channel Skip Time Zone OSD Language Closed Caption Parental Gamma Reset Default Auto search channels. Restores factory settings. ...13 www.polaroid.com Cable Air Auto-search channels and put the programs into memory. The default pin code is set to skip. Set language. Enter...
Service Manual
Page 14
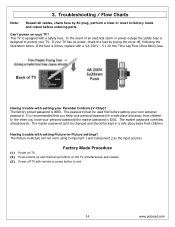
...that you loose your personal password in -Picture settings? It is designed to exit. 14 www.polaroid.com Having trouble with remote or power button to protect your TV has no power, check the fuse by AC plug, perform a clear or reset in factory ...Component 2 as the input sources. The Picture-in a safe place away from children. Troubleshooting / Flow Charts Note: Reseat all passwords. Can't power on the TV simultaneously and release. (3) Power off , following the illustration below. In the event you keep your personal password the master password is equipped with a 4 A ...
...that you loose your personal password in -Picture settings? It is designed to exit. 14 www.polaroid.com Having trouble with remote or power button to protect your TV has no power, check the fuse by AC plug, perform a clear or reset in factory ...Component 2 as the input sources. The Picture-in a safe place away from children. Troubleshooting / Flow Charts Note: Reseat all passwords. Can't power on the TV simultaneously and release. (3) Power off , following the illustration below. In the event you keep your personal password the master password is equipped with a 4 A ...
Service Manual
Page 18
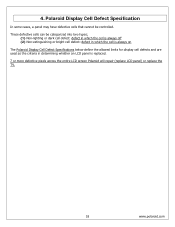
These defective cells can be controlled. Polaroid Display Cell Defect Specification In some cases, a panel may have defective cells that cannot be categorized into two types; (1) Non-lighting or dark cell defect: ...defect in which the cell is always off (2) Non-extinguishing or bright cell defect: defect in which the cell is always on The Polaroid Display Cell Defect Specifications below define the allowed limits for display cell defects and are used as the criteria in determining whether an...
These defective cells can be controlled. Polaroid Display Cell Defect Specification In some cases, a panel may have defective cells that cannot be categorized into two types; (1) Non-lighting or dark cell defect: ...defect in which the cell is always off (2) Non-extinguishing or bright cell defect: defect in which the cell is always on The Polaroid Display Cell Defect Specifications below define the allowed limits for display cell defects and are used as the criteria in determining whether an...
Service Manual
Page 20
Allow time for removing screws. • To help keep track of antistatic bags because only the inside an LCD or plasma TV are attached with a cable, unplug the cable before you begin disassembly. Note: Before returning this product to the end user, ... a grounding wrist strap (available at most electronics stores) and attach it to static electricity. Never slide components over any components. 20 www.polaroid.com ELECTROSTATIC DISCHARGE (ESD) Components inside of the bags provide electrostatic protection. • Always hold components you are ready to the component on...
Allow time for removing screws. • To help keep track of antistatic bags because only the inside an LCD or plasma TV are attached with a cable, unplug the cable before you begin disassembly. Note: Before returning this product to the end user, ... a grounding wrist strap (available at most electronics stores) and attach it to static electricity. Never slide components over any components. 20 www.polaroid.com ELECTROSTATIC DISCHARGE (ESD) Components inside of the bags provide electrostatic protection. • Always hold components you are ready to the component on...
Service Manual
Page 21
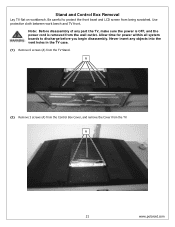
...careful to discharge before you begin disassembly. Use protective cloth between work bench and TV front. Allow time for power within all system boards to protect the front bezel and LCD screen from the wall outlet. A 21 www.polaroid.com A (2) Remove 3 screws (A) from the Control Box Cover, and ...remove the Cover from the TV Stand. Stand and Control Box Removal Lay TV flat on workbench. Never insert any part the TV, make sure the power ...
...careful to discharge before you begin disassembly. Use protective cloth between work bench and TV front. Allow time for power within all system boards to protect the front bezel and LCD screen from the wall outlet. A 21 www.polaroid.com A (2) Remove 3 screws (A) from the Control Box Cover, and ...remove the Cover from the TV Stand. Stand and Control Box Removal Lay TV flat on workbench. Never insert any part the TV, make sure the power ...

Service Manual
Page 22
A (4) Lift the Control Box upwards, and then towards the bottom of the Control Box. Unplug the 2 cables (A) from the Control Box, and remove the Box from the Control Box. (3) Remove 6 screws (A) from the TV. This procedure ensures that the chassis will not cause electric shock. 22 www.polaroid.com A Note: Before returning this product to the end user, you must follow the steps outlined in the section, Before Returning This Product to unhook it. (5) Remove the aluminum foil and bracket from the end of the TV to the User, on page 19.
A (4) Lift the Control Box upwards, and then towards the bottom of the Control Box. Unplug the 2 cables (A) from the Control Box, and remove the Box from the Control Box. (3) Remove 6 screws (A) from the TV. This procedure ensures that the chassis will not cause electric shock. 22 www.polaroid.com A Note: Before returning this product to the end user, you must follow the steps outlined in the section, Before Returning This Product to unhook it. (5) Remove the aluminum foil and bracket from the end of the TV to the User, on page 19.
Service Manual
Page 23
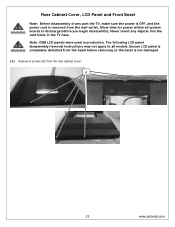
... removed from the wall outlet. Note: OEM LCD panels were used in the TV case. The following LCD panel disassembly/removal instructions may not apply to discharge before removing so the bezel is completely detached from the rear cabinet cover. A 23 www.polaroid.com Rear Cabinet Cover, LCD Panel and Front Bezel Note: Before disassembly...
... removed from the wall outlet. Note: OEM LCD panels were used in the TV case. The following LCD panel disassembly/removal instructions may not apply to discharge before removing so the bezel is completely detached from the rear cabinet cover. A 23 www.polaroid.com Rear Cabinet Cover, LCD Panel and Front Bezel Note: Before disassembly...
Service Manual
Page 24
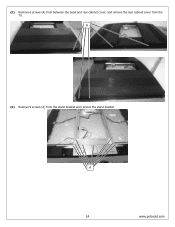
(2) Remove 6 screws (A) from between the bezel and rear cabinet cover, and remove the rear cabinet cover from the stand bracket and remove the stand bracket. A 24 www.polaroid.com A (3) Remove 9 screws (A) from the TV.
(2) Remove 6 screws (A) from between the bezel and rear cabinet cover, and remove the rear cabinet cover from the stand bracket and remove the stand bracket. A 24 www.polaroid.com A (3) Remove 9 screws (A) from the TV.

Service Manual
Page 27
A B (12) Remove the LCD panel from the TV. Note: Before returning this product to the end user, you must follow the steps outlined in the section, Before Returning This Product to lift the LCD Panel from the TV. NOTE: To avoid damage, TWO PEOPLE ARE REQUIRED to the User, on page 19. This procedure ensures that the chassis will not cause electric shock. 27 www.polaroid.com A (11) Unplug the inverter cable (A) and remove 3 screws (B) from one side of the panel. (10) Remove 3 screws (A) from the other side of the panel.
A B (12) Remove the LCD panel from the TV. Note: Before returning this product to the end user, you must follow the steps outlined in the section, Before Returning This Product to lift the LCD Panel from the TV. NOTE: To avoid damage, TWO PEOPLE ARE REQUIRED to the User, on page 19. This procedure ensures that the chassis will not cause electric shock. 27 www.polaroid.com A (11) Unplug the inverter cable (A) and remove 3 screws (B) from one side of the panel. (10) Remove 3 screws (A) from the other side of the panel.
Service Manual
Page 28
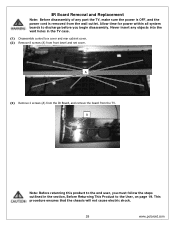
A Note: Before returning this product to the end user, you begin disassembly. Never insert any part the TV, make sure the power is OFF, and the power cord is removed from the wall outlet. IR Board Removal and Replacement Note: Before disassembly of ... to the User, on page 19. A (3) Remove 2 screws (A) from the IR Board, and remove the board from the TV. This procedure ensures that the chassis will not cause electric shock. 28 www.polaroid.com Allow time for power within all system boards to discharge before you must follow the steps outlined in...
A Note: Before returning this product to the end user, you begin disassembly. Never insert any part the TV, make sure the power is OFF, and the power cord is removed from the wall outlet. IR Board Removal and Replacement Note: Before disassembly of ... to the User, on page 19. A (3) Remove 2 screws (A) from the IR Board, and remove the board from the TV. This procedure ensures that the chassis will not cause electric shock. 28 www.polaroid.com Allow time for power within all system boards to discharge before you must follow the steps outlined in...
Service Manual
Page 29
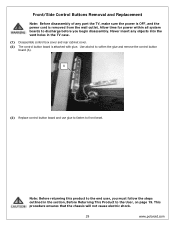
Use alcohol to front bezel. Never insert any part the TV, make sure the power is OFF, and the power cord is attached with glue. Note: ... on page 19. This procedure ensures that the chassis will not cause electric shock. 29 www.polaroid.com Allow time for power within all system boards to discharge before you must follow the steps outlined in the... TV case. (1) Disassemble control box cover and rear cabinet cover. (2) The control button board is removed from the wall...
Use alcohol to front bezel. Never insert any part the TV, make sure the power is OFF, and the power cord is attached with glue. Note: ... on page 19. This procedure ensures that the chassis will not cause electric shock. 29 www.polaroid.com Allow time for power within all system boards to discharge before you must follow the steps outlined in the... TV case. (1) Disassemble control box cover and rear cabinet cover. (2) The control button board is removed from the wall...
User Guide
Page 2
... "Dolby" and the double-D symbol are trademarks of HDMI Licensing LLC. This TV incorporates High-Definition Multimedia Interface (HDMITM) technology. For service, support and warranty information, visit www.polaroid.com. As a consumer, you are responsible for your country listed in subsequent... editions. All rights reserved. Changes are trademarks or registered trademarks of Polaroid Corporation, Waltham, MA, USA. Manufactured under license from Dolby Laboratories. HDMI, the HDMI logo and High-Definition...
... "Dolby" and the double-D symbol are trademarks of HDMI Licensing LLC. This TV incorporates High-Definition Multimedia Interface (HDMITM) technology. For service, support and warranty information, visit www.polaroid.com. As a consumer, you are responsible for your country listed in subsequent... editions. All rights reserved. Changes are trademarks or registered trademarks of Polaroid Corporation, Waltham, MA, USA. Manufactured under license from Dolby Laboratories. HDMI, the HDMI logo and High-Definition...
User Guide
Page 3
..., pursuant to Part 15 of the following measures: 1. If this equipment does cause harmful interference to radio communications. Consult the dealer or an experienced radio/TV technician for compliance could void the user authority to correct the interference by the manufacturer responsible for help. Increase the separation between the equipment and...
..., pursuant to Part 15 of the following measures: 1. If this equipment does cause harmful interference to radio communications. Consult the dealer or an experienced radio/TV technician for compliance could void the user authority to correct the interference by the manufacturer responsible for help. Increase the separation between the equipment and...
User Guide
Page 7
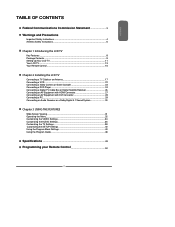
... Federal Communications Commission Statement 3 Warnings and Precautions Important Safety Instructions 4 Antenna Safety Instructions 6 Chapter 1 Introducing the LCD TV Key Features ...8 Package Contents ...9 Setting Up Your LCD TV 11 Your LCD TV...13 Your Remote Control 15 Chapter 2 Installing the LCD TV Connecting a TV Cable or an Antenna 17 Connecting a VCR ...22 Connecting a Video Camera or Game Console 23 Connecting...
... Federal Communications Commission Statement 3 Warnings and Precautions Important Safety Instructions 4 Antenna Safety Instructions 6 Chapter 1 Introducing the LCD TV Key Features ...8 Package Contents ...9 Setting Up Your LCD TV 11 Your LCD TV...13 Your Remote Control 15 Chapter 2 Installing the LCD TV Connecting a TV Cable or an Antenna 17 Connecting a VCR ...22 Connecting a Video Camera or Game Console 23 Connecting...
User Guide
Page 8
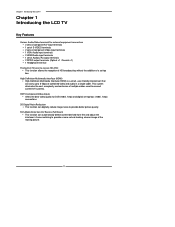
... function can automatically detect content derived from film and adjust the interlacer's frame matching to 5 Gbps of combined video and audio in TV tuner to receive HD ATSC ▪ This function allows the reception of HD broadcasting without the addition of a set -top-box (1080i,... Audio(L/R) output terminals ▪ 2 SPDIF output terminals (Optical x 1 /Coaxial x 1) ▪ 1 Headphone terminal The built-in a single cable. Chapter 1 Introducing the LCD TV Chapter 1 Introducing the LCD TV Key Features Various Audio/Video terminals for DVD(1080i, 720p) and digital set top box.
... function can automatically detect content derived from film and adjust the interlacer's frame matching to 5 Gbps of combined video and audio in TV tuner to receive HD ATSC ▪ This function allows the reception of HD broadcasting without the addition of a set -top-box (1080i,... Audio(L/R) output terminals ▪ 2 SPDIF output terminals (Optical x 1 /Coaxial x 1) ▪ 1 Headphone terminal The built-in a single cable. Chapter 1 Introducing the LCD TV Chapter 1 Introducing the LCD TV Key Features Various Audio/Video terminals for DVD(1080i, 720p) and digital set top box.

User Guide
Page 9
...figuration. Package Contents Chapter 1 Introducing the LCD TV Make sure all of the following contents are included. If you are all you need to set up and operate the LCD TV in the package. LCD TV Bottom Stand / Screw Driver and Screws 4 ENGLISH...TV PIP MENU OK INFO CC EXIT DVR 1 2 3 ABC DEF 4 5 6 GHI JKL MNO 7 8 9 PQRS TUV WXYZ INPUT . 0 ENTER Power Cord VIDEO Cable Component Cable AUDIO Cable Warranty Card User's Manual Quick Start Guide Stand Assembly Guide Remote control Guide These items are missing any items, please contact the Polaroid...
...figuration. Package Contents Chapter 1 Introducing the LCD TV Make sure all of the following contents are included. If you are all you need to set up and operate the LCD TV in the package. LCD TV Bottom Stand / Screw Driver and Screws 4 ENGLISH...TV PIP MENU OK INFO CC EXIT DVR 1 2 3 ABC DEF 4 5 6 GHI JKL MNO 7 8 9 PQRS TUV WXYZ INPUT . 0 ENTER Power Cord VIDEO Cable Component Cable AUDIO Cable Warranty Card User's Manual Quick Start Guide Stand Assembly Guide Remote control Guide These items are missing any items, please contact the Polaroid...
User Guide
Page 10
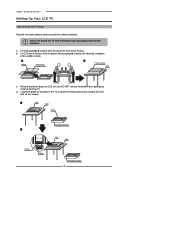
Lift foam packaging material from the TV. Chapter 1 Introducing the LCD TV Setting Up Your LCD TV How to install the TV Stand Read all four screws. b. a Stand Shipping box b Protective bag Table c. Locate the place on the back of the box. a. Remove protective bag from LCD unit, but DO NOT remove... the bottom foam packaging material from the top of the LCD out of the TV to attach the stand. Secure the stand to the LCD with all instructions before continuing with the stand installation. ...
Lift foam packaging material from the TV. Chapter 1 Introducing the LCD TV Setting Up Your LCD TV How to install the TV Stand Read all four screws. b. a Stand Shipping box b Protective bag Table c. Locate the place on the back of the box. a. Remove protective bag from LCD unit, but DO NOT remove... the bottom foam packaging material from the top of the LCD out of the TV to attach the stand. Secure the stand to the LCD with all instructions before continuing with the stand installation. ...
User Guide
Page 11
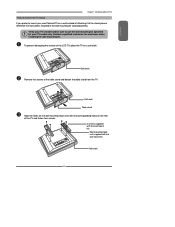
... only. Soft cloth Remove the screws of the table stand and detach the table stand from the TV. To prevent damaging the surface of the LCD TV, place the TV on the rear of the TV and fasten four screws. 4 screws (supplied with the wall mount kit) Wall mounting hook unit (supplied ...with the corresponding holes on a soft cloth. ENGLISH Chapter 1 Introducing the LCD TV How to remove the TV Stand If you prefer to mount your new Polaroid TV on a wall instead of attaching it to use the wall mounting kit specified for assistance when installing...
... only. Soft cloth Remove the screws of the table stand and detach the table stand from the TV. To prevent damaging the surface of the LCD TV, place the TV on the rear of the TV and fasten four screws. 4 screws (supplied with the wall mount kit) Wall mounting hook unit (supplied ...with the corresponding holes on a soft cloth. ENGLISH Chapter 1 Introducing the LCD TV How to remove the TV Stand If you prefer to mount your new Polaroid TV on a wall instead of attaching it to use the wall mounting kit specified for assistance when installing...


