
Operation Manual
Page 2
... Operations ...20 Changing Channels...20 Adjusting the Volume...20 Selecting Input Source Signal ...21 Selecting a Menu Language...21 Setting Picture ...22 Customizing the Picture ...22 Using the Preset Picture Mode...22 Setting System ...23 Setting System In TV Mode ...23 Adjusting Screen Aspect ...23 Reducing Picture Noise...23 VCR mode...23 Loading Default Values ...23 Setting System In VGA Mode ...24 Changing the Position of Image ...24 Adjusting Clock and Phase ...24 Adjusting the Picture Automatically ...24 Adjusting Screen Aspect ...25 Displaying Resolution Information...25...
... Operations ...20 Changing Channels...20 Adjusting the Volume...20 Selecting Input Source Signal ...21 Selecting a Menu Language...21 Setting Picture ...22 Customizing the Picture ...22 Using the Preset Picture Mode...22 Setting System ...23 Setting System In TV Mode ...23 Adjusting Screen Aspect ...23 Reducing Picture Noise...23 VCR mode...23 Loading Default Values ...23 Setting System In VGA Mode ...24 Changing the Position of Image ...24 Adjusting Clock and Phase ...24 Adjusting the Picture Automatically ...24 Adjusting Screen Aspect ...25 Displaying Resolution Information...25...

Operation Manual
Page 3
... Reducing Picture Noise...26 Loading Default Values ...26 Setting System In DVI Mode ...27 Adjusting Screen Aspect ...27 Displaying Resolution Information...27 Setting Sound ...28 Customizing the Sound ...28 Using the Preset Sound Mode ...28 Setting SRS effect ...28 Adjusting On-Screen Display...29 Adjusting OSD Position...29 Adjusting OSD Transparence...29 Zooming OSD Menu...29 Setting OSD Off Time...29 Loading default values ...29 TVPC Operations ...30 Viewing the TVPC ...30 Selecting the Signal Source for the TVPC Frame 30 Changing Channels...
... Reducing Picture Noise...26 Loading Default Values ...26 Setting System In DVI Mode ...27 Adjusting Screen Aspect ...27 Displaying Resolution Information...27 Setting Sound ...28 Customizing the Sound ...28 Using the Preset Sound Mode ...28 Setting SRS effect ...28 Adjusting On-Screen Display...29 Adjusting OSD Position...29 Adjusting OSD Transparence...29 Zooming OSD Menu...29 Setting OSD Off Time...29 Loading default values ...29 TVPC Operations ...30 Viewing the TVPC ...30 Selecting the Signal Source for the TVPC Frame 30 Changing Channels...

Operation Manual
Page 4
... servicing other than that the cable ground shall be connected to the grounding system of the building, as close to environmental considerations. In a domestic environment this product may cause radio interference in which case the user may cause harmful interference to operate this equipment in the literature accompanying the appliance. The lightning flash with the instruction manual...
... servicing other than that the cable ground shall be connected to the grounding system of the building, as close to environmental considerations. In a domestic environment this product may cause radio interference in which case the user may cause harmful interference to operate this equipment in the literature accompanying the appliance. The lightning flash with the instruction manual...

Operation Manual
Page 6
... wall outlet and disconnect the antenna. b. Move Carefully---When a cart is damaged, liquid has been spilled or objects have fallen into the product through vents or openings. a. e. For added protection for long periods of service or repair work by the manufacturer, or those described in the operating instructions. Do not touch the controls other equipment as power-supply cord or plug is used, use...
... wall outlet and disconnect the antenna. b. Move Carefully---When a cart is damaged, liquid has been spilled or objects have fallen into the product through vents or openings. a. e. For added protection for long periods of service or repair work by the manufacturer, or those described in the operating instructions. Do not touch the controls other equipment as power-supply cord or plug is used, use...
Operation Manual
Page 7
... other objects. Use only the power cord designated by a listed power supply indicated on the screen as VCRs and personal computers, you finely detailed pictures. For added protection for protection against electric shock. 23.Panel protection---The LCD panel used with another power supply voltage, the power cable must be installed near the equipment and easily accessible. The socket outlet should turn off the power of the unit...
... other objects. Use only the power cord designated by a listed power supply indicated on the screen as VCRs and personal computers, you finely detailed pictures. For added protection for protection against electric shock. 23.Panel protection---The LCD panel used with another power supply voltage, the power cable must be installed near the equipment and easily accessible. The socket outlet should turn off the power of the unit...
Operation Manual
Page 8
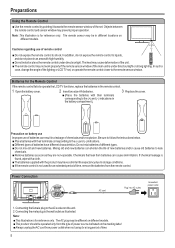
Preparations Using the Remote Control
Preparations Using the Remote Control

Operation Manual
Page 9
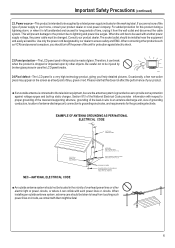
... adapter (not supplied) or VHF/UHF antenna 300-ohm twin-lead 75-ohm coaxial cable Antenna cable B. Since the signals of the following is necessary for black & white television reception. F-type connector 75-ohm coaxial cable (round) 300-ohm twin-lead cable (flat) OUTDOOR ANTENNA CONNECTION Use one of these premium pay channels". One possible method of splitter, RF switch or combiner that can view...
... adapter (not supplied) or VHF/UHF antenna 300-ohm twin-lead 75-ohm coaxial cable Antenna cable B. Since the signals of the following is necessary for black & white television reception. F-type connector 75-ohm coaxial cable (round) 300-ohm twin-lead cable (flat) OUTDOOR ANTENNA CONNECTION Use one of these premium pay channels". One possible method of splitter, RF switch or combiner that can view...

Operation Manual
Page 10
... access signal source select menu. 4. This operation manual provides a description based on and a red indicator lights when in the standby mode. POWER Press this button to directly change the TV channel; INPUT MENU Channel Up/Down Volume Up/Down Select Input Signal Menu Power On/Standby 1. button to turn the set back to STANDBY. 2. In OSD Menu, press these buttons to choose the OSD items. Note: Functions of VOL+/-, CH+/-, MENU, INPUT and POWER are also provided to adjust...
... access signal source select menu. 4. This operation manual provides a description based on and a red indicator lights when in the standby mode. POWER Press this button to directly change the TV channel; INPUT MENU Channel Up/Down Volume Up/Down Select Input Signal Menu Power On/Standby 1. button to turn the set back to STANDBY. 2. In OSD Menu, press these buttons to choose the OSD items. Note: Functions of VOL+/-, CH+/-, MENU, INPUT and POWER are also provided to adjust...
Operation Manual
Page 14
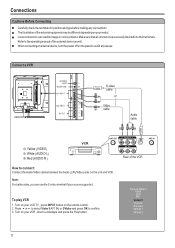
... your source supports it. To play VCR 1. Source Select VGA DVI RF Video1 Video2 SVideo YPbPr1 YPbPr2 11 Turn on your model. Refer to confirm. 3. Note: For better video, you can result in image or color problems. Make sure that all connectors are securely inserted into their terminals. Connections Cautions Before Connecting Carefully check the terminals for position and type before making any issues. Turn on your LCD TV , press INPUT button...
... your source supports it. To play VCR 1. Source Select VGA DVI RF Video1 Video2 SVideo YPbPr1 YPbPr2 11 Turn on your model. Refer to confirm. 3. Note: For better video, you can result in image or color problems. Make sure that all connectors are securely inserted into their terminals. Connections Cautions Before Connecting Carefully check the terminals for position and type before making any issues. Turn on your LCD TV , press INPUT button...
Operation Manual
Page 16
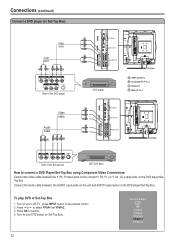
... RW DVI-D IN VGA IN AU DI O DVI-D DVI-D IN AU DI O HDTV IN HDTV IN DVD player W white (audio L) R red (audio R, Pr /Cr ) G Green (Y) B Blue (Pb /Cb ) Video cable Audio cable RW RBG RW GBR HDTV IN DVI-D IN VGA IN AU DI O DVI-D DVI-D IN AU DI O HDTV IN AUDIO R AUDIO L COMPONENT Pr Pb Y ANT Rear of the Set-top box SET-TOP BOX How to connect a DVD Player/Set-Top Box using Component Video Connections: Connect the Video cable between the AUDIO input...
... RW DVI-D IN VGA IN AU DI O DVI-D DVI-D IN AU DI O HDTV IN HDTV IN DVD player W white (audio L) R red (audio R, Pr /Cr ) G Green (Y) B Blue (Pb /Cb ) Video cable Audio cable RW RBG RW GBR HDTV IN DVI-D IN VGA IN AU DI O DVI-D DVI-D IN AU DI O HDTV IN AUDIO R AUDIO L COMPONENT Pr Pb Y ANT Rear of the Set-top box SET-TOP BOX How to connect a DVD Player/Set-Top Box using Component Video Connections: Connect the Video cable between the AUDIO input...
Operation Manual
Page 20
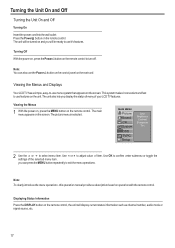
... MENU Picture Sound CH System OSD TVPC Setup Color Brightness Contrast Sharpness Tint 2 Use the 5 or 6 to turn off. Turning the Unit On and Off Turning the Unit On and Off Turning On Insert the power cord into the wall outlet. Press the Power button on the remote control. Viewing the Menus and Displays Your LCD TV has a simple, easy-to adjust value of the selected menu item. Viewing the Menus 1 With the power on, press the MENU button...
... MENU Picture Sound CH System OSD TVPC Setup Color Brightness Contrast Sharpness Tint 2 Use the 5 or 6 to turn off. Turning the Unit On and Off Turning the Unit On and Off Turning On Insert the power cord into the wall outlet. Press the Power button on the remote control. Viewing the Menus and Displays Your LCD TV has a simple, easy-to adjust value of the selected menu item. Viewing the Menus 1 With the power on, press the MENU button...

Operation Manual
Page 26
... the remote control. It helps to obtain a better synchronization and improve the stability of the screen. MAIN MENU Picture Sound CH System Aspect Ratio N/R VCR mode Default OSD TVPC Setup On Loading Default Values You may quickly select the screen aspect by using the Default item. 23 Zoom -- This mode stretches the picture horizontally and crops the top and bottom black bars of poor signal. For 16:9 signal format. For 4:3 letterbox signal format...
... the remote control. It helps to obtain a better synchronization and improve the stability of the screen. MAIN MENU Picture Sound CH System Aspect Ratio N/R VCR mode Default OSD TVPC Setup On Loading Default Values You may quickly select the screen aspect by using the Default item. 23 Zoom -- This mode stretches the picture horizontally and crops the top and bottom black bars of poor signal. For 16:9 signal format. For 4:3 letterbox signal format...

Operation Manual
Page 27
... displayed in the image, try adjusting the clock frequency setting. The Auto Adjust function only works when the picture is apparent in 16:9 with full screen. Setting System (continued) Setting System In VGA Mode Changing the Position of Image The unit allows you can obtain a clearer image by adjusting the phase setting. If you experience blurring , you to adjust the position of the screen if it is not well-aligned. 1 Press MENU to display the menu...
... displayed in the image, try adjusting the clock frequency setting. The Auto Adjust function only works when the picture is apparent in 16:9 with full screen. Setting System (continued) Setting System In VGA Mode Changing the Position of Image The unit allows you can obtain a clearer image by adjusting the phase setting. If you experience blurring , you to adjust the position of the screen if it is not well-aligned. 1 Press MENU to display the menu...

Operation Manual
Page 28
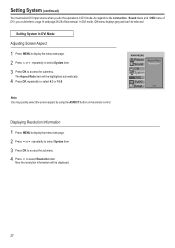
Note: You may quickly select the screen aspect by using the Resolution item. Displaying Resolution Information You may quickly load default values by using the ASPECT button on the remote control. MAIN MENU Picture Sound CH System OSD TVPC Setup H Position V Position Clock Phase Auto Adjust Aspect Ratio Resolution Default 16:9 25 Loading Default Values You may quickly display the resolution information by using the Default item. Setting System (continued) Setting System In VGA Mode(continued) Adjusting Screen Aspect 1 Press MENU to display the menu main page. 2 Press 5or6...
Note: You may quickly select the screen aspect by using the Resolution item. Displaying Resolution Information You may quickly load default values by using the ASPECT button on the remote control. MAIN MENU Picture Sound CH System OSD TVPC Setup H Position V Position Clock Phase Auto Adjust Aspect Ratio Resolution Default 16:9 25 Loading Default Values You may quickly display the resolution information by using the Default item. Setting System (continued) Setting System In VGA Mode(continued) Adjusting Screen Aspect 1 Press MENU to display the menu main page. 2 Press 5or6...
Operation Manual
Page 30
... OK repeatedly to select 4:3 or 16:9. MAIN MENU Picture Aspect Ratio Sound Resolution CH System OSD TVPC Setup 16:9 Note: You may quickly select the screen aspect by using the ASPECT button on the remote control. The Aspect Ratio item will be selected. As regards to the connection , Sound menu and OSD menu of this manual. Setting System (continued) You must select DVI input source when you could refer to page 14...
... OK repeatedly to select 4:3 or 16:9. MAIN MENU Picture Aspect Ratio Sound Resolution CH System OSD TVPC Setup 16:9 Note: You may quickly select the screen aspect by using the ASPECT button on the remote control. The Aspect Ratio item will be selected. As regards to the connection , Sound menu and OSD menu of this manual. Setting System (continued) You must select DVI input source when you could refer to page 14...

Operation Manual
Page 31
... and right volumes). Bass Adjusts Bass (low sounds) Treble Adjusts Treble (high sounds). Use OK to toggle On or Off Use OK to toggle On or Off Use OK to toggle On or Off Using the Preset Sound Mode Use the SOUND MODE button to quickly select sound mode. Mute Mutes the sound Speaker Turns on or off speaker sound output Head Phone Turns on or off headphone sound output Setting Sound MAIN MENU Picture Sound CH System OSD TVPC Setup Volume Bass...
... and right volumes). Bass Adjusts Bass (low sounds) Treble Adjusts Treble (high sounds). Use OK to toggle On or Off Use OK to toggle On or Off Use OK to toggle On or Off Using the Preset Sound Mode Use the SOUND MODE button to quickly select sound mode. Mute Mutes the sound Speaker Turns on or off speaker sound output Head Phone Turns on or off headphone sound output Setting Sound MAIN MENU Picture Sound CH System OSD TVPC Setup Volume Bass...

Operation Manual
Page 36
... Lock System OSD TVPC On Setup 33 Check for the symbol to On, the unit display closed caption when you mute the sound. System OSD 4 Press 5or6 repeatedly to select a desired mode. The [TEXT] mode displays various information over the picture (such as well. TVPC CC-1 Setup 5 Press OK repeatedly to select CCD mode item. You may quickly select CCD mode by using the CAPTION button directly. Turning...
... Lock System OSD TVPC On Setup 33 Check for the symbol to On, the unit display closed caption when you mute the sound. System OSD 4 Press 5or6 repeatedly to select a desired mode. The [TEXT] mode displays various information over the picture (such as well. TVPC CC-1 Setup 5 Press OK repeatedly to select CCD mode item. You may quickly select CCD mode by using the CAPTION button directly. Turning...

Operation Manual
Page 39
... number buttons. Please set the individual content-based ratings as your password and retain it for future use. Adjusting the TV Rating 1 From the Child Lock menu page, press 5or6 repeatedly to select TV Rating item. 2 Press OK repeatedly to select a desired rating you want to remember your password. MAIN MENU Picture Block On/Off Sound MPAA TV Rating CH CA EngRateSys System CA FrnRateSys New Password OSD TVPC On Setup...
... number buttons. Please set the individual content-based ratings as your password and retain it for future use. Adjusting the TV Rating 1 From the Child Lock menu page, press 5or6 repeatedly to select TV Rating item. 2 Press OK repeatedly to select a desired rating you want to remember your password. MAIN MENU Picture Block On/Off Sound MPAA TV Rating CH CA EngRateSys System CA FrnRateSys New Password OSD TVPC On Setup...
Operation Manual
Page 41
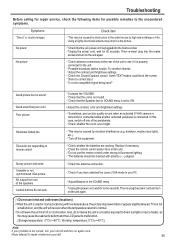
... AC power cord is used in SOUND menu is set to ON. • Adjust the contrast, color and brightness settings. !Sometimes, poor picture quality occurs when an activated S-VHS camera or camcorder is connected while another channel. !Adjust the contrast and brightness settings. !Check the Closed Captions control. Snowy picture and noise Unstable or not synchronized VGA picture No output from one of the peripherals. !Check whether the room is not solved, turn on...
... AC power cord is used in SOUND menu is set to ON. • Adjust the contrast, color and brightness settings. !Sometimes, poor picture quality occurs when an activated S-VHS camera or camcorder is connected while another channel. !Adjust the contrast and brightness settings. !Check the Closed Captions control. Snowy picture and noise Unstable or not synchronized VGA picture No output from one of the peripherals. !Check whether the room is not solved, turn on...
Operation Manual
Page 43
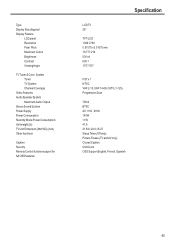
Type Display Size diagonal Display Feature LCD panel Resolution Pixel Pitch Maximum Colors Brightness Contrast Viewing Angle TV Tuner & Color System Tuner TV System Channel Coverage Video Features Audio Speaker System Maximum Audio Output Stereo Sound System Power Supply Power Consumption Stand by Mode Power Consumption Unit weight (lb) TV Unit Dimension (WxHxD) (inch) Other functions Caption Security Remote Control function support for full OSD features Specification LCD TV 26" TFT-LCD 1366 x 768 0.51075 x 0.51075 mm 16,777,216 500 nit 600...
Type Display Size diagonal Display Feature LCD panel Resolution Pixel Pitch Maximum Colors Brightness Contrast Viewing Angle TV Tuner & Color System Tuner TV System Channel Coverage Video Features Audio Speaker System Maximum Audio Output Stereo Sound System Power Supply Power Consumption Stand by Mode Power Consumption Unit weight (lb) TV Unit Dimension (WxHxD) (inch) Other functions Caption Security Remote Control function support for full OSD features Specification LCD TV 26" TFT-LCD 1366 x 768 0.51075 x 0.51075 mm 16,777,216 500 nit 600...


