Operation Manual
Page 4
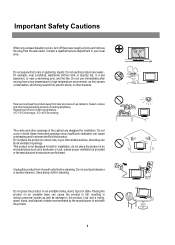
...'s instructions are designed for working The vents and other heat generating products (including amplifiers). Important Safety Cautions When any unusual situation occurs, turn off the power supply at once and remove the plug from heat sources such as a bookcase or rack, unless proper ventilation is not designed for cleaning. Do not...
...'s instructions are designed for working The vents and other heat generating products (including amplifiers). Important Safety Cautions When any unusual situation occurs, turn off the power supply at once and remove the plug from heat sources such as a bookcase or rack, unless proper ventilation is not designed for cleaning. Do not...
Operation Manual
Page 5
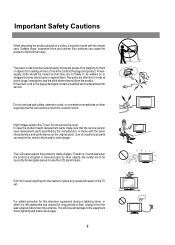
... Do not remove the cover. This will prevent damage to the equipment due to lightning and power-line surges. 2 High Voltage exists in this product is left unattended and unused for long periods... not overload wall outlets, extension cords, or convenience receptacles on the TV set . Therefore, it from the wall outlet and disconnect the antenna. Use of time, unplug it... or electric shock. Sudden stops, excessive force and uneven floor surfaces can result in case the LCD panel breaks. Important Safety Cautions When relocating the product placed on a trolley, it must be routed...
... Do not remove the cover. This will prevent damage to the equipment due to lightning and power-line surges. 2 High Voltage exists in this product is left unattended and unused for long periods... not overload wall outlets, extension cords, or convenience receptacles on the TV set . Therefore, it from the wall outlet and disconnect the antenna. Use of time, unplug it... or electric shock. Sudden stops, excessive force and uneven floor surfaces can result in case the LCD panel breaks. Important Safety Cautions When relocating the product placed on a trolley, it must be routed...
Operation Manual
Page 6
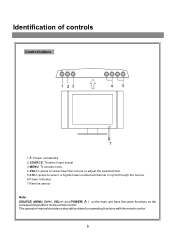
and POWER( ) on the main unit have the same functions as the corresponding buttons on /standby 2.SOURCE: To select input signal 3.MENU: To access menu 4.VOL+/-:press to raise/lower the volume or adjust the selected item. 5.CH+/-:press to select a higher/lower numbered channel or cycle through the menus. 6.Power Indicator 7.Remote sensor Note: SOURCE, MENU, CH+/-, VOL+/- Identification of controls Control buttons 1 23 45 6 7 1. : Power on the remote control. This operation manual provides a description based on operating functions with the remote control. 3
and POWER( ) on the main unit have the same functions as the corresponding buttons on /standby 2.SOURCE: To select input signal 3.MENU: To access menu 4.VOL+/-:press to raise/lower the volume or adjust the selected item. 5.CH+/-:press to select a higher/lower numbered channel or cycle through the menus. 6.Power Indicator 7.Remote sensor Note: SOURCE, MENU, CH+/-, VOL+/- Identification of controls Control buttons 1 23 45 6 7 1. : Power on the remote control. This operation manual provides a description based on operating functions with the remote control. 3
Operation Manual
Page 8
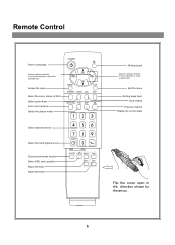
Remote Control Power on/standby Volume up /down selector. Exit the menu Setting sleep timer Clock setting Previous channel Display the current state Flip the cover open in the direction shown by the arrow. 5 In menu operations, used to select item. In the menu operation, adjust the selected item Access the menu Select the mono, stereo or SAP Select zoom mode Auto correct picture Switch the picture mode Direct channel selector Select the input signal source Sound preset mode selector Select OSD menu position Adjust the bass Adjust the treble Muting sound Channel up /down selector.
Remote Control Power on/standby Volume up /down selector. Exit the menu Setting sleep timer Clock setting Previous channel Display the current state Flip the cover open in the direction shown by the arrow. 5 In menu operations, used to select item. In the menu operation, adjust the selected item Access the menu Select the mono, stereo or SAP Select zoom mode Auto correct picture Switch the picture mode Direct channel selector Select the input signal source Sound preset mode selector Select OSD menu position Adjust the bass Adjust the treble Muting sound Channel up /down selector.

Operation Manual
Page 12
Connecting the female plug to the wall outlet as illustrated. Note: Connecting the male plug to the AC socket on AC adapter. 2. Installation(continued) Power connection Household power outlet Power cord Adapter To power input (DC 12V) DC 12V Connect to the DC power input of the product. Connecting the AC adapter to the DC input socket of the back of the set. 3. Be sure to fully insert plug into the socket and confirm it is secure. 1.
Connecting the female plug to the wall outlet as illustrated. Note: Connecting the male plug to the AC socket on AC adapter. 2. Installation(continued) Power connection Household power outlet Power cord Adapter To power input (DC 12V) DC 12V Connect to the DC power input of the product. Connecting the AC adapter to the DC input socket of the back of the set. 3. Be sure to fully insert plug into the socket and confirm it is secure. 1.
Operation Manual
Page 13
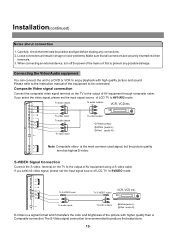
When connecting an external device, turn off the power of the equipment to produce the best picture. 10 If you select S-video signal, please set the input signal source of AV equipment using a S-video ... instruction manual of the main unit first to AV1/AV2 mode. Composite Video signal connection Connect the composite video signal terminal on the TV to the output of LCD TV to prevent any connections. 2. Installation(continued) Notes about connection 1. To video input To video output To audio inputs R w Y To video input Y Yellow (video...
When connecting an external device, turn off the power of the equipment to produce the best picture. 10 If you select S-video signal, please set the input signal source of AV equipment using a S-video ... instruction manual of the main unit first to AV1/AV2 mode. Composite Video signal connection Connect the composite video signal terminal on the TV to the output of LCD TV to prevent any connections. 2. Installation(continued) Notes about connection 1. To video input To video output To audio inputs R w Y To video input Y Yellow (video...
Operation Manual
Page 17
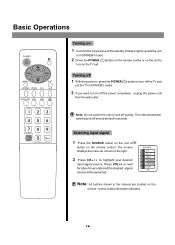
... wall outlet. CLK 2 If you want to turn on the TV set. or wait for about 4 seconds and the desired signal source will be selected. Turning off 1 With the power on the right. 2 Press CH5/6 to turn off the TV and put the TV in the manual are located on the remote control. SOURCE... TV AV 1 AV 2 SVIDEO YPbPr/YCbCr VGA TV Note: All buttons shown in STANDBY mode. Selecting input signal 1 Press...
... wall outlet. CLK 2 If you want to turn on the TV set. or wait for about 4 seconds and the desired signal source will be selected. Turning off 1 With the power on the right. 2 Press CH5/6 to turn off the TV and put the TV in the manual are located on the remote control. SOURCE... TV AV 1 AV 2 SVIDEO YPbPr/YCbCr VGA TV Note: All buttons shown in STANDBY mode. Selecting input signal 1 Press...
Operation Manual
Page 34
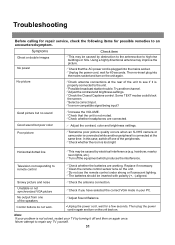
...Replace if necessary. !Clean the remote control sensor lens on . Control buttons do not work. =Unplug the power cord, wait for 60 seconds. Then plug the power cord in your TV by electrical interference (e.g. hairdryer, nearby neon lights, etc.) !Turn off and then on the unit again..... !Adjust the contrast and brightness settings. !Check the Closed Captions control. Then re-insert plug into the mains socket. !Unplug the power cord, wait for a few seconds. Adjust the contrast, color and brightness settings. Snowy picture and noise !Check the antenna connection. Try...
...Replace if necessary. !Clean the remote control sensor lens on . Control buttons do not work. =Unplug the power cord, wait for 60 seconds. Then plug the power cord in your TV by electrical interference (e.g. hairdryer, nearby neon lights, etc.) !Turn off and then on the unit again..... !Adjust the contrast and brightness settings. !Check the Closed Captions control. Then re-insert plug into the mains socket. !Unplug the power cord, wait for a few seconds. Adjust the contrast, color and brightness settings. Snowy picture and noise !Check the antenna connection. Try...
Operation Manual
Page 35
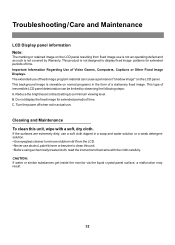
Turn the power off when not in actual use of irreversible LCD panel deterioration can cause a permanent "shadow image" on the LCD panel. This type of fixed image program material can be limited by Warranty. C. Cleaning and Maintenance To clean this unit. • Before ... the form of Video Games, Computers, Captions or Other Fixed Image Displays. Troubleshooting/Care and Maintenance LCD Display panel information Note: The marking or retained image on the LCD panel resulting from the LCD. • Never use alcohol, paint thinner or benzine to clean this unit, wipe with the...
Turn the power off when not in actual use of irreversible LCD panel deterioration can cause a permanent "shadow image" on the LCD panel. This type of fixed image program material can be limited by Warranty. C. Cleaning and Maintenance To clean this unit. • Before ... the form of Video Games, Computers, Captions or Other Fixed Image Displays. Troubleshooting/Care and Maintenance LCD Display panel information Note: The marking or retained image on the LCD panel resulting from the LCD. • Never use alcohol, paint thinner or benzine to clean this unit, wipe with the...
Operation Manual
Page 36
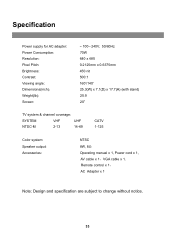
... x 480 0.2125mm x 0.6375mm 450 nit 500:1 160o/140o 25.3(W) x 7.1(D) x 17.7(H) (with stand) 20.9 20" TV system & channel coverage: SYSTEM VHF UHF NTSC-M 2-13 14-69 CATV 1-125 Color system: Speaker output: Accessories: NTSC 8W, 8W Operating manual x 1, Power cord x 1, AV cable x 1,VGA cable x 1, Remote control x 1, AC Adapter x 1 Note: Design and...
... x 480 0.2125mm x 0.6375mm 450 nit 500:1 160o/140o 25.3(W) x 7.1(D) x 17.7(H) (with stand) 20.9 20" TV system & channel coverage: SYSTEM VHF UHF NTSC-M 2-13 14-69 CATV 1-125 Color system: Speaker output: Accessories: NTSC 8W, 8W Operating manual x 1, Power cord x 1, AV cable x 1,VGA cable x 1, Remote control x 1, AC Adapter x 1 Note: Design and...


