
User Guide
Page 2
... the customer service number for ensuring that this document. For service, support and warranty information, visit www.polaroid.com. All rights reserved. This TV incorporates High-Definition Multimedia Interface (HDMITM) technology. HDMI, the HDMI logo and High-Definition Multimedia Interface are trademarks of HDMI Licensing LLC. All rights reserved. Changes, technical inaccuracies, and typographic errors will be...
... the customer service number for ensuring that this document. For service, support and warranty information, visit www.polaroid.com. All rights reserved. This TV incorporates High-Definition Multimedia Interface (HDMITM) technology. HDMI, the HDMI logo and High-Definition Multimedia Interface are trademarks of HDMI Licensing LLC. All rights reserved. Changes, technical inaccuracies, and typographic errors will be...
User Guide
Page 4
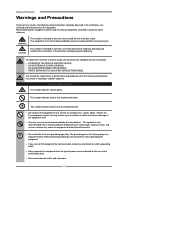
... equipment on any injuries, the following safety precautions should be observed in the installation, use, servicing and maintenance of this equipment from the type of important operating and maintenance instructions in hazardous radiation exposure. Use of controls, adjustments or performance of the serial/model plate. ▪ Never overload wall outlets and extensions. 2 The equipment may fall, causing serious injury to children or...
... equipment on any injuries, the following safety precautions should be observed in the installation, use, servicing and maintenance of this equipment from the type of important operating and maintenance instructions in hazardous radiation exposure. Use of controls, adjustments or performance of the serial/model plate. ▪ Never overload wall outlets and extensions. 2 The equipment may fall, causing serious injury to children or...
User Guide
Page 6
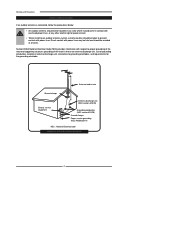
... clamps Power service grounding (NEC Art250 part H) NEC : National Electrical code EXAMPLE OF OUTDOOR ANTENNA GROUNDING 4 Section 810 of National Electrical Code (NEC) provides information with respect to proper grounding of the mast and supporting structure, grounding of the lead-in wire to an antenna discharge unit, size of grounding conductors, location of antenna discharge unit, connection to prevent contact with power lines...
... clamps Power service grounding (NEC Art250 part H) NEC : National Electrical code EXAMPLE OF OUTDOOR ANTENNA GROUNDING 4 Section 810 of National Electrical Code (NEC) provides information with respect to proper grounding of the mast and supporting structure, grounding of the lead-in wire to an antenna discharge unit, size of grounding conductors, location of antenna discharge unit, connection to prevent contact with power lines...
User Guide
Page 7
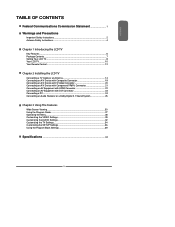
... Remote Control 12 Chapter 2 Installing the LCD TV Connecting a TV Cable or an Antenna 14 Connecting an A/V Device with Composite Connector 19 Connecting an A/V Device with S-Video Connector 20 Connecting an A/V Device with Component(YPbPr) Connector 21 Connecting an AV Equipment with HDMI Connector 22 Connecting an AV Equipment with DVI Connector 23 Connecting a PC...24 Connecting an Audio Receiver or a Dolby Digital 5.1 Sound System 25 Chapter 3 Using The Features Wide Screen Viewing...30 Using...
... Remote Control 12 Chapter 2 Installing the LCD TV Connecting a TV Cable or an Antenna 14 Connecting an A/V Device with Composite Connector 19 Connecting an A/V Device with S-Video Connector 20 Connecting an A/V Device with Component(YPbPr) Connector 21 Connecting an AV Equipment with HDMI Connector 22 Connecting an AV Equipment with DVI Connector 23 Connecting a PC...24 Connecting an Audio Receiver or a Dolby Digital 5.1 Sound System 25 Chapter 3 Using The Features Wide Screen Viewing...30 Using...
User Guide
Page 8
... cost, complexity and confusion of multiple cables used to connect current A/V systems. HDTV Component Video Inputs ▪ Offers the best video quality for composite C-VIDEO/S-VIDEO ▪ 1 COAXIAL output terminal ▪ 1 Headphone terminal The built-in TV tuner to receive HD ATSC signal ▪ This function allows the reception of HD broadcasting without the addition of a set -top-box (1080i, 720p) connections. 2D Digital Noise Reduction ▪ This function...
... cost, complexity and confusion of multiple cables used to connect current A/V systems. HDTV Component Video Inputs ▪ Offers the best video quality for composite C-VIDEO/S-VIDEO ▪ 1 COAXIAL output terminal ▪ 1 Headphone terminal The built-in TV tuner to receive HD ATSC signal ▪ This function allows the reception of HD broadcasting without the addition of a set -top-box (1080i, 720p) connections. 2D Digital Noise Reduction ▪ This function...

User Guide
Page 9
INPUT CH. GUIDE EXIT INFO MENU LIST FREEZE FAV.CH TIMER Power Cord VIDEO Cable AUDIO Cable Component Cable Warranty Card User's Manual Quick Start Guide These items are missing any items, please contact the Polaroid customer service department. 7 If you are all you need to set up and operate the LCD TV in the package. Package Contents Make sure all of the above contents are included. MODE CAPTION SLEEP P.SIZE MUTE VOL. Make sure all of the following...
INPUT CH. GUIDE EXIT INFO MENU LIST FREEZE FAV.CH TIMER Power Cord VIDEO Cable AUDIO Cable Component Cable Warranty Card User's Manual Quick Start Guide These items are missing any items, please contact the Polaroid customer service department. 7 If you are all you need to set up and operate the LCD TV in the package. Package Contents Make sure all of the above contents are included. MODE CAPTION SLEEP P.SIZE MUTE VOL. Make sure all of the following...
User Guide
Page 10
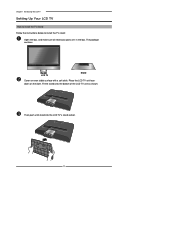
The package contains: LCD TV Stand Cover an even stable surface with a soft cloth. Fit the stand onto the bottom of the LCD TV unit as shown: Then push until stand into the LCD TV's stand socket. 8 Chapter 1 Introducing the LCD TV Setting Up Your LCD TV How to install the TV Stand Follow the instructions below to install the TV stand: Open the box, and make sure all necessary parts are in the box. Place the LCD TV unit facedown on the cloth.
The package contains: LCD TV Stand Cover an even stable surface with a soft cloth. Fit the stand onto the bottom of the LCD TV unit as shown: Then push until stand into the LCD TV's stand socket. 8 Chapter 1 Introducing the LCD TV Setting Up Your LCD TV How to install the TV Stand Follow the instructions below to install the TV stand: Open the box, and make sure all necessary parts are in the box. Place the LCD TV unit facedown on the cloth.
User Guide
Page 13
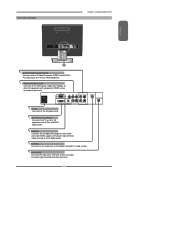
... IN Connects to receive high/standard definition television. 11 VHF/UHF IN Connects RF input from VHF/UHF antenna or cable to the AC power cord. HDMI IN Connects the all digital AV equipment with VGA and AUDIO output jacks. COAXIAL Connects to the audio jack on external video equipment. PC/VGA IN/ PC AUDIO IN Connects the PC, or other AV equipment with component(YPbPr) video and audio output jacks. Rear View and...
... IN Connects to receive high/standard definition television. 11 VHF/UHF IN Connects RF input from VHF/UHF antenna or cable to the AC power cord. HDMI IN Connects the all digital AV equipment with VGA and AUDIO output jacks. COAXIAL Connects to the audio jack on external video equipment. PC/VGA IN/ PC AUDIO IN Connects the PC, or other AV equipment with component(YPbPr) video and audio output jacks. Rear View and...
User Guide
Page 14
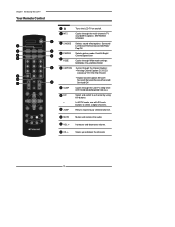
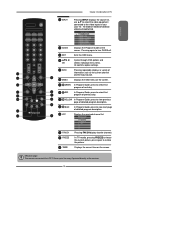
... using 0-9 buttons. LIST FREEZE FAV.CH TIMER 10 MUTE 11 VOL.+- MODE 3 4 CAPTION SLEEP P.SIZE 6 5 7 8 9 10 MUTE 12 11 VOL. INPUT CH. GUIDE EXIT INFO MENU 1 Turns the LCD TV on and off. 22 MTS Cycles through the multi-channels TV sound(MTS) options: SAP/MONO/ STEREO 3 S.MODE Selects sound effect options: Surround/ Live/Dance/Techno/Classic/Soft/Rock/ Pop/Off. 4 P.MODE 5 P.SIZE Selects picture mode: Vivid/Hi-Bright/ Cinema/Sport/User...
... using 0-9 buttons. LIST FREEZE FAV.CH TIMER 10 MUTE 11 VOL.+- MODE 3 4 CAPTION SLEEP P.SIZE 6 5 7 8 9 10 MUTE 12 11 VOL. INPUT CH. GUIDE EXIT INFO MENU 1 Turns the LCD TV on and off. 22 MTS Cycles through the multi-channels TV sound(MTS) options: SAP/MONO/ STEREO 3 S.MODE Selects sound effect options: Surround/ Live/Dance/Techno/Classic/Soft/Rock/ Pop/Off. 4 P.MODE 5 P.SIZE Selects picture mode: Vivid/Hi-Bright/ Cinema/Sport/User...
User Guide
Page 15
...: The remote can control the LCD TV from up to restore the picture. 26 TIMER Displays the current time on the screen. INPUT CH. 13 GUIDE EXIT 14 16 INFO 17 MENU 19 20 LIST FREEZE FAV.CH TIMER 23 24 Chapter 2 Installing the LCD TV 13 INPUT 14 GUIDE Pressing INPUT displays the source list, use ▲▼ to select the video equipment connected to the video inputs of detailed program description. 23 LIST 26 Displays the received channel list Channel List 7-1 KABC...
...: The remote can control the LCD TV from up to restore the picture. 26 TIMER Displays the current time on the screen. INPUT CH. 13 GUIDE EXIT 14 16 INFO 17 MENU 19 20 LIST FREEZE FAV.CH TIMER 23 24 Chapter 2 Installing the LCD TV 13 INPUT 14 GUIDE Pressing INPUT displays the source list, use ▲▼ to select the video equipment connected to the video inputs of detailed program description. 23 LIST 26 Displays the received channel list Channel List 7-1 KABC...
User Guide
Page 18
... program owner. ■ A 75-ohm coaxial cable connector is generally provided to position B allows viewing of cable entry as possible. When connecting the 75-ohm coaxial cable to provide two inputs (A and B). terminal. ■ Some cable TV companies offer premium pay channels are scrambled, a cable TV converter/descrambler is built into the set , connect the 75ohm cable into the ANT. Chapter 2 Installing the LCD TV Cable TV...
... program owner. ■ A 75-ohm coaxial cable connector is generally provided to position B allows viewing of cable entry as possible. When connecting the 75-ohm coaxial cable to provide two inputs (A and B). terminal. ■ Some cable TV companies offer premium pay channels are scrambled, a cable TV converter/descrambler is built into the set , connect the 75ohm cable into the ANT. Chapter 2 Installing the LCD TV Cable TV...
User Guide
Page 20
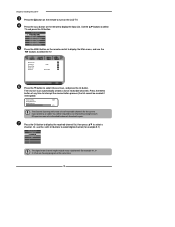
.... Input Source TV(CABLE/AIR) VIDEO1 (AV) VIDEO2 (S-VIDEO) VIDEO3 (YPbPr) VIDEO4 (HDMI) COMPUTER(VGA) Press the MENU button on the LCD TV. The Channel Scan automatically creates a list of available channels from both inputs. Channel Scan Tuner Mode Channel Skip Favorite List Time Zone Cable Eastern Time TV Select Exit Press the ▼ button to select TV and press the OK button. Chapter 2 Installing the LCD TV Press the button on the remote to turn on the remote control to display...
.... Input Source TV(CABLE/AIR) VIDEO1 (AV) VIDEO2 (S-VIDEO) VIDEO3 (YPbPr) VIDEO4 (HDMI) COMPUTER(VGA) Press the MENU button on the LCD TV. The Channel Scan automatically creates a list of available channels from both inputs. Channel Scan Tuner Mode Channel Skip Favorite List Time Zone Cable Eastern Time TV Select Exit Press the ▼ button to select TV and press the OK button. Chapter 2 Installing the LCD TV Press the button on the remote to turn on the remote control to display...
User Guide
Page 21
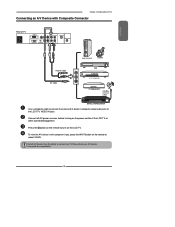
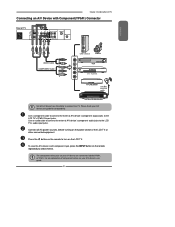
... with component input, press the INPUT button on the LCD TV. Please check your A/V devices user guide for compatibility. 19 Not all AC power sources, before turning on the power switch of TV HDMI IN Y Pb Pr VIDEO IN S-VIDEO IN COAXIAL VHF/UHF IN PC/VGA IN PC AUDIO IN L AUDIO IN R L AUDIO IN R GAME CONSOLE AUDIO Cable AV Cable VIDEO OUT L R D V D PLA YER Use a composite cable to connect the external A/V device's composite video/audio jacks to a TV. To view...
... with component input, press the INPUT button on the LCD TV. Please check your A/V devices user guide for compatibility. 19 Not all AC power sources, before turning on the power switch of TV HDMI IN Y Pb Pr VIDEO IN S-VIDEO IN COAXIAL VHF/UHF IN PC/VGA IN PC AUDIO IN L AUDIO IN R L AUDIO IN R GAME CONSOLE AUDIO Cable AV Cable VIDEO OUT L R D V D PLA YER Use a composite cable to connect the external A/V device's composite video/audio jacks to a TV. To view...
User Guide
Page 23
... to select VIDEO3. Use a component cable to connect the external A/V device's component output jacks to a TV. Press the button on the remote to the LCD TV's audio input jacks. ENGLISH Chapter 2 Installing the LCD TV Connecting an A/V Device with component input, press the INPUT button on your A/V device are sometimes labeled YPbPr, or YCbCr. Use an audio cable to connect the external A/V device's component audio jacks to turn on the power switch of component video, see your A/V device user guide for compatibility. Connect all A/V device...
... to select VIDEO3. Use a component cable to connect the external A/V device's component output jacks to a TV. Press the button on the remote to the LCD TV's audio input jacks. ENGLISH Chapter 2 Installing the LCD TV Connecting an A/V Device with component input, press the INPUT button on your A/V device are sometimes labeled YPbPr, or YCbCr. Use an audio cable to connect the external A/V device's component audio jacks to turn on the power switch of component video, see your A/V device user guide for compatibility. Connect all A/V device...
User Guide
Page 24
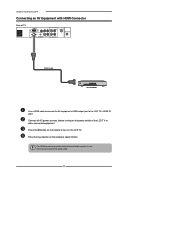
... PC AUDIO IN L AUDIO IN R L AUDIO IN R HDMI Cable AV EQUIPMENT Use a HDMI cable to connect the AV equipment's HDMI output jack to the LCD TV's HDMI IN jacks. The HDMI connector provides both video and audio signals, it's not necessary to select VIDEO4. Connect all AC power sources, before turning on the LCD TV. Press the Input button on the remote to connect the audio cable. 22 Chapter 2 Installing the LCD TV Connecting an AV Equipment with HDMI Connector Rear of the LCD...
... PC AUDIO IN L AUDIO IN R L AUDIO IN R HDMI Cable AV EQUIPMENT Use a HDMI cable to connect the AV equipment's HDMI output jack to the LCD TV's HDMI IN jacks. The HDMI connector provides both video and audio signals, it's not necessary to select VIDEO4. Connect all AC power sources, before turning on the LCD TV. Press the Input button on the remote to connect the audio cable. 22 Chapter 2 Installing the LCD TV Connecting an AV Equipment with HDMI Connector Rear of the LCD...
User Guide
Page 26
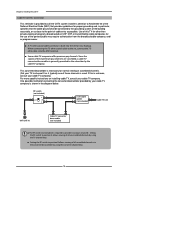
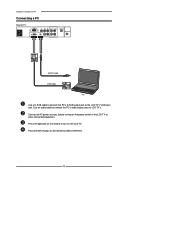
Connect all AC power sources, before turning on the power switch of TV HDMI IN Y Pb Pr VIDEO IN S-VIDEO IN COAXIAL VHF/UHF IN PC/VGA IN PC AUDIO IN L AUDIO IN R L AUDIO IN R AUDIO Cable VGA Cable PC Use a D-SUB cable to connect the PC's D-SUB output jack to LCD TV's. Press the INPUT button on the remote to turn on the remote to select COMPUTER. 24 Press the button on the LCD TV. Chapter 3 Using the LCD TV Connecting a PC Rear of the LCD TV or other connected equipment. Use an audio cable to connect the PC's audio output jacks to the LCD TV's VGA input jack.
Connect all AC power sources, before turning on the power switch of TV HDMI IN Y Pb Pr VIDEO IN S-VIDEO IN COAXIAL VHF/UHF IN PC/VGA IN PC AUDIO IN L AUDIO IN R L AUDIO IN R AUDIO Cable VGA Cable PC Use a D-SUB cable to connect the PC's D-SUB output jack to LCD TV's. Press the INPUT button on the remote to turn on the remote to select COMPUTER. 24 Press the button on the LCD TV. Chapter 3 Using the LCD TV Connecting a PC Rear of the LCD TV or other connected equipment. Use an audio cable to connect the PC's audio output jacks to the LCD TV's VGA input jack.

User Guide
Page 29
... program being shown on the remote control and use the ▲▼ buttons to select first program of previous day. ENGLISH Using the Program Guide Chapter 3 Using the LCD TV The Program Guide feature brings all sorts of detailed program description. The Program information in the guide is provided by the broadcasters. BLUE In Program Guide, press to view next page of information to a television programming source, press the INPUT button on each channel...
... program being shown on the remote control and use the ▲▼ buttons to select first program of previous day. ENGLISH Using the Program Guide Chapter 3 Using the LCD TV The Program Guide feature brings all sorts of detailed program description. The Program information in the guide is provided by the broadcasters. BLUE In Program Guide, press to view next page of information to a television programming source, press the INPUT button on each channel...

User Guide
Page 31
... the menu. 29 Channel Scan Tuner Mode Channel Skip Favorite List Time Zone Cable Eastern Time Chapter 3 Using the LCD TV TV Select Exit SETUP MENU: Allows you to edit and label channels. ENGLISH TV MENU: Allows you to set up a variety of features: Language, Closed Caption, factory reset, Parental Control sleep timer. ▪ If the signal source is TV/VIDOE/S-VIDEO/YPbPr, the SETUP MENU appears as: ▪ If the signal source is HDMI/VGA, the SETUP MENU appears as: OSD Language Time Setup Closed Caption Parental Gamma Reset Default English...
... the menu. 29 Channel Scan Tuner Mode Channel Skip Favorite List Time Zone Cable Eastern Time Chapter 3 Using the LCD TV TV Select Exit SETUP MENU: Allows you to edit and label channels. ENGLISH TV MENU: Allows you to set up a variety of features: Language, Closed Caption, factory reset, Parental Control sleep timer. ▪ If the signal source is TV/VIDOE/S-VIDEO/YPbPr, the SETUP MENU appears as: ▪ If the signal source is HDMI/VGA, the SETUP MENU appears as: OSD Language Time Setup Closed Caption Parental Gamma Reset Default English...
User Guide
Page 33
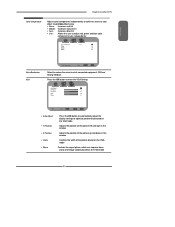
Position ▪ V. Press the OK button to adjust red, green and blue color component levels independently. Position 31 Clock 127 Phase 31 VGA Enter Select Exit ▪ Auto Adjust ▪ H. Position ▪ Clock ▪ Phase Press the OK button to automatically adjust the display settings to reduce the noise level of the picture based on the VGA mode Controls the signal phase, which can improve focus clarity and...
Position ▪ V. Press the OK button to adjust red, green and blue color component levels independently. Position 31 Clock 127 Phase 31 VGA Enter Select Exit ▪ Auto Adjust ▪ H. Position ▪ Clock ▪ Phase Press the OK button to automatically adjust the display settings to reduce the noise level of the picture based on the VGA mode Controls the signal phase, which can improve focus clarity and...
User Guide
Page 36
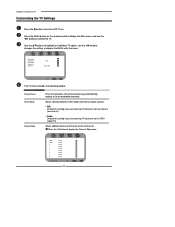
... LCD TV Customizing the TV Settings Press the button to turn the LCD TV on the remote control to display the Main menu, and use the ◄► buttons changes the setting, and press the MENU exits the menu. Use the ▲▼buttons to highlight an individual TV option, use the ◄► buttons to display the Channel Skip menu: 2 ABC 3 DISC 4 5 6 7 8 9 10 Analog Analog Analog Analog Analog Analog Analog Analog Analog Channel Skip Select Back 34 Channel Scan Tuner Mode Channel Skip Favorite List Time Zone Cable Eastern Time...
... LCD TV Customizing the TV Settings Press the button to turn the LCD TV on the remote control to display the Main menu, and use the ◄► buttons changes the setting, and press the MENU exits the menu. Use the ▲▼buttons to highlight an individual TV option, use the ◄► buttons to display the Channel Skip menu: 2 ABC 3 DISC 4 5 6 7 8 9 10 Analog Analog Analog Analog Analog Analog Analog Analog Analog Channel Skip Select Back 34 Channel Scan Tuner Mode Channel Skip Favorite List Time Zone Cable Eastern Time...


