Owner's Manual
Page 2
... - Displaying the rear view camera image 35 How to use this Pioneer product. Important The screens shown in the examples may be changed without notice for performance and function improvements. How to use the navigation menu screens 34 - Unplugging a USB storage device 30 Connecting and disconnecting an iPod 31 - What you have finished reading the instructions, keep this manual in a USB storage device 30 - Switching the map mode 38 PIONEER AVIC-X910BT, AVIC-X710BT for the Tele Atlas Data...
... - Displaying the rear view camera image 35 How to use this Pioneer product. Important The screens shown in the examples may be changed without notice for performance and function improvements. How to use the navigation menu screens 34 - Unplugging a USB storage device 30 Connecting and disconnecting an iPod 31 - What you have finished reading the instructions, keep this manual in a USB storage device 30 - Switching the map mode 38 PIONEER AVIC-X910BT, AVIC-X710BT for the Tele Atlas Data...

Owner's Manual
Page 7
... "System Settings" menu 154 - Displaying the "AV System Settings" menu 163 - Setting the rear output 165 - Contents Customizing preferences The options in the "Navi Settings" menu 143 - Time Settings 144 - Map Settings 145 - Smart Zoom 146 - Warnings 148 - Creating new categories 151 - Selecting the language 155 - Adjusting the screen brightness 157 - Turning off the screen 159 The "AV Sound Settings" menu options 159 - Using the equalizer 160 - Setting video input 1 (AV1) 163 - Changing the wide screen mode 164 - Flow of the touch panel (touch...
... "System Settings" menu 154 - Displaying the "AV System Settings" menu 163 - Setting the rear output 165 - Contents Customizing preferences The options in the "Navi Settings" menu 143 - Time Settings 144 - Map Settings 145 - Smart Zoom 146 - Warnings 148 - Creating new categories 151 - Selecting the language 155 - Adjusting the screen brightness 157 - Turning off the screen 159 The "AV Sound Settings" menu options 159 - Using the equalizer 160 - Setting video input 1 (AV1) 163 - Changing the wide screen mode 164 - Flow of the touch panel (touch...
Owner's Manual
Page 8
... 209 Specifications 212 Settings Menu 205 - Contents - Forgotten passwords 173 Returning the navigation system to cause noticeable positioning errors 188 Route setting information 189 - Setting items to be deleted 175 Appendix Troubleshooting 177 Messages and how to react to hands-free phoning 171 Tips for audio functions 183 Positioning technology 186 - DVD-Video and CD 192 - Handling the LCD screen 202 - Setting the password 173 - DTS sound 192 8 En Detailed information for playing a disc...
... 209 Specifications 212 Settings Menu 205 - Contents - Forgotten passwords 173 Returning the navigation system to cause noticeable positioning errors 188 Route setting information 189 - Setting items to be deleted 175 Appendix Troubleshooting 177 Messages and how to react to hands-free phoning 171 Tips for audio functions 183 Positioning technology 186 - DVD-Video and CD 192 - Handling the LCD screen 202 - Setting the password 173 - DTS sound 192 8 En Detailed information for playing a disc...
Owner's Manual
Page 23
... apply to use this product without making advance contact. ! Using this function for repair without running the engine can drain the battery. Rear view camera With an optional rear view camera, you purchased the product for connection of Canada, Inc. CUSTOMER SUPPORT DIVISION P.O. En 23 WARNING ! CAUTION ! tion is for aftersales service (including warranty conditions) or any other information. Do not use the navigation system as an aid to watch video images while...
... apply to use this product without making advance contact. ! Using this function for repair without running the engine can drain the battery. Rear view camera With an optional rear view camera, you purchased the product for connection of Canada, Inc. CUSTOMER SUPPORT DIVISION P.O. En 23 WARNING ! CAUTION ! tion is for aftersales service (including warranty conditions) or any other information. Do not use the navigation system as an aid to watch video images while...
Owner's Manual
Page 24
... the "Front Display". Touch panel keys that is connected to this navigation unit will help you greatly as loss or theft. 2 Receive updates on page 154. Familiarity with an RCA cable, such as the "Rear Display". "Video image" "Video image" in this manual indicates moving on, take a few minutes to read the following information about the conventions used in this navigation unit will be referred to this manual, the screen that are...
... the "Front Display". Touch panel keys that is connected to this navigation unit will help you greatly as loss or theft. 2 Receive updates on page 154. Familiarity with an RCA cable, such as the "Rear Display". "Video image" "Video image" in this manual indicates moving on, take a few minutes to read the following information about the conventions used in this navigation unit will be referred to this manual, the screen that are...
Owner's Manual
Page 26
... LCD screen to using a cellular phone, keep the antenna of the video in LCD screen malfunction due to operate properly. ! p When using this product for the AV source without clearing all the navigation function items. Please refer to the related section before you operate this product is disconnected or discharged, the memory will be erased and must be problems with this navigation system, refer to the default or factory settings...
... LCD screen to using a cellular phone, keep the antenna of the video in LCD screen malfunction due to operate properly. ! p When using this product for the AV source without clearing all the navigation function items. Please refer to the related section before you operate this product is disconnected or discharged, the memory will be erased and must be problems with this navigation system, refer to the default or factory settings...

Owner's Manual
Page 31
... boot up the system. Flow from startup to termination CAUTION For safety reasons, the rear view camera function is usually not possible to terminate the system. To AV input on our website. Pioneer accepts no data is also turned off the vehicle engine to recover the data. En 31 p Connection via USB hub is not possible. 2 Connect your iPod % Pull out the USB interface cable for iPod after checking...
... boot up the system. Flow from startup to termination CAUTION For safety reasons, the rear view camera function is usually not possible to terminate the system. To AV input on our website. Pioneer accepts no data is also turned off the vehicle engine to recover the data. En 31 p Connection via USB hub is not possible. 2 Connect your iPod % Pull out the USB interface cable for iPod after checking...
Owner's Manual
Page 75
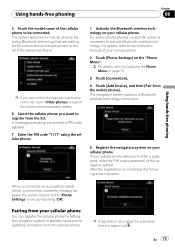
... specific action is completed, the following screen appears. After the registration is necessary to the "Phone Settings" menu by setting the navigation system to be connected. For details, refer to the instruction manual of your cellular phone. 2 Touch [Phone Settings] on your cellular phone asks you to enter a password, enter the PIN code (password) of the navigation system. If your cellular phone. En 75 A message prompting you to enter a PIN code appears. 7 Enter the PIN code "1111" using the cellular phone. 1 Activate the Bluetooth...
... specific action is completed, the following screen appears. After the registration is necessary to the "Phone Settings" menu by setting the navigation system to be connected. For details, refer to the instruction manual of your cellular phone. 2 Touch [Phone Settings] on your cellular phone asks you to enter a password, enter the PIN code (password) of the navigation system. If your cellular phone. En 75 A message prompting you to enter a PIN code appears. 7 Enter the PIN code "1111" using the cellular phone. 1 Activate the Bluetooth...

Owner's Manual
Page 84
... the volume level for a device name. The registered name appears if the phone number of the functions on a phone, you answer the phone by using Bluetooth wireless technology, this navigation system. ! Press the MAP button. - Calls made or editing performed only on the other end of the received call appears. ! The cellular phone used must be performed. ! This may not produce a ring sound. ! The received call history. ! Connection to all...
... the volume level for a device name. The registered name appears if the phone number of the functions on a phone, you answer the phone by using Bluetooth wireless technology, this navigation system. ! Press the MAP button. - Calls made or editing performed only on the other end of the received call appears. ! The cellular phone used must be performed. ! This may not produce a ring sound. ! The received call history. ! Connection to all...
Owner's Manual
Page 85
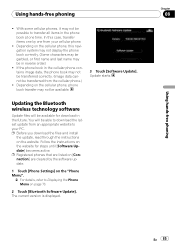
... reverse order.) ! p Registered phones that are listed on [Connection] are cleared by one time. The current version is displayed. Using hands-free phoning Chapter 08 En 85 Follow the instructions on page 73. 2 Touch [Bluetooth Software Update]. Depending on the cellular phone, this case, transfer items one by the software update. 1 Touch [Phone Settings] on the "Phone Menu". = For details, refer to download the latest update from your PC. Update starts. Updating the Bluetooth wireless technology software Update files...
... reverse order.) ! p Registered phones that are listed on [Connection] are cleared by one time. The current version is displayed. Using hands-free phoning Chapter 08 En 85 Follow the instructions on page 73. 2 Touch [Bluetooth Software Update]. Depending on the cellular phone, this case, transfer items one by the software update. 1 Touch [Phone Settings] on the "Phone Menu". = For details, refer to download the latest update from your PC. Update starts. Updating the Bluetooth wireless technology software Update files...
Owner's Manual
Page 104
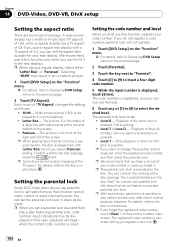
A wide screen display has a width-to input a four digit code number. 5 While the input number is dis- scan system, the disc is set. ! You can set the parental lock level in an unnatural picture. 1 Touch [DVD Setup] on the "Function" menu. = For details, refer to change the parental level already set restrictions so that do not register a code number, parental lock will begin when the correct code number is (initial setting) ! The parental lock level is played back with...
A wide screen display has a width-to input a four digit code number. 5 While the input number is dis- scan system, the disc is set. ! You can set the parental lock level in an unnatural picture. 1 Touch [DVD Setup] on the "Function" menu. = For details, refer to change the parental level already set restrictions so that do not register a code number, parental lock will begin when the correct code number is (initial setting) ! The parental lock level is played back with...

Owner's Manual
Page 143
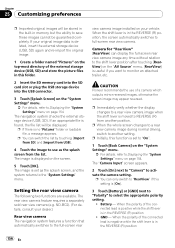
..." screen appears. The "Navi Settings" menu appears. 3 Touch [Sound settings]. En 143 The "Sound settings" menu appears. 4 Use the tool assigned to the desired option to change the settings. 1 23 1 Slider Change the value by touching the desired point on the bar or dragging the slider to the desired point. 2 Detailed setup key Displays the screen for the navigation guidance and beep is being received from. % Touch [GPS & Time Settings] on the "Navi Settings" menu. A method for changing the volume setting...
..." screen appears. The "Navi Settings" menu appears. 3 Touch [Sound settings]. En 143 The "Sound settings" menu appears. 4 Use the tool assigned to the desired option to change the settings. 1 23 1 Slider Change the value by touching the desired point on the bar or dragging the slider to the desired point. 2 Detailed setup key Displays the screen for the navigation guidance and beep is being received from. % Touch [GPS & Time Settings] on the "Navi Settings" menu. A method for changing the volume setting...

Owner's Manual
Page 144
... you set the time manually. 1 Touch [GPS & Time Settings] on "Time Zone" and "Time". ! Available options; ! Touch the key to the appropriate time zone. "Auto Correction" Synchronizes the internal clock of this navigation system with GPS reception. Chapter 25 Customizing preferences 1 2 3 45 1 Positions of the GPS constellation being received by changing the time zone automatically according to this system's whereabouts. [Off]: Corrects the current time according to the settings on the "Navi Settings" menu. Color Green Yellow Red Black...
... you set the time manually. 1 Touch [GPS & Time Settings] on "Time Zone" and "Time". ! Available options; ! Touch the key to the appropriate time zone. "Auto Correction" Synchronizes the internal clock of this navigation system with GPS reception. Chapter 25 Customizing preferences 1 2 3 45 1 Positions of the GPS constellation being received by changing the time zone automatically according to this system's whereabouts. [Off]: Corrects the current time according to the settings on the "Navi Settings" menu. Color Green Yellow Red Black...
Owner's Manual
Page 156
... REVERSE (R) from USB]. 4 Touch the image to use of the connected lead is positive while the shift lever is no "Pictures" folder or loadable file, a message appears. p You can only switch to "RearView" if this function is in the REVERSE (R) position, the screen automatically switches to full-screen rear view camera. The rear view camera feature requires a separately sold rear view camera (e.g. p Initially, this setting is useful if you want to activate the camera setting. p You can display the full-screen rear view camera image any time...
... REVERSE (R) from USB]. 4 Touch the image to use of the connected lead is positive while the shift lever is no "Pictures" folder or loadable file, a message appears. p You can only switch to "RearView" if this function is in the REVERSE (R) position, the screen automatically switches to full-screen rear view camera. The rear view camera feature requires a separately sold rear view camera (e.g. p Initially, this setting is useful if you want to activate the camera setting. p You can display the full-screen rear view camera image any time...
Owner's Manual
Page 177
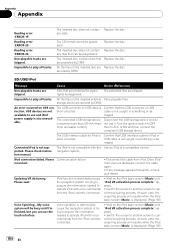
... Department of GPS signals. The fuse is in microprocessor to operate incorrectly. Be very sure to install a correct fuse with the navigation screen Symptom Cause Action (Reference) The power doesn't turn on the map without a significant satellites is not comprehensive, it should answer your most common problems are properly connected. Keep signal quality may lead to greater positioning errors.) -If a vehicle phone or cellular phone is...
... Department of GPS signals. The fuse is in microprocessor to operate incorrectly. Be very sure to install a correct fuse with the navigation screen Symptom Cause Action (Reference) The power doesn't turn on the map without a significant satellites is not comprehensive, it should answer your most common problems are properly connected. Keep signal quality may lead to greater positioning errors.) -If a vehicle phone or cellular phone is...
Owner's Manual
Page 178
... switch automatically between daytime and nighttime. [Night mode] is a problem with MULTI-CON- There is set on the backlight. (Page 159) The source disc being listened to "Installation Manual".) Indication of the position of the LCD panel is selected. (Page 145) Check the connection. Check whether or not the reverse gear signal input lead (violet) is connected properly. (The navigation system works properly without a significant positioning error. Turn the volume...
... switch automatically between daytime and nighttime. [Night mode] is a problem with MULTI-CON- There is set on the backlight. (Page 159) The source disc being listened to "Installation Manual".) Indication of the position of the LCD panel is selected. (Page 145) Check the connection. Check whether or not the reverse gear signal input lead (violet) is connected properly. (The navigation system works properly without a significant positioning error. Turn the volume...

Owner's Manual
Page 179
... the file format. not be played Replace the disc. Connect the parking brake lead correctly, and apply the parking brake. erly.) (Page 31) The audio or video skips. No sounds are not connected correctly. The USB storage device has been Park your touch for [Back Camera]. (Page 156) There is not con- off removed immediately after plugging the engine. Insert the disc with DVD-Video. back. is no sound on fast reverse or forward. The system is...
... the file format. not be played Replace the disc. Connect the parking brake lead correctly, and apply the parking brake. erly.) (Page 31) The audio or video skips. No sounds are not connected correctly. The USB storage device has been Park your touch for [Back Camera]. (Page 156) There is not con- off removed immediately after plugging the engine. Insert the disc with DVD-Video. back. is no sound on fast reverse or forward. The system is...
Owner's Manual
Page 184
... check instruction manual. Updating VR dictionary. Appendix Appendix Reading error (ERROR-15) Reading error (ERROR-23) Reading error (ERROR-22) Non-playable tracks are Replace the disc. any data. USB cable is trying to acquire the information needed to play all tracks. navigation system. Please wait. appears. • Switch the screen to another screen to use it. The inserted disc does not contain Replace the disc. are protected by DRM. The connected USB storage device Disconnect the USB storage device and...
... check instruction manual. Updating VR dictionary. Appendix Appendix Reading error (ERROR-15) Reading error (ERROR-23) Reading error (ERROR-22) Non-playable tracks are Replace the disc. any data. USB cable is trying to acquire the information needed to play all tracks. navigation system. Please wait. appears. • Switch the screen to another screen to use it. The inserted disc does not contain Replace the disc. are protected by DRM. The connected USB storage device Disconnect the USB storage device and...
Installation Manual
Page 2
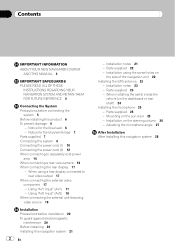
... steering column 26 - Parts supplied 22 - Installation notes 23 - Installation using a rear display connected to separately sold power amp 14 When connecting a rear view camera 16 When connecting the rear display 17 - Parts supplied 25 - Using "AV1 Input" (AV1) 17 - Using "AV2 Input" (AV2) 18 When connecting the external unit featuring video source 19 Installation Precautions before connecting the system 5 Before installing this product 6 To prevent damage 6 - Mounting on the side of the navigation unit 22 Installing the GPS antenna 23 - When using the screw holes...
... steering column 26 - Parts supplied 22 - Installation notes 23 - Installation using a rear display connected to separately sold power amp 14 When connecting a rear view camera 16 When connecting the rear display 17 - Parts supplied 25 - Using "AV1 Input" (AV1) 17 - Using "AV2 Input" (AV2) 18 When connecting the external unit featuring video source 19 Installation Precautions before connecting the system 5 Before installing this product 6 To prevent damage 6 - Mounting on the side of the navigation unit 22 Installing the GPS antenna 23 - When using the screw holes...

Installation Manual
Page 6
... colored port, i.e., blue connector to the blue port, black to control the antenna of the rating prescribed on the ignition switch. Since a unique BPTL circuit is output through the blue lead to black, etc. ! If the RCA pin jack on changing [Ant CTRL] mode, refer to your vehicle. A signal is employed, do not remove the caps attached to another source. - Turn the source off the ignition switch (ACC OFF) ! Turn off - Section 03 Connecting the System...
... colored port, i.e., blue connector to the blue port, black to control the antenna of the rating prescribed on the ignition switch. Since a unique BPTL circuit is output through the blue lead to black, etc. ! If the RCA pin jack on changing [Ant CTRL] mode, refer to your vehicle. A signal is employed, do not remove the caps attached to another source. - Turn the source off the ignition switch (ACC OFF) ! Turn off - Section 03 Connecting the System...


