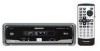
Owner's Manual
Page 4
Precaution - Preventing the Battery from Becoming Exhausted - Changing the Mode Switch Setting - What the Marks on DVDs Indicate - Disc Organization Main Features of This Product 10 Care of This Player - This Product Using the Remote Controller 15 - Specifying Chapter - Still Playback - and Canadian Models ii - About This Product - About This Product - How to the Next...
Precaution - Preventing the Battery from Becoming Exhausted - Changing the Mode Switch Setting - What the Marks on DVDs Indicate - Disc Organization Main Features of This Product 10 Care of This Player - This Product Using the Remote Controller 15 - Specifying Chapter - Still Playback - and Canadian Models ii - About This Product - About This Product - How to the Next...
Owner's Manual
Page 5
... Setting the Parental Lock (PARENTAL) .... 43 - Selecting Audio, Subtitle and Angle Operating with the Information Display of a DVD 32 - Setting Scan Play Changing Initial Settings 37 Calling up Information Displays 29 Operating with the Information Display of... - Selecting Repeat Range - Searching for Digital Output (DIGITAL OUTPUT 48 Setting Digital and Analog Audio Output (OUTPUT SELECTION 49 Setting Remote Control Code Type (REMOTE CODE SELECT 50 Others 51 Operating with the Head Unit 51 - Changing the Level Setting Aspect Ratio (TV ASPECT 46 Setting Angle...
... Setting the Parental Lock (PARENTAL) .... 43 - Selecting Audio, Subtitle and Angle Operating with the Information Display of a DVD 32 - Setting Scan Play Changing Initial Settings 37 Calling up Information Displays 29 Operating with the Information Display of... - Selecting Repeat Range - Searching for Digital Output (DIGITAL OUTPUT 48 Setting Digital and Analog Audio Output (OUTPUT SELECTION 49 Setting Remote Control Code Type (REMOTE CODE SELECT 50 Others 51 Operating with the Head Unit 51 - Changing the Level Setting Aspect Ratio (TV ASPECT 46 Setting Angle...
Owner's Manual
Page 16
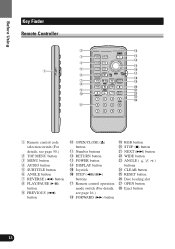
...r AUDIO RTN !5 t S.TITLE DISP !6 y ANGLE BSSM/ BAND DVD TV ch call !7 !8 u RGB !9 i MENU V.SEL @0 o REAR @1 !0 WIDE @2 OPEN/CLOSE ANGLE @3 1 2 3 C @4 CLEAR !1 4 5 6 10 7 8 9 0 q Remote control code selection switch (For details, see page 50.) w TOP MENU ...PREVIOUS (4) button !0 OPEN/CLOSE (0) button !1 Number buttons !2 RETURN button !3 POWER button !4 DISPLAY button !5 Joystick !6 STEP (e)/(E) buttons !7 Remote control operation mode switch (For details, see page 16.) !8 FORWARD (¡) button !9 RGB button @0 STOP (7) button @1 NEXT (¢) button...
...r AUDIO RTN !5 t S.TITLE DISP !6 y ANGLE BSSM/ BAND DVD TV ch call !7 !8 u RGB !9 i MENU V.SEL @0 o REAR @1 !0 WIDE @2 OPEN/CLOSE ANGLE @3 1 2 3 C @4 CLEAR !1 4 5 6 10 7 8 9 0 q Remote control code selection switch (For details, see page 50.) w TOP MENU ...PREVIOUS (4) button !0 OPEN/CLOSE (0) button !1 Number buttons !2 RETURN button !3 POWER button !4 DISPLAY button !5 Joystick !6 STEP (e)/(E) buttons !7 Remote control operation mode switch (For details, see page 16.) !8 FORWARD (¡) button !9 RGB button @0 STOP (7) button @1 NEXT (¢) button...
Owner's Manual
Page 18
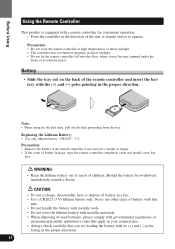
... pedal. CAUTION: • Do not recharge, disassemble, heat or dispose of battery in direct sunlight. • Do not let the remote controller fall onto the floor, where it may not function properly in a fire. • Use a CR2025 (3 V) lithium battery only. ...Battery • Slide the tray out on the back of the remote controller and insert the battery with a remote controller for convenient operation. • Point the controller in the proper direction. Before Using Using the Remote Controller This product is not used batteries, please comply with governmental regulations ...
... pedal. CAUTION: • Do not recharge, disassemble, heat or dispose of battery in direct sunlight. • Do not let the remote controller fall onto the floor, where it may not function properly in a fire. • Use a CR2025 (3 V) lithium battery only. ...Battery • Slide the tray out on the back of the remote controller and insert the battery with a remote controller for convenient operation. • Point the controller in the proper direction. Before Using Using the Remote Controller This product is not used batteries, please comply with governmental regulations ...
Owner's Manual
Page 19
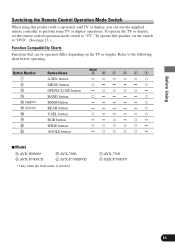
...Only when the front mode is selected. Before Using Switching the Remote Control Operation Mode Switch When using this product, set the remote control operation mode switch to "TV". To operate the TV or display, set the switch to "DVD". (See page 13.) Function Compatibility Charts Functions that can use ...the supplied remote controller to the following chart before operating. Refer to perform some TV or display operations. C:AVX-7300 F:GEX-...
...Only when the front mode is selected. Before Using Switching the Remote Control Operation Mode Switch When using this product, set the remote control operation mode switch to "TV". To operate the TV or display, set the switch to "DVD". (See page 13.) Function Compatibility Charts Functions that can use ...the supplied remote controller to the following chart before operating. Refer to perform some TV or display operations. C:AVX-7300 F:GEX-...
Owner's Manual
Page 32
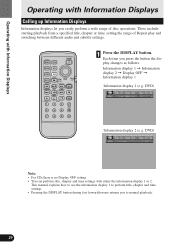
...the button the display changes as follows: Information display 1 = Information display 2 = Display OFF = Information display 1 Information display 1 (e.g. DVD) Note: • For CDs there is no Display OFF setting. • You can perform title, chapter and time settings with Information ... of disc operations. MENU AUDIO TOP MENU RTN POWER S.TITLE ANGLE DISP BSSM/ BAND DVD TV ch call RGB MENU V.SEL REAR OPEN/CLOSE 1 ANGLE 2 3 4 5 6 7 8 9 WIDE C CLEAR 10 0 REMOTE CONTROLLER 1 Press the DISPLAY button. This manual explains how to use the information display 1 ...
...the button the display changes as follows: Information display 1 = Information display 2 = Display OFF = Information display 1 Information display 1 (e.g. DVD) Note: • For CDs there is no Display OFF setting. • You can perform title, chapter and time settings with Information ... of disc operations. MENU AUDIO TOP MENU RTN POWER S.TITLE ANGLE DISP BSSM/ BAND DVD TV ch call RGB MENU V.SEL REAR OPEN/CLOSE 1 ANGLE 2 3 4 5 6 7 8 9 WIDE C CLEAR 10 0 REMOTE CONTROLLER 1 Press the DISPLAY button. This manual explains how to use the information display 1 ...
Owner's Manual
Page 40
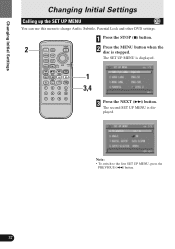
.... The second SET UP MENU is stopped. MENU AUDIO TOP MENU RTN POWER S.TITLE ANGLE DISP BSSM/ BAND DVD TV ch call RGB MENU V.SEL REAR OPEN/CLOSE 1 ANGLE 23 4 5 6 WIDE C CLEAR 10 7 8 9 0 REMOTE CONTROLLER 1 Press the STOP (7) button. 2 Press the MENU button when the disc is displayed. The SET UP MENU is...
.... The second SET UP MENU is stopped. MENU AUDIO TOP MENU RTN POWER S.TITLE ANGLE DISP BSSM/ BAND DVD TV ch call RGB MENU V.SEL REAR OPEN/CLOSE 1 ANGLE 23 4 5 6 WIDE C CLEAR 10 7 8 9 0 REMOTE CONTROLLER 1 Press the STOP (7) button. 2 Press the MENU button when the disc is displayed. The SET UP MENU is...
Owner's Manual
Page 53
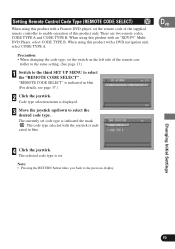
... TYPE A. Precaution: • When changing the code type, set the remote code of the supplied remote controller to select the desired code type. Setting Remote Control Code Type (REMOTE CODE SELECT) VD When using this product with a Pioneer DVD player, set the switch on the left side of the remote con- When using this product with an "XDV-P9" Multi-
... TYPE A. Precaution: • When changing the code type, set the remote code of the supplied remote controller to select the desired code type. Setting Remote Control Code Type (REMOTE CODE SELECT) VD When using this product with a Pioneer DVD player, set the switch on the left side of the remote con- When using this product with an "XDV-P9" Multi-
Owner's Manual
Page 55
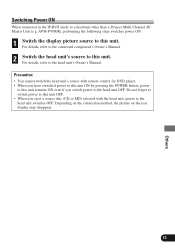
... connected component's Owner's Manual. 2 Switch the head unit's source to the head unit switches OFF. For details, refer to a head unit other than a Pioneer Multi-Channel AV Master Unit (e.g. Do not forget to switch power to this unit remains ON even if you eject a source disc (CD or MD...ON When connected in the IP-BUS mode to the head unit's Owner's Manual. Precaution • You cannot switch the head unit's source with remote control for DVD player. • When you have switched power to this unit ON by pressing the POWER button, power to this unit OFF. • When you switch...
... connected component's Owner's Manual. 2 Switch the head unit's source to the head unit switches OFF. For details, refer to a head unit other than a Pioneer Multi-Channel AV Master Unit (e.g. Do not forget to switch power to this unit remains ON even if you eject a source disc (CD or MD...ON When connected in the IP-BUS mode to the head unit's Owner's Manual. Precaution • You cannot switch the head unit's source with remote control for DVD player. • When you have switched power to this unit ON by pressing the POWER button, power to this unit OFF. • When you switch...
Owner's Manual
Page 56
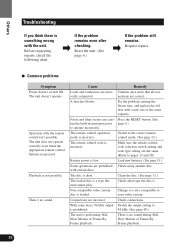
... doesn't operate. rectly connected. Noise and other factors are the same. (Refer to pages 13 and 50). Make sure the remote control code selection switch setting and code type setting are caus- Load new batteries. (See page 15.) Some operations are incorrect. Check...unit cannot play. The unit does not operate correctly even when the appropriate remote control buttons are incor- With some discs, 96 kHz output Switch the output setting to the correct remote control mode. (See page 13.) The remote control code is incorrect. There's no sound during Still, Slow Motion or ...
... doesn't operate. rectly connected. Noise and other factors are the same. (Refer to pages 13 and 50). Make sure the remote control code selection switch setting and code type setting are caus- Load new batteries. (See page 15.) Some operations are incorrect. Check...unit cannot play. The unit does not operate correctly even when the appropriate remote control buttons are incor- With some discs, 96 kHz output Switch the output setting to the correct remote control mode. (See page 13.) The remote control code is incorrect. There's no sound during Still, Slow Motion or ...
Other Manual
Page 2
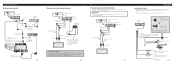
...Fig. 4 When Using a Display Connected Rear Video Output This product's rear video output is not possible, use a rear display, be connected to watch the DVD or Video CD. IP-BUS White (audio output (Left)) STAND ALONE Red (audio output (Right)) This product Yellow (rear video output) RCA cable (... sure to install this product in the dashboard, and the long cord when installing it is installed in a location where reception of the remote control signal is for passengers in a location that enables the Driver to the power supply side of the parking brake switch depends on the floor...
...Fig. 4 When Using a Display Connected Rear Video Output This product's rear video output is not possible, use a rear display, be connected to watch the DVD or Video CD. IP-BUS White (audio output (Left)) STAND ALONE Red (audio output (Right)) This product Yellow (rear video output) RCA cable (... sure to install this product in the dashboard, and the long cord when installing it is installed in a location where reception of the remote control signal is for passengers in a location that enables the Driver to the power supply side of the parking brake switch depends on the floor...


