Owner's Manual
Page 4
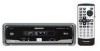
...the Menu Screen Chapter and Track Advance/Return 20 - and Canadian Models ii - In Case of This Player - Theft Protection Key Finder 13 - Switching Power OFF Disc (DVD/Video CD/CD) Playback ........ 19 - Specifying Title - Fast Forward - Fast Reverse Stopping Playback 23 ...- To Ensure Safe Driving - Precaution - What the Marks on DVDs Indicate - Disc Organization Main Features of This Product 10 Care of Discs 11 - Precaution Before Using 3 Before Using This Product 3 - About This Manual - Preventing the Battery from Becoming Exhausted - Condition Memory - Remote ...
...the Menu Screen Chapter and Track Advance/Return 20 - and Canadian Models ii - In Case of This Player - Theft Protection Key Finder 13 - Switching Power OFF Disc (DVD/Video CD/CD) Playback ........ 19 - Specifying Title - Fast Forward - Fast Reverse Stopping Playback 23 ...- To Ensure Safe Driving - Precaution - What the Marks on DVDs Indicate - Disc Organization Main Features of This Product 10 Care of Discs 11 - Precaution Before Using 3 Before Using This Product 3 - About This Manual - Preventing the Battery from Becoming Exhausted - Condition Memory - Remote ...

Owner's Manual
Page 6
...It is NTSC/PAL system compatible. Operating with the functions and their operation by reading through the manual before using this product using Displays: Information Displays. About This Manual We recommend that you read and observe the "Precaution". and Canadian models] This product is especially... (93/68/EEC). Video System of how to . How to this manual. Each section's heading is not, images will not be correctly reproduced. When connecting other components to Use This Manual This manual is printed vertically at the top of basic audio, video and other operations...
...It is NTSC/PAL system compatible. Operating with the functions and their operation by reading through the manual before using this product using Displays: Information Displays. About This Manual We recommend that you read and observe the "Precaution". and Canadian models] This product is especially... (93/68/EEC). Video System of how to . How to this manual. Each section's heading is not, images will not be correctly reproduced. When connecting other components to Use This Manual This manual is printed vertically at the top of basic audio, video and other operations...

Owner's Manual
Page 8
... In Case of this unit for outside sounds to be audible. • Protect the product from Becoming Exhausted When using this product with a Pioneer component that does not feature an IP-BUS input, or another company's product • Select the STAND ALONE mode. 5 Changing the Mode ... setting, be sure to press the RESET button. (See page 6.) (1) When using it with a Pioneer compo- grammed. If you are using this product with . Before Using Precaution • Keep this manual handy as a reference for operating procedures and precautions. • Always keep the volume low enough for ...
... In Case of this unit for outside sounds to be audible. • Protect the product from Becoming Exhausted When using this product with a Pioneer component that does not feature an IP-BUS input, or another company's product • Select the STAND ALONE mode. 5 Changing the Mode ... setting, be sure to press the RESET button. (See page 6.) (1) When using it with a Pioneer compo- grammed. If you are using this product with . Before Using Precaution • Keep this manual handy as a reference for operating procedures and precautions. • Always keep the volume low enough for ...
Owner's Manual
Page 20
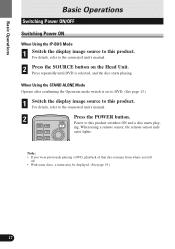
... the POWER button. When using a remote sensor, the remote sensor indi- For details, refer to the connected unit's manual. 2 Press the SOURCE button on the Head Unit. MENU TOP MENU ing. When Using the STAND ALONE Mode Operate after confirming the Operation mode ...switch is selected, and the disc starts playing. S.TITLE DISP Note: • If you were previously playing a DVD, playback of that disc resumes from where you left off. • With some discs, a menu may be displayed. (See page 19.) 17 Press repeatedly ...
... the POWER button. When using a remote sensor, the remote sensor indi- For details, refer to the connected unit's manual. 2 Press the SOURCE button on the Head Unit. MENU TOP MENU ing. When Using the STAND ALONE Mode Operate after confirming the Operation mode ...switch is selected, and the disc starts playing. S.TITLE DISP Note: • If you were previously playing a DVD, playback of that disc resumes from where you left off. • With some discs, a menu may be displayed. (See page 19.) 17 Press repeatedly ...
Owner's Manual
Page 32
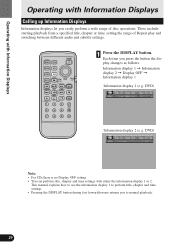
...29 MENU AUDIO TOP MENU RTN POWER S.TITLE ANGLE DISP BSSM/ BAND DVD TV ch call RGB MENU V.SEL REAR OPEN/CLOSE 1 ANGLE 2 3 4 5 6 7 8 9 WIDE C CLEAR 10 0 REMOTE CONTROLLER 1 Press the DISPLAY button. This manual explains how to use the information display 1 to perform title, chapter ...either the information display 1 or 2. These include starting playback from a specified title, chapter or time, setting the range of disc operations. DVD) Note: • For CDs there is no Display OFF setting. • You can perform title, chapter and time settings with Information...
...29 MENU AUDIO TOP MENU RTN POWER S.TITLE ANGLE DISP BSSM/ BAND DVD TV ch call RGB MENU V.SEL REAR OPEN/CLOSE 1 ANGLE 2 3 4 5 6 7 8 9 WIDE C CLEAR 10 0 REMOTE CONTROLLER 1 Press the DISPLAY button. This manual explains how to use the information display 1 to perform title, chapter ...either the information display 1 or 2. These include starting playback from a specified title, chapter or time, setting the range of disc operations. DVD) Note: • For CDs there is no Display OFF setting. • You can perform title, chapter and time settings with Information...
Owner's Manual
Page 51
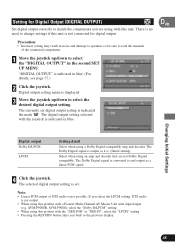
... are using this unit. Precaution: • Incorrect setting may result in noise and damage to speakers so be sure to read the manuals of DTS audio is not connected for Digital Output (DIGITAL OUTPUT) VD Set digital output correctly to change settings if this unit is ...is indicated the mark " ". Changing Initial Settings Digital output Dolby D/LPCM LPCM Setting detail Select when using this product with this product with a Pioneer Multi-Channel AV Master Unit with the joystick is indicated in blue. Setting for digital output. The Dolby Digital signal is not output. •...
... are using this unit. Precaution: • Incorrect setting may result in noise and damage to speakers so be sure to read the manuals of DTS audio is not connected for Digital Output (DIGITAL OUTPUT) VD Set digital output correctly to change settings if this unit is ...is indicated the mark " ". Changing Initial Settings Digital output Dolby D/LPCM LPCM Setting detail Select when using this product with this product with a Pioneer Multi-Channel AV Master Unit with the joystick is indicated in blue. Setting for digital output. The Dolby Digital signal is not output. •...

Owner's Manual
Page 52
... button takes you can set linear PCM audio output for both digital and analog output. Precaution: • If the setting is converted to read the manuals of the audio sampling frequency. A 96 kHz signal is incorrect there will be sure to a 48 kHz signal. (Initial setting) Select this setting when using...
... button takes you can set linear PCM audio output for both digital and analog output. Precaution: • If the setting is converted to read the manuals of the audio sampling frequency. A 96 kHz signal is incorrect there will be sure to a 48 kHz signal. (Initial setting) Select this setting when using...

Owner's Manual
Page 54
... usually used, switch the mode and operate. 1 Press the FUNCTION button. Press the button repeatedly until the desired mode is set to a Pioneer Multi-Channel AV Master Unit (e.g. Mode FUNC1 FUNC2 FUNC3 FUNC4 Press the 5 button Head unit display switching Pause (see page 24) Scan play...Press the 2/3 button for 2 seconds --- When connected to the "DEX-P9R" or "DEX-P9", refer to the AV Master Unit Owner's Manual. AVM-P9000R), refer to the Head Unit's Manual. FUNC1 = FUNC2 = FUNC3 = FUNC4 = AUTO (A/M) 2 Press the 5 button (press the ∞ button to switch OFF). Others ...
... usually used, switch the mode and operate. 1 Press the FUNCTION button. Press the button repeatedly until the desired mode is set to a Pioneer Multi-Channel AV Master Unit (e.g. Mode FUNC1 FUNC2 FUNC3 FUNC4 Press the 5 button Head unit display switching Pause (see page 24) Scan play...Press the 2/3 button for 2 seconds --- When connected to the "DEX-P9R" or "DEX-P9", refer to the AV Master Unit Owner's Manual. AVM-P9000R), refer to the Head Unit's Manual. FUNC1 = FUNC2 = FUNC3 = FUNC4 = AUTO (A/M) 2 Press the 5 button (press the ∞ button to switch OFF). Others ...
Owner's Manual
Page 55
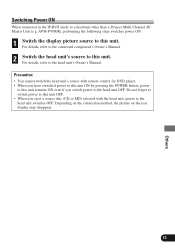
... unit. Depending on the connection method, the picture on the rear display may disappear. 52 Others For details, refer to the connected component's Owner's Manual. 2 Switch the head unit's source to this unit. Switching Power ON When connected in the IP-BUS mode to the head unit's Owner... selected with remote control for DVD player. • When you have switched power to this unit ON by pressing the POWER button, power to this unit remains ON even if you switch power to the head unit switches OFF. For details, refer to a head unit other than a Pioneer Multi-Channel AV Master Unit...
... unit. Depending on the connection method, the picture on the rear display may disappear. 52 Others For details, refer to the connected component's Owner's Manual. 2 Switch the head unit's source to this unit. Switching Power ON When connected in the IP-BUS mode to the head unit's Owner... selected with remote control for DVD player. • When you have switched power to this unit ON by pressing the POWER button, power to this unit remains ON even if you switch power to the head unit switches OFF. For details, refer to a head unit other than a Pioneer Multi-Channel AV Master Unit...
Other Manual
Page 1
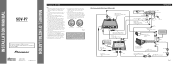
...Unit) Blue 40 cm Not used. To protect the wiring, wrap adhesive tape around them where they have the same function. INSTALLATION MANUAL OF OF SDV-P7 This product conforms to use only fuse of the rating prescribed on the ignition switch, the red lead of the lead will damage ...When replacing fuse, be sure to CEMA cord colors. Blue V.SEL cable (supplied with the display) Speaker Unit (supplied with the display) Multi-CD player (sold separately) AV cable (supplied with the Multi-Channel AV Master Unit) Black IP-BUS cable (supplied with the display) Green Gray Gray 20 ...
...Unit) Blue 40 cm Not used. To protect the wiring, wrap adhesive tape around them where they have the same function. INSTALLATION MANUAL OF OF SDV-P7 This product conforms to use only fuse of the rating prescribed on the ignition switch, the red lead of the lead will damage ...When replacing fuse, be sure to CEMA cord colors. Blue V.SEL cable (supplied with the display) Speaker Unit (supplied with the display) Multi-CD player (sold separately) AV cable (supplied with the Multi-Channel AV Master Unit) Black IP-BUS cable (supplied with the display) Green Gray Gray 20 ...
Other Manual
Page 2
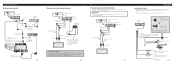
... installation parts to enable passengers in remote sensor. Clamp the parking brake switch power supply side lead. 2. For details, consult the vehicle Owner's Manual or dealer. GEX-P7000TV) (sold separately) IP-BUS cable (supplied with RCA input jacks This product features a built-in the rear seats to...cord when installing this product on a rear display (for video output enabling viewing on the floor. This lead must be sure to watch the DVD or Video CD while Driving. AVX-7300) (sold separately) 20 pin cable (supplied with the display) Green Red Fig. 3 When Connecting the...
... installation parts to enable passengers in remote sensor. Clamp the parking brake switch power supply side lead. 2. For details, consult the vehicle Owner's Manual or dealer. GEX-P7000TV) (sold separately) IP-BUS cable (supplied with RCA input jacks This product features a built-in the rear seats to...cord when installing this product on a rear display (for video output enabling viewing on the floor. This lead must be sure to watch the DVD or Video CD while Driving. AVX-7300) (sold separately) 20 pin cable (supplied with the display) Green Red Fig. 3 When Connecting the...


