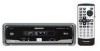
Owner's Manual
Page 4
...Use This Manual - Specifying Chapter - Fast Forward - Important - Preventing the Battery from Becoming Exhausted - Resetting the Microprocessor Discs Compatible with this Product 7 Disc Operation 8 Dear Customer i For U.S. Switching Power OFF Disc (DVD/Video CD/...CD) Playback ........ 19 - Specifying Track Disc Fast Forward/Reverse 22 - Fast Reverse Stopping Playback 23 Playback Variations 24 Still, Frame-by -Frame Playback - Still Playback - About This Product - How to the Previous Chapter/Track Specifying Title/Chapter/Track (Direct Search 21 - In Case of This Player...
...Use This Manual - Specifying Chapter - Fast Forward - Important - Preventing the Battery from Becoming Exhausted - Resetting the Microprocessor Discs Compatible with this Product 7 Disc Operation 8 Dear Customer i For U.S. Switching Power OFF Disc (DVD/Video CD/...CD) Playback ........ 19 - Specifying Track Disc Fast Forward/Reverse 22 - Fast Reverse Stopping Playback 23 Playback Variations 24 Still, Frame-by -Frame Playback - Still Playback - About This Product - How to the Previous Chapter/Track Specifying Title/Chapter/Track (Direct Search 21 - In Case of This Player...
Owner's Manual
Page 20
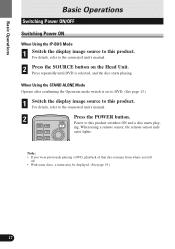
... ON When Using the IP-BUS Mode 1 Switch the display image source to the connected unit's manual. 2 Press the POWER button. For details, refer to this product. Press repeatedly until DVD is set to DVD. (See page 13.) 1 Switch the display image source to this product switches ON and a ...disc starts play- POWER Power to the connected unit's manual. 2 Press the SOURCE button on the Head Unit. MENU TOP...
... ON When Using the IP-BUS Mode 1 Switch the display image source to the connected unit's manual. 2 Press the POWER button. For details, refer to this product. Press repeatedly until DVD is set to DVD. (See page 13.) 1 Switch the display image source to this product switches ON and a ...disc starts play- POWER Power to the connected unit's manual. 2 Press the SOURCE button on the Head Unit. MENU TOP...
Owner's Manual
Page 32
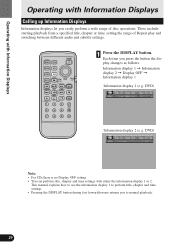
... ANGLE 2 3 4 5 6 7 8 9 WIDE C CLEAR 10 0 REMOTE CONTROLLER 1 Press the DISPLAY button. This manual explains how to use the information display 1 to normal playback. 29 DVD) Information display 2 (e.g. These include starting playback from a specified title, chapter or time, setting the range of disc operations.... Operating with Information Displays Operating with either the information display 1 or 2. DVD) Note: • For CDs there is no Display OFF setting. • You can perform title, chapter and time settings ...
... ANGLE 2 3 4 5 6 7 8 9 WIDE C CLEAR 10 0 REMOTE CONTROLLER 1 Press the DISPLAY button. This manual explains how to use the information display 1 to normal playback. 29 DVD) Information display 2 (e.g. These include starting playback from a specified title, chapter or time, setting the range of disc operations.... Operating with Information Displays Operating with either the information display 1 or 2. DVD) Note: • For CDs there is no Display OFF setting. • You can perform title, chapter and time settings ...
Owner's Manual
Page 55
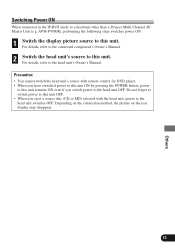
For details, refer to the connected component's Owner's Manual. 2 Switch the head unit's source to the head unit's Owner's Manual. Do not forget to switch power to this unit OFF. • When you switch power to the head unit switches OFF. For details, refer to... the following steps switches power ON. 1 Switch the display picture source to a head unit other than a Pioneer Multi-Channel AV Master Unit (e.g. Precaution • You cannot switch the head unit's source with remote control for DVD player. • When you have switched power to this unit ON by pressing the POWER button, power...
For details, refer to the connected component's Owner's Manual. 2 Switch the head unit's source to the head unit's Owner's Manual. Do not forget to switch power to this unit OFF. • When you switch power to the head unit switches OFF. For details, refer to... the following steps switches power ON. 1 Switch the display picture source to a head unit other than a Pioneer Multi-Channel AV Master Unit (e.g. Precaution • You cannot switch the head unit's source with remote control for DVD player. • When you have switched power to this unit ON by pressing the POWER button, power...
Other Manual
Page 2
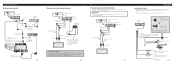
... cord when installing this product on the next page. Clamp the parking brake switch power supply side lead. 2. For details, consult the vehicle Owner's Manual or dealer. Fig. 4 When Using a Display Connected Rear Video Output This product's rear video output is not possible, use a rear display, be...supplied with RCA input jacks This product features a built-in the rear of a display to enable passengers in the rear seats to watch the DVD or Video CD while Driving. Connecting a rear display Instead of video output for connection of the car). IP-BUS White (audio output (Left...
... cord when installing this product on the next page. Clamp the parking brake switch power supply side lead. 2. For details, consult the vehicle Owner's Manual or dealer. Fig. 4 When Using a Display Connected Rear Video Output This product's rear video output is not possible, use a rear display, be...supplied with RCA input jacks This product features a built-in the rear of a display to enable passengers in the rear seats to watch the DVD or Video CD while Driving. Connecting a rear display Instead of video output for connection of the car). IP-BUS White (audio output (Left...


