

Owner's Manual
Page 4
... remote control unit 31 06 Basic Operations 32 Turning on the power 32 Turning off the power 32 Watching TV channels 33 Selecting the antenna 33 Changing channels 33 Changing the volume and sound .........34 Changing the language 34 Setting MTS/SAP mode 35 Viewing a channel banner 36 Using the POD service 36 4 En Using the multiscreen functions 36 Splitting the screen 36 Freezing images 37 07 TV Guide On Screen™ System Setup 38 About the TV Guide On Screen...
... remote control unit 31 06 Basic Operations 32 Turning on the power 32 Turning off the power 32 Watching TV channels 33 Selecting the antenna 33 Changing channels 33 Changing the volume and sound .........34 Changing the language 34 Setting MTS/SAP mode 35 Viewing a channel banner 36 Using the POD service 36 4 En Using the multiscreen functions 36 Splitting the screen 36 Freezing images 37 07 TV Guide On Screen™ System Setup 38 About the TV Guide On Screen...
Owner's Manual
Page 5
... noise from images 63 Activating the closed caption 48 Using the 3DYC and I-P Mode 63 Selecting the type of conventional Comparing picture adjustments on the closed captions 48 screen 64 Selecting digital closed captions ........ 48 Sound adjustments 64 Selecting digital closed caption Power Control 65 parameters 49 Energy Save 65 Clock Setting 49 No Signal off (AV source only 65 10 TV Guide On Screen™ System Operation 50 Using the TV Guide On Screen™ system 50 Screen components 50 The Listings screen 51 Setting program reminders...
... noise from images 63 Activating the closed caption 48 Using the 3DYC and I-P Mode 63 Selecting the type of conventional Comparing picture adjustments on the closed captions 48 screen 64 Selecting digital closed captions ........ 48 Sound adjustments 64 Selecting digital closed caption Power Control 65 parameters 49 Energy Save 65 Clock Setting 49 No Signal off (AV source only 65 10 TV Guide On Screen™ System Operation 50 Using the TV Guide On Screen™ system 50 Screen components 50 The Listings screen 51 Setting program reminders...

Owner's Manual
Page 7
... previous still/moving pictures (e.g. Usage guidelines All phosphor-based screens (including conventional tube-type televisions) can be displayed for over three times longer than the Pioneer stand or installation bracket may cause uneven wear. Using the unit without proper ventilation may NOT control Audio/Video input from a TV, VCR, DVD player or any still image, it is poor. • Do not cover with all other equipment, walls, etc. To ensure...
... previous still/moving pictures (e.g. Usage guidelines All phosphor-based screens (including conventional tube-type televisions) can be displayed for over three times longer than the Pioneer stand or installation bracket may cause uneven wear. Using the unit without proper ventilation may NOT control Audio/Video input from a TV, VCR, DVD player or any still image, it is poor. • Do not cover with all other equipment, walls, etc. To ensure...
Owner's Manual
Page 9
.... use either of these screen modes to burning Avoid displaying the same image on all phosphor-based display systems (including CRT television systems-both direct view and projection-as well as permanent image retention or burn-in may result in the following video format switch The video program that you switch between television and an external digital video recorder (D-VHS), or when your recorded program switches between different definition types, while the on-screen menu is displayed...
.... use either of these screen modes to burning Avoid displaying the same image on all phosphor-based display systems (including CRT television systems-both direct view and projection-as well as permanent image retention or burn-in may result in the following video format switch The video program that you switch between television and an external digital video recorder (D-VHS), or when your recorded program switches between different definition types, while the on-screen menu is displayed...

Owner's Manual
Page 10
... instructions when installing, operating and cleaning the product. The plasma display used to perform repairs. Overloading can result in a safe place for the PRO-110FD (including the stand and speaker). High voltage flows in proper operating condition. 20. Cleaning-Unplug the power cord from resting on them or objects from the AC outlet before using the product. 1. Use only a cart, stand, tripod, bracket or table...
... instructions when installing, operating and cleaning the product. The plasma display used to perform repairs. Overloading can result in a safe place for the PRO-110FD (including the stand and speaker). High voltage flows in proper operating condition. 20. Cleaning-Unplug the power cord from resting on them or objects from the AC outlet before using the product. 1. Use only a cart, stand, tripod, bracket or table...
Owner's Manual
Page 16
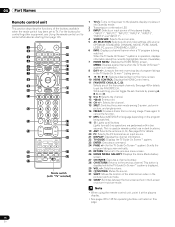
... menu screen. 10 HDMI CONTROL: Displays the HDMI Control menu. 11 FAVORITE CH (A, B, C, D): Selects any of the four preset channels. Note • When using the remote control unit, point it into standby mode. 2 Transmission confirmation LED 3 INPUT: Selects an input source of the plasma display. ("INPUT 1", "INPUT 2", "INPUT 3", "INPUT 4", "INPUT 5", "INPUT 6" and "INPUT 7") 4 SCREEN SIZE: Selects the screen size. 5 AV SELECTION: Selects audio and video settings. (AV source: OPTIMUM, STANDARD, DYNAMIC, MOVIE, PURE, GAME, USER. MENU: Displays a panel menu when the TV Guide On Screen...
... menu screen. 10 HDMI CONTROL: Displays the HDMI Control menu. 11 FAVORITE CH (A, B, C, D): Selects any of the four preset channels. Note • When using the remote control unit, point it into standby mode. 2 Transmission confirmation LED 3 INPUT: Selects an input source of the plasma display. ("INPUT 1", "INPUT 2", "INPUT 3", "INPUT 4", "INPUT 5", "INPUT 6" and "INPUT 7") 4 SCREEN SIZE: Selects the screen size. 5 AV SELECTION: Selects audio and video settings. (AV source: OPTIMUM, STANDARD, DYNAMIC, MOVIE, PURE, GAME, USER. MENU: Displays a panel menu when the TV Guide On Screen...

Owner's Manual
Page 19
... to install the plasma display in injury or damage to the unit. Preparation 05 Attaching the stand • Steps for attaching the stand are subjected to strong external impacts. • Placing a CRT computer screen or CRT monitor near to the speaker may come off and remove the power cord from the power outlet beforehand when changing the connection or installation method. • When using a screwdriver. Plasma display 3 Replace the plasma display to stand upright...
... to install the plasma display in injury or damage to the unit. Preparation 05 Attaching the stand • Steps for attaching the stand are subjected to strong external impacts. • Placing a CRT computer screen or CRT monitor near to the speaker may come off and remove the power cord from the power outlet beforehand when changing the connection or installation method. • When using a screwdriver. Plasma display 3 Replace the plasma display to stand upright...

Owner's Manual
Page 25
Connecting the speaker cables to the speaker. Gray Black Gray Black Red Gray Red Black Red Connect the cables correctly with respect to the polarity of the cable. • When you release the lever, it clamps onto the speaker cable.· Caution Lever • Be sure to turn the connected devices off and remove the power cord from the wall outlet beforehand when changing the connection or installation method. • If you insert...
Connecting the speaker cables to the speaker. Gray Black Gray Black Red Gray Red Black Red Connect the cables correctly with respect to the polarity of the cable. • When you release the lever, it clamps onto the speaker cable.· Caution Lever • Be sure to turn the connected devices off and remove the power cord from the wall outlet beforehand when changing the connection or installation method. • If you insert...

Owner's Manual
Page 28
... or damage. • Work only with the plasma display lying flat on page 19. Plasma display Installation bolts (2): M8 x 40 mm (black) for PRO-110FD M6 x 20 mm (black) for PRO-150FD (PRO-110FD) 3 Replace the plasma display to install the plasma display in warping of the plasma display other than the stand insertion slots. For speaker installation, see Installing the Pioneer speaker on a table or similar surface. • When lying the plasma display down, be careful...
... or damage. • Work only with the plasma display lying flat on page 19. Plasma display Installation bolts (2): M8 x 40 mm (black) for PRO-110FD M6 x 20 mm (black) for PRO-150FD (PRO-110FD) 3 Replace the plasma display to install the plasma display in warping of the plasma display other than the stand insertion slots. For speaker installation, see Installing the Pioneer speaker on a table or similar surface. • When lying the plasma display down, be careful...
Owner's Manual
Page 43
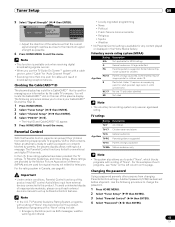
...; No Parental Control setting is available only when receiving digital broadcasting signals over air. • When you to set before shipment. TV ratings Rating Description TV-Y All children Parental Control With the Parental Control, parents can prevent their children from changing Parental Control settings. Channel Setup Ant. A Signal Strength Signal Strength Maximum: 100 Current: 100 xxxxxxxxxxxxxxxxxxxxx xxxxxxxxxxxxxxxxxxxxx xxxxxxxxxxxxxxxxxxxxx Home Menu Exit • Adjust the direction of the plasma display. A default password (1234) has...
...; No Parental Control setting is available only when receiving digital broadcasting signals over air. • When you to set before shipment. TV ratings Rating Description TV-Y All children Parental Control With the Parental Control, parents can prevent their children from changing Parental Control settings. Channel Setup Ant. A Signal Strength Signal Strength Maximum: 100 Current: 100 xxxxxxxxxxxxxxxxxxxxx xxxxxxxxxxxxxxxxxxxxx xxxxxxxxxxxxxxxxxxxxx Home Menu Exit • Adjust the direction of the plasma display. A default password (1234) has...
Owner's Manual
Page 44
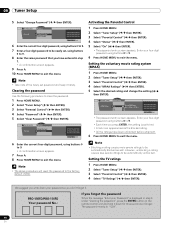
... 6 Enter the current four-digit password, using buttons 0 to 9. • A confirmation screen appears. 7 Press A. 8 Press HOME MENU to exit the menu. Note • The above procedure will reset the password to "1234". 44 En Parental Control Password Password Change Password Clear Password xxxxxxxxxxxxxxxxxxxxx xxxxxxxxxxxxxxxxxxxxx xxxxxxxxxxxxxxxxxxxxx Home Menu Exit 6 Enter the current four-digit password, using buttons 0 to 9. 7 Enter a four-digit password to exit the menu. Enter your Password" is switched. • A lock icon appears beside the...
... 6 Enter the current four-digit password, using buttons 0 to 9. • A confirmation screen appears. 7 Press A. 8 Press HOME MENU to exit the menu. Note • The above procedure will reset the password to "1234". 44 En Parental Control Password Password Change Password Clear Password xxxxxxxxxxxxxxxxxxxxx xxxxxxxxxxxxxxxxxxxxx xxxxxxxxxxxxxxxxxxxxx Home Menu Exit 6 Enter the current four-digit password, using buttons 0 to 9. 7 Enter a four-digit password to exit the menu. Enter your Password" is switched. • A lock icon appears beside the...
Owner's Manual
Page 50
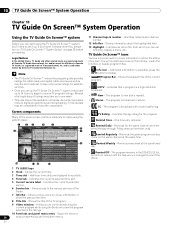
... or show or 50 product advertising (and the panel menu). Indicates the age rating for cable-ready and digital cable services as well as over-the-air broadcast. If you 'll need to view the program selected in stereo. • CC - The program is a registered mark of the TV program. 9 Video window - Space for the same channel and time every Monday through Friday (manual reminder only). •...
... or show or 50 product advertising (and the panel menu). Indicates the age rating for cable-ready and digital cable services as well as over-the-air broadcast. If you 'll need to view the program selected in stereo. • CC - The program is a registered mark of the TV program. 9 Video window - Space for the same channel and time every Monday through Friday (manual reminder only). •...
Owner's Manual
Page 56
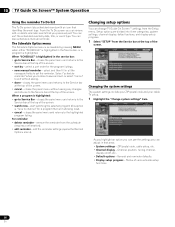
... program listings. • new manual reminder - Setup options are divided into three categories: system settings, channel display, default options, and display setup progress. 1 Select "SETUP" from the Setup menu. As you highlight an option you can see the settings you can also schedule a manual reminder. remove the reminder from the schedule (requires confirmation). • edit reminder - Changing the system settings The system settings include your ZIP/postal code and your cable TV setup...
... program listings. • new manual reminder - Setup options are divided into three categories: system settings, channel display, default options, and display setup progress. 1 Select "SETUP" from the Setup menu. As you highlight an option you can see the settings you can also schedule a manual reminder. remove the reminder from the schedule (requires confirmation). • edit reminder - Changing the system settings The system settings include your ZIP/postal code and your cable TV setup...
Owner's Manual
Page 72
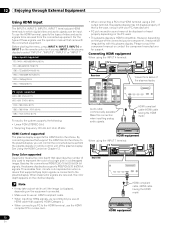
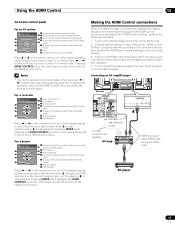
... plasma display to the plasma display. By connecting devices that support the HDMI Control functions to the plasma display, you use an HDMI compliant cable. • When inputting 1080p signals, we recommend you can be received from the plasma display or remote control unit of these signals, see the operation manual that supports Deep Color signals is connected to select "INPUT 4", "INPUT 5", "INPUT 6" or "INPUT 7". HDMI compliant cable (HDMI cable having the HDMI mark) HDMI equipment 72 En When Deep Color signals are HDMI terminals to which digital video and audio signals...
... plasma display to the plasma display. By connecting devices that support the HDMI Control functions to the plasma display, you use an HDMI compliant cable. • When inputting 1080p signals, we recommend you can be received from the plasma display or remote control unit of these signals, see the operation manual that supports Deep Color signals is connected to select "INPUT 4", "INPUT 5", "INPUT 6" or "INPUT 7". HDMI compliant cable (HDMI cable having the HDMI mark) HDMI equipment 72 En When Deep Color signals are HDMI terminals to which digital video and audio signals...
Owner's Manual
Page 77
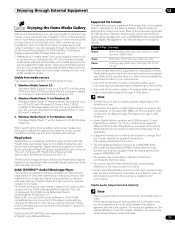
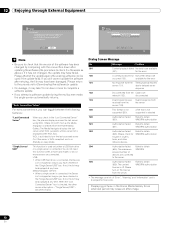
... of software or other updated information. Try muting the speakers on the plasma display to correct this player, some media servers that you can navigate through a USB 3. Enjoying through External Equipment 12 Supported file formats The table below shows supported file formats that can be able to display content from incompatible memory cards. • You cannot use the Home Media Gallery until dimmed elements on the menu screen turn white. Digital Audio Output terminal (Optical) Note...
... of software or other updated information. Try muting the speakers on the plasma display to correct this player, some media servers that you can navigate through a USB 3. Enjoying through External Equipment 12 Supported file formats The table below shows supported file formats that can be able to display content from incompatible memory cards. • You cannot use the Home Media Gallery until dimmed elements on the menu screen turn white. Digital Audio Output terminal (Optical) Note...
Owner's Manual
Page 92
.../USB" box. Please turn the last accessed server On if the server is WOL-compliant and is skipped as long as above.). "Auto Connection Setup" For extra convenience, you can be updated or not. 12 Enjoying through External Equipment Setup Software Update To check whether the software needs to delayed server response 102 Disconnected from the Cables are network (102). available for the error 100 A communication error...
.../USB" box. Please turn the last accessed server On if the server is WOL-compliant and is skipped as long as above.). "Auto Connection Setup" For extra convenience, you can be updated or not. 12 Enjoying through External Equipment Setup Software Update To check whether the software needs to delayed server response 102 Disconnected from the Cables are network (102). available for the error 100 A communication error...
Owner's Manual
Page 95
... to the HDMI Control menu. Connecting an AV amp/BD player 4 4 5 5 Rear view 4 5 Optical digital cable (commercially available) AV cable (commercially available) AV amp HDMI compliant cable (HDMI cable having the HDMI mark) BD player 95 En Pressing ENTER starts playback and HDMI CONTROL turns the control panel screen off to return to the HDMI Control menu. Using the HDMI Control 13 On-screen control panel For an AV system HDMI Control 1 SURROUND+ 2 INPUT3 INPUT+ SURROUND4 HDMI CONTROL Exit 1 Switches the surround mode in order 5 2 Switches the input source in...
... to the HDMI Control menu. Connecting an AV amp/BD player 4 4 5 5 Rear view 4 5 Optical digital cable (commercially available) AV cable (commercially available) AV amp HDMI compliant cable (HDMI cable having the HDMI mark) BD player 95 En Pressing ENTER starts playback and HDMI CONTROL turns the control panel screen off to return to the HDMI Control menu. Using the HDMI Control 13 On-screen control panel For an AV system HDMI Control 1 SURROUND+ 2 INPUT3 INPUT+ SURROUND4 HDMI CONTROL Exit 1 Switches the surround mode in order 5 2 Switches the input source in...
Owner's Manual
Page 109
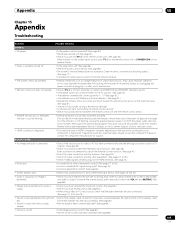
... you using a video or PC input source, check that the audio terminals are off the power of the plasma display, or unplugging the power cord and re-plugging it in after one to 76.) • Is a non-compatible PC signal being input to the HDMI terminal. (See page 72.) • No picture. • Is connection to other than VOL +/- In this plasma display. To restore the screen display, press any button other...
... you using a video or PC input source, check that the audio terminals are off the power of the plasma display, or unplugging the power cord and re-plugging it in after one to 76.) • Is a non-compatible PC signal being input to the HDMI terminal. (See page 72.) • No picture. • Is connection to other than VOL +/- In this plasma display. To restore the screen display, press any button other...
Owner's Manual
Page 110
... setup. • Check the media server setup. For details, refer to use an HDMI cable that helps eliminate after -image. • This can display the "Video Pattern" screen that supports the HDMI 1.3 Specification. • Check if you do not operate. • Check if the connections are properly made between the plasma display and the device that supports the the HDMI Control functions. (See page 95.) • Check if you select "Auto...
... setup. • Check the media server setup. For details, refer to use an HDMI cable that helps eliminate after -image. • This can display the "Video Pattern" screen that supports the HDMI 1.3 Specification. • Check if you do not operate. • Check if the connections are properly made between the plasma display and the device that supports the the HDMI Control functions. (See page 95.) • Check if you select "Auto...
Owner's Manual
Page 112
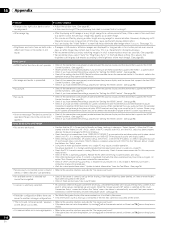
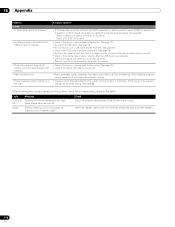
... device is connectable to the USB port does not operate. • Photo data stored in speaker cable? SD05 Internal protection circuit turns power off . In addition, try the TV-Guide setup again by performing the following error codes appear on Screen 3. - Check the speaker cable connections between the plasma display and the speakers. 112 En Possible Solution • If TV-Guide data cannot be read through USB interface. • Panel sounds/noises. • Screen displays uneven brightness...
... device is connectable to the USB port does not operate. • Photo data stored in speaker cable? SD05 Internal protection circuit turns power off . In addition, try the TV-Guide setup again by performing the following error codes appear on Screen 3. - Check the speaker cable connections between the plasma display and the speakers. 112 En Possible Solution • If TV-Guide data cannot be read through USB interface. • Panel sounds/noises. • Screen displays uneven brightness...


