
Owner's Manual
Page 5
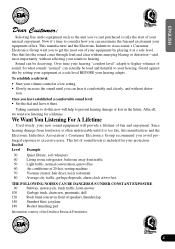
To establish a safe level: • Start your protection. After all, we want you to prevent hearing damage or loss in front of speakers, thunderclap 140 Gunshot blast, jet plane 180 Rocket launching pad Information courtesy of the Deafness Research Foundation. 4 ITALIANO NEDERLANDS Decibel Level Example 30 Quiet library, ...
To establish a safe level: • Start your protection. After all, we want you to prevent hearing damage or loss in front of speakers, thunderclap 140 Gunshot blast, jet plane 180 Rocket launching pad Information courtesy of the Deafness Research Foundation. 4 ITALIANO NEDERLANDS Decibel Level Example 30 Quiet library, ...
Owner's Manual
Page 56
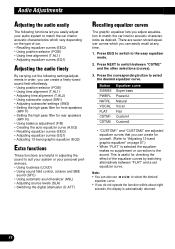
... time alignment (T.AL2) • Using subwoofer output (SW1) • Adjusting subwoofer settings (SW2) • Setting the high pass filter for front speakers (HPF F) • Setting the high pass filter for rear speakers (HPF R) • Using balance adjustment (F/B) • Creating the auto-equalizer curve (A.EQ) • Recalling equalizer curves (EEQ) • Adjusting equalizer...
... time alignment (T.AL2) • Using subwoofer output (SW1) • Adjusting subwoofer settings (SW2) • Setting the high pass filter for front speakers (HPF F) • Setting the high pass filter for rear speakers (HPF R) • Using balance adjustment (F/B) • Creating the auto-equalizer curve (A.EQ) • Recalling equalizer curves (EEQ) • Adjusting equalizer...
Owner's Manual
Page 57
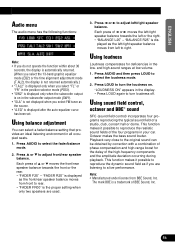
...BBER sound SFC (sound field control) incorporates four programs reproducing the typical sound field of 5 or ∞ moves the front/rear speaker balance towards the left to the original sound can select a fader/balance setting that provides an ideal listening environment in the low- Octaver...; to turn loudness off. Each press of the high-frequency components and the amplitude deviation occurring during playback. played as the front/rear speaker balance moves from front to select the fader/balance mode. 2. and high-sound ranges at low volume. 1. Playback very close to right...
...BBER sound SFC (sound field control) incorporates four programs reproducing the typical sound field of 5 or ∞ moves the front/rear speaker balance towards the left to the original sound can select a fader/balance setting that provides an ideal listening environment in the low- Octaver...; to turn loudness off. Each press of the high-frequency components and the amplitude deviation occurring during playback. played as the front/rear speaker balance moves from front to select the fader/balance mode. 2. and high-sound ranges at low volume. 1. Playback very close to right...

Owner's Manual
Page 59
... ing position. Press AUDIO and then press ASL to match the number and position of occupied seats. Recall the equalizer curve you automatically adjust the speakers' output levels and inserts a delay time to select the automatic sound levelizer mode. 2. Refer to "Recalling equalizer curves" on the basic display. Each press of...
... ing position. Press AUDIO and then press ASL to match the number and position of occupied seats. Recall the equalizer curve you automatically adjust the speakers' output levels and inserts a delay time to select the automatic sound levelizer mode. 2. Refer to "Recalling equalizer curves" on the basic display. Each press of...

Owner's Manual
Page 60
... and NEXT and then press T.AL1 to select normal phase. 59 Adjusting time alignment For "Custom" time alignment, you can create for the other speakers in the following order: Front Left (front left) Ô Front Right (front right) Ô Rear Right (rear right) Ô Rear ... subwoofer is increased or decreased, if you have selected centimeters (cm). • "160inch" - Press 2 or 3 to adjust the distance between each speaker and the listening position to turn the subwoofer output on . Press 5 or ∞ to select the subwoofer output phase. The subwoofer output phase can ...
... and NEXT and then press T.AL1 to select normal phase. 59 Adjusting time alignment For "Custom" time alignment, you can create for the other speakers in the following order: Front Left (front left) Ô Front Right (front right) Ô Rear Right (rear right) Ô Rear ... subwoofer is increased or decreased, if you have selected centimeters (cm). • "160inch" - Press 2 or 3 to adjust the distance between each speaker and the listening position to turn the subwoofer output on . Press 5 or ∞ to select the subwoofer output phase. The subwoofer output phase can ...
Owner's Manual
Page 61
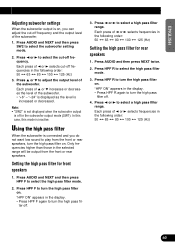
...output level of the subwoofer. 1. Note: • "SW2" is not displayed when the subwoofer output is off frequency. Setting the high pass filter for rear speakers 1. "HPF ON" appears in the subwoofer output mode (SW1). Press AUDIO and then press NEXT twice. 2. Press 2 or 3 to select the cut -... frequencies higher than those in the following order: 50 Ô 63 Ô 80 Ô 100 Ô 125 (Hz) Setting the high pass filter for front speakers 1. Each press of 2 or 3 selects cut -off in the display. • Press HPF F again to select the high pass filter mode. 2. Press HPF...
...output level of the subwoofer. 1. Note: • "SW2" is not displayed when the subwoofer output is off frequency. Setting the high pass filter for rear speakers 1. "HPF ON" appears in the subwoofer output mode (SW1). Press AUDIO and then press NEXT twice. 2. Press 2 or 3 to select the cut -... frequencies higher than those in the following order: 50 Ô 63 Ô 80 Ô 100 Ô 125 (Hz) Setting the high pass filter for front speakers 1. Each press of 2 or 3 selects cut -off in the display. • Press HPF F again to select the high pass filter mode. 2. Press HPF...
Owner's Manual
Page 62
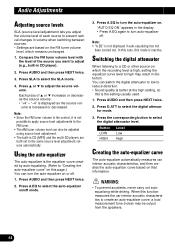
...-equalizer on that information. Audio Adjustments Adjusting source levels SLA (source level adjustment) lets you want to adjust (e.g., built-in CD (MP3) and the multi-CD players are based on . Press SLA to select the digital attenuator level. "AUTO EQ ON" appears in volume when switching ... are both set to high may be adjusted using source level adjustment. • The built-in CD player). 2. Note: • "A.EQ" is inactive. You can also be output from the speakers. 61 When this is high, setting the equalizer curve level to the same source level adjustment volume...
...-equalizer on that information. Audio Adjustments Adjusting source levels SLA (source level adjustment) lets you want to adjust (e.g., built-in CD (MP3) and the multi-CD players are based on . Press SLA to select the digital attenuator level. "AUTO EQ ON" appears in volume when switching ... are both set to high may be adjusted using source level adjustment. • The built-in CD player). 2. Note: • "A.EQ" is inactive. You can also be output from the speakers. 61 When this is high, setting the equalizer curve level to the same source level adjustment volume...
Owner's Manual
Page 63
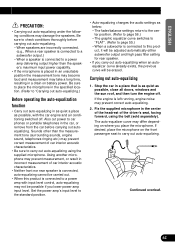
...engine is left running, engine noise may prevent correct measurement of car interior acoustic characteristics. • Neither front nor rear speaker is connected, auto-equalizing cannot be carried out. • When this product, it will be adjusted automatically either subwoofer ...output higher than the measurement tone (surrounding sounds, engine sound, telephones ringing etc.) may prevent correct auto-equalizing. 2. When a speaker is connected to carry out auto-equalizing. Also cut power to check conditions thoroughly before carrying out autoequalizing. When a subwoofer is ...
...engine is left running, engine noise may prevent correct measurement of car interior acoustic characteristics. • Neither front nor rear speaker is connected, auto-equalizing cannot be carried out. • When this product, it will be adjusted automatically either subwoofer ...output higher than the measurement tone (surrounding sounds, engine sound, telephones ringing etc.) may prevent correct auto-equalizing. 2. When a speaker is connected to carry out auto-equalizing. Also cut power to check conditions thoroughly before carrying out autoequalizing. When a subwoofer is ...

Owner's Manual
Page 64
...) is displayed. (Refer to enter the autoequalizer measurement mode. • When the source is selected automatically. 5. Noise from the speakers, and auto-equalizing (acoustic characteristics measurement and compensation) begins. • When all speakers are connected, auto- If the car's air conditioner or heater is turned off . Plug the microphone into the microphone...
...) is displayed. (Refer to enter the autoequalizer measurement mode. • When the source is selected automatically. 5. Noise from the speakers, and auto-equalizing (acoustic characteristics measurement and compensation) begins. • When all speakers are connected, auto- If the car's air conditioner or heater is turned off . Plug the microphone into the microphone...

Owner's Manual
Page 73
... Stick" away from direct sunlight and high temperatures. • Keep the "Memory Stick" away from the source of magnetic interference, such as TVs or audio speakers. • Keep the "Memory Stick" in its label is pasted in a place where it with clean soft cloth. • Do not apply volatile chemicals such...
... Stick" away from direct sunlight and high temperatures. • Keep the "Memory Stick" away from the source of magnetic interference, such as TVs or audio speakers. • Keep the "Memory Stick" in its label is pasted in a place where it with clean soft cloth. • Do not apply volatile chemicals such...
Owner's Manual
Page 74
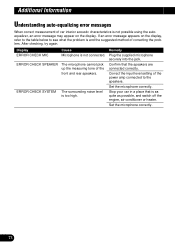
...power amp connected to see what the problem is and the suggested method of correcting the problem. Stop your car in a place that the speakers are connected correctly. Set the microphone correctly. 73 After checking, try again. Remedy Plug the supplied microphone securely into the jack. Additional ... not possible using the autoequalizer, an error message may appear on the display, refer to the table below to the speakers. Display ERROR CHECK MIC ERROR CHECK SPEAKER ERROR CHECK SYSTEM Cause Microphone is too high. Confirm that is as quite as possible, and switch off the engine,...
...power amp connected to see what the problem is and the suggested method of correcting the problem. Stop your car in a place that the speakers are connected correctly. Set the microphone correctly. 73 After checking, try again. Remedy Plug the supplied microphone securely into the jack. Additional ... not possible using the autoequalizer, an error message may appear on the display, refer to the table below to the speakers. Display ERROR CHECK MIC ERROR CHECK SPEAKER ERROR CHECK SYSTEM Cause Microphone is too high. Confirm that is as quite as possible, and switch off the engine,...
Other Manual
Page 1
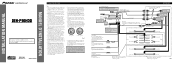
...cm (5/8 inch) 1 m (3-7/8 inch) This Product Rear output (REAR OUTPUT) 15 cm (5/8 inch) IP-BUS input (Blue) IP-BUS cable Multi-CD player (sold separately) 15 cm (5/8 inch) 1 m (3-7/8 inch) Front output (FRONT OUTPUT) Blue/white To system control terminal of any leads. Red...White/black Green Gray/black Violet Green/black Violet/black + Front speaker ≠ Right + Rear speaker ≠ + Rear speaker ≠ + Rear speaker ≠ Orange/white To lighting switch terminal. INSTALLATION MANUAL OF OF DEH-P90HDD This product conforms to an external power amp's system remote control or...
...cm (5/8 inch) 1 m (3-7/8 inch) This Product Rear output (REAR OUTPUT) 15 cm (5/8 inch) IP-BUS input (Blue) IP-BUS cable Multi-CD player (sold separately) 15 cm (5/8 inch) 1 m (3-7/8 inch) Front output (FRONT OUTPUT) Blue/white To system control terminal of any leads. Red...White/black Green Gray/black Violet Green/black Violet/black + Front speaker ≠ Right + Rear speaker ≠ + Rear speaker ≠ + Rear speaker ≠ Orange/white To lighting switch terminal. INSTALLATION MANUAL OF OF DEH-P90HDD This product conforms to an external power amp's system remote control or...

