

Owner's Manual
Page 2
... demo modes 9 About basic displays 9 Remote controller and care 10 Using the steering remote controller 11 Displaying and setting the clock 12 Detaching and replacing the front panel .......... 13 Basic Operation 14 Turning a source on or off 14 SOFT KEY operation 14 Key guidance indicator 16 Tuner 17 Display and indicators 17 Basic operation 17 Storing and recalling broadcast stations .......... 17 Tuner function menu 18 Storing the strongest broadcast stations .......... 18 Selecting stations from the preset channel list 18 Tuning...
... demo modes 9 About basic displays 9 Remote controller and care 10 Using the steering remote controller 11 Displaying and setting the clock 12 Detaching and replacing the front panel .......... 13 Basic Operation 14 Turning a source on or off 14 SOFT KEY operation 14 Key guidance indicator 16 Tuner 17 Display and indicators 17 Basic operation 17 Storing and recalling broadcast stations .......... 17 Tuner function menu 18 Storing the strongest broadcast stations .......... 18 Selecting stations from the preset channel list 18 Tuning...
Owner's Manual
Page 4
... sound levelizer 58 Using position selector 58 Using time alignment 59 Using subwoofer output 59 Using the high pass filter 60 Adjusting source levels 61 Using the auto-equalizer 61 Switching the digital attenuator 61 Creating the auto-equalizer curve 61 Initial Settings 64 Initial settings menu 64 Using reverse mode 64 Using the feature demo 64 Switching the auxiliary setting 64 Switching the telephone muting/attenuation setting 65 Formatting the "Memory Stick 65 Setting the warning tone 66 Other Functions 67 Attenuating volume 67 Changing...
... sound levelizer 58 Using position selector 58 Using time alignment 59 Using subwoofer output 59 Using the high pass filter 60 Adjusting source levels 61 Using the auto-equalizer 61 Switching the digital attenuator 61 Creating the auto-equalizer curve 61 Initial Settings 64 Initial settings menu 64 Using reverse mode 64 Using the feature demo 64 Switching the auxiliary setting 64 Switching the telephone muting/attenuation setting 65 Formatting the "Memory Stick 65 Setting the warning tone 66 Other Functions 67 Attenuating volume 67 Changing...
Owner's Manual
Page 9
... be connected. (Refer to the XM tuner owner's manual. FRANÇAIS ITALIANO NEDERLANDS 8 U.S.A. Note: • The XM Satellite Radio is no correspondence to coast. ENGLISH ESPAÑOL DEUTSCH After-sales service for Pioneer products Please contact the dealer or distributor from coast to backup or repair of music data.) • This product does not support additional hard disk installation or...
... be connected. (Refer to the XM tuner owner's manual. FRANÇAIS ITALIANO NEDERLANDS 8 U.S.A. Note: • The XM Satellite Radio is no correspondence to coast. ENGLISH ESPAÑOL DEUTSCH After-sales service for Pioneer products Please contact the dealer or distributor from coast to backup or repair of music data.) • This product does not support additional hard disk installation or...
Owner's Manual
Page 10
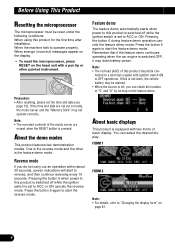
... the button 5 again to start the feature demo mode. If this product is switched off while the ignition switch is set to operate properly. Reverse mode If you can select the desired display. When strange (incorrect) messages appear on the display. • To reset the microprocessor, press RESET on page 67. 9 Precaution: • After resetting, please set correctly, the music server and the "Memory Stick" may drain battery power...
... the button 5 again to start the feature demo mode. If this product is switched off while the ignition switch is set to operate properly. Reverse mode If you can select the desired display. When strange (incorrect) messages appear on the display. • To reset the microprocessor, press RESET on page 67. 9 Precaution: • After resetting, please set correctly, the music server and the "Memory Stick" may drain battery power...
Owner's Manual
Page 12
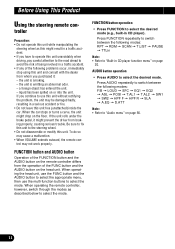
... prevent the driver from braking properly, causing serious trouble. To do so may cause a malfunction. • When VOLUME extends outward, the remote control may be damaged badly, resulting in CD player function menu" on the head unit. When operating the head unit, use the FUNC button and the AUDIO button to select the desired mode (e.g., built-in a traffic accident. • If any of the following problems occur, immediately stop using this unit and...
... prevent the driver from braking properly, causing serious trouble. To do so may cause a malfunction. • When VOLUME extends outward, the remote control may be damaged badly, resulting in CD player function menu" on the head unit. When operating the head unit, use the FUNC button and the AUDIO button to select the desired mode (e.g., built-in a traffic accident. • If any of the following problems occur, immediately stop using this unit and...
Owner's Manual
Page 13
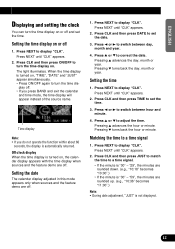
... to turn the time display off. • If you do not operate the function within about 60 seconds, the display is "30" - Press NEXT to set the date. 3. Press NEXT to display "CLK". Pressing ∞ turns back the hour or minute. Press NEXT to display "CLK". The light illuminates. Setting the date The calender display adjusted in this mode appears only when sources and the feature demo...
... to turn the time display off. • If you do not operate the function within about 60 seconds, the display is "30" - Press NEXT to set the date. 3. Press NEXT to display "CLK". Pressing ∞ turns back the hour or minute. Press NEXT to display "CLK". The light illuminates. Setting the date The calender display adjusted in this mode appears only when sources and the feature demo...

Owner's Manual
Page 15
... Operation Turning a source on FORM 1 display. Press SOURCE to adjust the volume. 4. Press VOLUME to this product. * No disc is set in this product. * No "Memory Stick" is set in this product. * No magazine is set in the multi-CD player. * AUX (auxiliary setting) is set by this product. (See page 39.) 1. Turn VOLUME to select the desired source (e.g., tuner). the functions performed by the buttons change : * When no product corresponding to the source is connected to extend the VOLUME...
... Operation Turning a source on FORM 1 display. Press SOURCE to adjust the volume. 4. Press VOLUME to this product. * No disc is set in this product. * No "Memory Stick" is set in this product. * No magazine is set in the multi-CD player. * AUX (auxiliary setting) is set by this product. (See page 39.) 1. Turn VOLUME to select the desired source (e.g., tuner). the functions performed by the buttons change : * When no product corresponding to the source is connected to extend the VOLUME...
Owner's Manual
Page 18
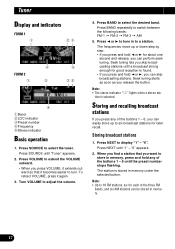
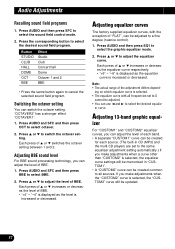
... adjust the volume. 4. Press BAND to tune in memory under the selected button. Seek tuning lets you want to extend the VOLUME outward. • When you press VOLUME, it extends outward so that you skip broadcasting stations until "Tuner" appears. 2. Press VOLUME to store in memory. 17 Press SOURCE until a broadcast strong enough for later recall. The station is selected. Note: • The stereo indicator "" lights when a stereo...
... adjust the volume. 4. Press BAND to tune in memory under the selected button. Seek tuning lets you want to extend the VOLUME outward. • When you press VOLUME, it extends outward so that you skip broadcasting stations until "Tuner" appears. 2. Press VOLUME to store in memory. 17 Press SOURCE until a broadcast strong enough for later recall. The station is selected. Note: • The stereo indicator "" lights when a stereo...
Owner's Manual
Page 47
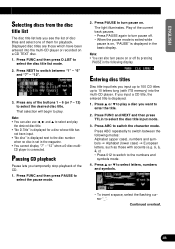
... any of the CD. 1. CD player is displayed. 1. Entering disc titles Disc title input lets you input up to 100 CD titles up to 10 letters long (with accents (e.g Press 012 to switch to the numbers and symbols mode. 4. Press 5 or ∞ to play . Press FUNC and NEXT and then press TTLin to select letters, numbers and symbols. • To insert a space, select the flashing cursor "_". Press...
... any of the CD. 1. CD player is displayed. 1. Entering disc titles Disc title input lets you input up to 100 CD titles up to 10 letters long (with accents (e.g Press 012 to switch to the numbers and symbols mode. 4. Press 5 or ∞ to play . Press FUNC and NEXT and then press TTLin to select letters, numbers and symbols. • To insert a space, select the flashing cursor "_". Press...
Owner's Manual
Page 50
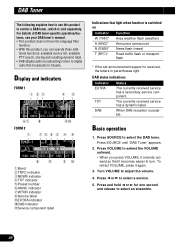
... (digital audio broadcasting) refers to digital radio that broadcasts in parentheses light. Press and hold 2 or 3 for one second and release to adjust the volume. 4. DAB Tuner The following explains how to use this product, you press VOLUME, it extends outward so that it again. 3. The currently received service has a dynamic label. For details of DAB tuner-specific operation/features, see your DAB tuner's manual...
... (digital audio broadcasting) refers to digital radio that broadcasts in parentheses light. Press and hold 2 or 3 for one second and release to adjust the volume. 4. DAB Tuner The following explains how to use this product, you press VOLUME, it extends outward so that it again. 3. The currently received service has a dynamic label. For details of DAB tuner-specific operation/features, see your DAB tuner's manual...
Owner's Manual
Page 56
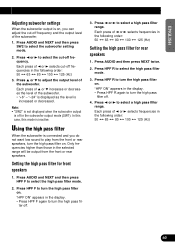
... or your audio system to match the car interior acoustic characteristics which you can easily recall at any time. 1. There are helpful in order, you can create a finely-tuned sound field effortlessly. • Using position selector (POSI) • Using time alignment (T.AL1) • Adjusting time alignment (T.AL2) • Using subwoofer output (SW1) • Adjusting subwoofer settings (SW2) • Setting the high pass filter for front speakers (HPF F) • Setting the...
... or your audio system to match the car interior acoustic characteristics which you can easily recall at any time. 1. There are helpful in order, you can create a finely-tuned sound field effortlessly. • Using position selector (POSI) • Using time alignment (T.AL1) • Adjusting time alignment (T.AL2) • Using subwoofer output (SW1) • Adjusting subwoofer settings (SW2) • Setting the high pass filter for front speakers (HPF F) • Setting the...
Owner's Manual
Page 57
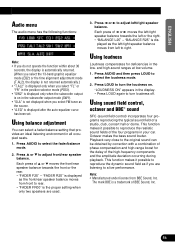
... low volume. 1. Press AUDIO and then press LOUD to adjust front/rear speaker balance. This function makes it possible to right. Note: • Manufactured under license from left to reproduce the dynamic sound field as if you are used. 3. Using balance adjustment You can be obtained by correction with a combination of the four programs in the subwoofer output mode (SW1). • "SLA" is not displayed when you select FM tuner...
... low volume. 1. Press AUDIO and then press LOUD to adjust front/rear speaker balance. This function makes it possible to right. Note: • Manufactured under license from left to reproduce the dynamic sound field as if you are used. 3. Using balance adjustment You can be obtained by correction with a combination of the four programs in the subwoofer output mode (SW1). • "SLA" is not displayed when you select FM tuner...
Owner's Manual
Page 58
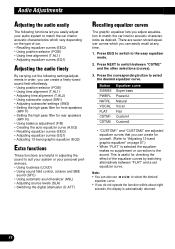
... button to select the sound field control mode. 2. Adjusting equalizer curves The factory supplied equalizer curves, with all sources. Each press of "FLAT", can be created common to all frequencies set to 0 cannot be updated. 57 er curve. Press AUDIO and SFC and then press OCT to select BBE. 2. Note: • The actual range of each band. • A separate "CUSTOM1" curve can switch the octaver setting. Press AUDIO...
... button to select the sound field control mode. 2. Adjusting equalizer curves The factory supplied equalizer curves, with all sources. Each press of "FLAT", can be created common to all frequencies set to 0 cannot be updated. 57 er curve. Press AUDIO and SFC and then press OCT to select BBE. 2. Note: • The actual range of each band. • A separate "CUSTOM1" curve can switch the octaver setting. Press AUDIO...
Owner's Manual
Page 61
...ÑOL DEUTSCH Adjusting subwoofer settings When the subwoofer output is on, you do not want low sound to play from the front or rear speakers. Press AUDIO and NEXT and then press SW2 to select the high pass filter mode. 2. In this case, this mode is increased or decreased. ter off frequency. "-24" is displayed as the level is inactive. Press AUDIO and NEXT and then...
...ÑOL DEUTSCH Adjusting subwoofer settings When the subwoofer output is on, you do not want low sound to play from the front or rear speakers. Press AUDIO and NEXT and then press SW2 to select the high pass filter mode. 2. In this case, this mode is increased or decreased. ter off frequency. "-24" is displayed as the level is inactive. Press AUDIO and NEXT and then...
Owner's Manual
Page 63
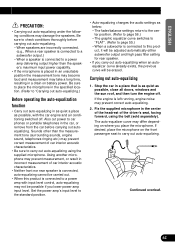
... 55.) - When a subwoofer is connected to carry out auto-equalizing using the belt (sold separately). When speakers are incorrectly connected. (e.g., When a rear speaker is left running, engine noise may take a long time, resulting in a place that is connected to the standard position. • Auto-equalizing changes the audio settings as possible, with input level control, auto-equalizing may damage the speakers. Set the power amp's input level to a power amp with the car engine and air conditioning switched off . FRANÇ...
... 55.) - When a subwoofer is connected to carry out auto-equalizing using the belt (sold separately). When speakers are incorrectly connected. (e.g., When a rear speaker is left running, engine noise may take a long time, resulting in a place that is connected to the standard position. • Auto-equalizing changes the audio settings as possible, with input level control, auto-equalizing may damage the speakers. Set the power amp's input level to a power amp with the car engine and air conditioning switched off . FRANÇ...

Owner's Manual
Page 64
... or heater may cause distortion, color change or malfunction. Remove the microphone input jack cap and plug in about four minutes. • To cancel auto-equalizing part way through, press any button to turn the source off , you start the auto-equalizing. 63 Press and hold 2 to "Using position selector" on the feature demo. 7. WARNING: • After attaching the microphone input jack cap, store it can...
... or heater may cause distortion, color change or malfunction. Remove the microphone input jack cap and plug in about four minutes. • To cancel auto-equalizing part way through, press any button to turn the source off , you start the auto-equalizing. 63 Press and hold 2 to "Using position selector" on the feature demo. 7. WARNING: • After attaching the microphone input jack cap, store it can...
Owner's Manual
Page 74
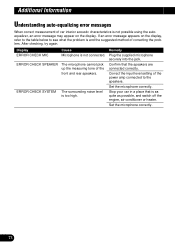
... level is not connected. Confirm that is and the suggested method of correcting the problem. Set the microphone correctly. Additional Information Understanding auto-equalizing error messages When correct measurement of car interior acoustic characteristics is not possible using the autoequalizer, an error message may appear on the display, refer to the table below to the speakers. After checking, try again. Correct the input level setting...
... level is not connected. Confirm that is and the suggested method of correcting the problem. Set the microphone correctly. Additional Information Understanding auto-equalizing error messages When correct measurement of car interior acoustic characteristics is not possible using the autoequalizer, an error message may appear on the display, refer to the table below to the speakers. After checking, try again. Correct the input level setting...
Other Manual
Page 1
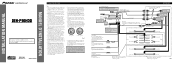
... be connected to other equipment by ignition switch (12 V DC) ON/OFF. Please ground this unit has been installed. Subwoofer output (SUBWOOFER OUTPUT) Antenna jack 15 cm (5/8 inch) 1 m (3-7/8 inch) This Product Rear output (REAR OUTPUT) 15 cm (5/8 inch) IP-BUS input (Blue) IP-BUS cable Multi-CD player (sold separately) 15 cm (5/8 inch) 1 m (3-7/8 inch) Front output (FRONT OUTPUT) Blue/white To system control terminal of the auto-antenna. If not, keep the Audio Mute lead free of the wiring short...
... be connected to other equipment by ignition switch (12 V DC) ON/OFF. Please ground this unit has been installed. Subwoofer output (SUBWOOFER OUTPUT) Antenna jack 15 cm (5/8 inch) 1 m (3-7/8 inch) This Product Rear output (REAR OUTPUT) 15 cm (5/8 inch) IP-BUS input (Blue) IP-BUS cable Multi-CD player (sold separately) 15 cm (5/8 inch) 1 m (3-7/8 inch) Front output (FRONT OUTPUT) Blue/white To system control terminal of the auto-antenna. If not, keep the Audio Mute lead free of the wiring short...
Other Manual
Page 2
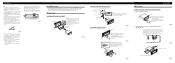
... installing the unit, connect the wiring temporarily, making sure it is all connected up properly, and the unit and the system work properly. • Use only the parts included with the unit to remove the frame. (When reattaching the frame, point the side with a groove downwards and attach it.) 2. Do not close , this unit and the navigation unit may not operate correctly. • Do not install...
... installing the unit, connect the wiring temporarily, making sure it is all connected up properly, and the unit and the system work properly. • Use only the parts included with the unit to remove the frame. (When reattaching the frame, point the side with a groove downwards and attach it.) 2. Do not close , this unit and the navigation unit may not operate correctly. • Do not install...
Other Manual
Page 3
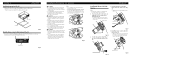
Installation Installing the power box (Fig. 12) The power box has velcro tape on the underside to secure it disturbs driving stability, causing a traffic accident. Otherwise, there is likely to be damaged or could dismount itself, which may result in a traffic accident. • Do not attach this manual. When installing the unit, select a location that the arrow-marked side faces the driver as...
Installation Installing the power box (Fig. 12) The power box has velcro tape on the underside to secure it disturbs driving stability, causing a traffic accident. Otherwise, there is likely to be damaged or could dismount itself, which may result in a traffic accident. • Do not attach this manual. When installing the unit, select a location that the arrow-marked side faces the driver as...


