
Owner's Manual
Page 2
... Setting Menu Functions 16 Tuner Operation 17 - Disc Loading Slot - Random Play (RANDOM) - Pause (PAUSE) - ITS Play (ITS-P) - Title Display Switching - Track Search and Fast Forward/Reverse - Title Scroll 1 Manual and Seek Tuning - Local Seek Tuning (LOCAL) - ITS Programming (ITS) - Head Unit Before Using This Product 5 About This Product 5 About This Manual 5 Important 5 Precaution 6 After-sales Service for Pioneer Products .......... 6 When using the 50-Disc Type Multi-CD Player 6 Basic Operation 7 To Listen to Music 7 Basic Operation...
... Setting Menu Functions 16 Tuner Operation 17 - Disc Loading Slot - Random Play (RANDOM) - Pause (PAUSE) - ITS Play (ITS-P) - Title Display Switching - Track Search and Fast Forward/Reverse - Title Scroll 1 Manual and Seek Tuning - Local Seek Tuning (LOCAL) - ITS Programming (ITS) - Head Unit Before Using This Product 5 About This Product 5 About This Manual 5 Important 5 Precaution 6 After-sales Service for Pioneer Products .......... 6 When using the 50-Disc Type Multi-CD Player 6 Basic Operation 7 To Listen to Music 7 Basic Operation...

Owner's Manual
Page 3
... Output Level Adjustment (NON FAD) - Setting the Time - Setting the Rear Speaker Lead and Subwoofer Controller (REAR SP) Other Functions 40 Using the PROGRAM Button (PGM-FUNC 40 - AUX Title Input Cellular Telephone Muting 42 CD Player and Care 43 Precaution 43 Built-in CD Player's Error Message 43 Specifications 44 DEUTSCH FRANÇAIS ITALIANO NEDERLANDS 2 ENGLISH ESPAÑOL Audio Adjustment 28 Selecting the Equalizer Curve 28 Entering the Audio Menu 28 Audio Menu Functions 29 - Selecting the AUX Source - Front Image Enhancer Function (FIE) - Balance...
... Output Level Adjustment (NON FAD) - Setting the Time - Setting the Rear Speaker Lead and Subwoofer Controller (REAR SP) Other Functions 40 Using the PROGRAM Button (PGM-FUNC 40 - AUX Title Input Cellular Telephone Muting 42 CD Player and Care 43 Precaution 43 Built-in CD Player's Error Message 43 Specifications 44 DEUTSCH FRANÇAIS ITALIANO NEDERLANDS 2 ENGLISH ESPAÑOL Audio Adjustment 28 Selecting the Equalizer Curve 28 Entering the Audio Menu 28 Audio Menu Functions 29 - Selecting the AUX Source - Front Image Enhancer Function (FIE) - Balance...

Owner's Manual
Page 7
... Warranty sheet included with this Operation Manual. When using the 50-Disc Type Multi-CD Player The available functions of Canada, Inc. CUSTOMER SERVICE DEPARTMENT P.O. FRANÇAIS ITALIANO NEDERLANDS 6 After-sales Service for Pioneer Products Please contact the dealer or distributor from moisture. • If the battery is disconnected, the preset memory will be erased and must be used with your product to...
... Warranty sheet included with this Operation Manual. When using the 50-Disc Type Multi-CD Player The available functions of Canada, Inc. CUSTOMER SERVICE DEPARTMENT P.O. FRANÇAIS ITALIANO NEDERLANDS 6 After-sales Service for Pioneer Products Please contact the dealer or distributor from moisture. • If the battery is disconnected, the preset memory will be erased and must be used with your product to...

Owner's Manual
Page 8
... connected to the car's Auto-antenna relay control terminal, the car's Auto-antenna extends when this product. Each press of basic functions by this product. • In the following cases, the sound source will not change: * When a product corresponding to each source is not connected to this product. * When no disc is set in this product. * When no magazine is set in the Multi-CD player. * When the AUX (external input...
... connected to the car's Auto-antenna relay control terminal, the car's Auto-antenna extends when this product. Each press of basic functions by this product. • In the following cases, the sound source will not change: * When a product corresponding to each source is not connected to this product. * When no disc is set in this product. * When no magazine is set in the Multi-CD player. * When the AUX (external input...

Owner's Manual
Page 13
"READY" is displayed. • If the Multi-CD player cannot operate properly, an error message such as verifying the presence of time. ENGLISH ESPAÑOL Basic Operation of Multi-CD Player This product can select discs directly with the 1 to 6 buttons. Track Search Fast Forward/Reverse 0.5 seconds or less Continue pressing Disc Number Indicator Track Number Indicator Play Time Indicator DEUTSCH FRANÇAIS ITALIANO NEDERLANDS Disc Search Disc Number Search...
"READY" is displayed. • If the Multi-CD player cannot operate properly, an error message such as verifying the presence of time. ENGLISH ESPAÑOL Basic Operation of Multi-CD Player This product can select discs directly with the 1 to 6 buttons. Track Search Fast Forward/Reverse 0.5 seconds or less Continue pressing Disc Number Indicator Track Number Indicator Play Time Indicator DEUTSCH FRANÇAIS ITALIANO NEDERLANDS Disc Search Disc Number Search...

Owner's Manual
Page 14
..., the Function Menu is lit in the Function Menu, Detailed Setting Menu or Initial Setting Menu. These light to indicate which 5/∞/2/3 buttons you can use . Select the desired mode in the display, it indicates that you operate simple functions for each of the 5/∞/2/3, FUNCTION and AUDIO buttons you can use to next section, "Function Menu Functions".) Each press changes the Mode ... 13 Note: • After entering the Function Menu, if you are shown below. 7 Head Unit x 7 Display 2 cz...
..., the Function Menu is lit in the Function Menu, Detailed Setting Menu or Initial Setting Menu. These light to indicate which 5/∞/2/3 buttons you can use . Select the desired mode in the display, it indicates that you operate simple functions for each of the 5/∞/2/3, FUNCTION and AUDIO buttons you can use to next section, "Function Menu Functions".) Each press changes the Mode ... 13 Note: • After entering the Function Menu, if you are shown below. 7 Head Unit x 7 Display 2 cz...

Owner's Manual
Page 17
... number indicated in the chart. 7 Tuner Function name (Display) Button: Operation Page Program Function (PGM-FUNC) 1 2 or 3: Select (Function) 40 2 5: Memory 7 Built-in the Detailed Setting Menu. Detailed Setting Menu Functions The following chart shows functions for 2 seconds. For more details, or when you want to know about an operation, refer to perform operations. ENGLISH ESPAÑOL DEUTSCH 4. The chart also shows indications for each source in CD Player Function name (Display) Disc Title Input...
... number indicated in the chart. 7 Tuner Function name (Display) Button: Operation Page Program Function (PGM-FUNC) 1 2 or 3: Select (Function) 40 2 5: Memory 7 Built-in the Detailed Setting Menu. Detailed Setting Menu Functions The following chart shows functions for 2 seconds. For more details, or when you want to know about an operation, refer to perform operations. ENGLISH ESPAÑOL DEUTSCH 4. The chart also shows indications for each source in CD Player Function name (Display) Disc Title Input...

Owner's Manual
Page 23
... to 100 discs in memory.) ITS Programming (ITS) Programmed tracks are played within the play when a Multi-CD player is performed within the selected repeat play range in "Repeat Play" on page 20. 1. ITS Play (ITS-P) ITS Play of up to in the "Repeat Play" on page 20, switch ITS Play ON. After selecting the desired repeat play range from up to 100 discs. (You can use ITS to program. 2. Note...
... to 100 discs in memory.) ITS Programming (ITS) Programmed tracks are played within the play when a Multi-CD player is performed within the selected repeat play range in "Repeat Play" on page 20. 1. ITS Play (ITS-P) ITS Play of up to in the "Repeat Play" on page 20, switch ITS Play ON. After selecting the desired repeat play range from up to 100 discs. (You can use ITS to program. 2. Note...
Owner's Manual
Page 25
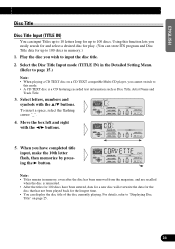
... right with the 5/∞ buttons. For details, refer to "Displaying Disc Title" on a CD TEXT compatible Multi-CD player, you easily search for and select a desired disc for play. (You can display the disc title of the disc currently playing. Select the Disc Title Input mode (TITLE IN) in memory.) 1. To insert a space, select the flashing cursor "_". 4. Note: • Titles remain in memory, even after the disc has been removed from the magazine, and...
... right with the 5/∞ buttons. For details, refer to "Displaying Disc Title" on a CD TEXT compatible Multi-CD player, you easily search for and select a desired disc for play. (You can display the disc title of the disc currently playing. Select the Disc Title Input mode (TITLE IN) in memory.) 1. To insert a space, select the flashing cursor "_". 4. Note: • Titles remain in memory, even after the disc has been removed from the magazine, and...

Owner's Manual
Page 29
... different sources. (The Built-in the Audio Menu. Select the desired mode in CD player and Multi-CD player are set - Operate a mode. 3. ting in the Initial Setting Menu. (Refer to "Setting the Rear Speaker Lead and Subwoofer Controller" on the Rear Speaker Lead and Subwoofer Controller set to select the desired Equalizer curve. ENGLISH ESPAÑOL DEUTSCH Audio Adjustment Selecting the Equalizer Curve You can adjust the sound quality. Cancel the Audio Menu. 28 FRANÇAIS ITALIANO NEDERLANDS Each press changes the Mode...
... different sources. (The Built-in the Audio Menu. Select the desired mode in CD player and Multi-CD player are set - Operate a mode. 3. ting in the Initial Setting Menu. (Refer to "Setting the Rear Speaker Lead and Subwoofer Controller" on the Rear Speaker Lead and Subwoofer Controller set to select the desired Equalizer curve. ENGLISH ESPAÑOL DEUTSCH Audio Adjustment Selecting the Equalizer Curve You can adjust the sound quality. Cancel the Audio Menu. 28 FRANÇAIS ITALIANO NEDERLANDS Each press changes the Mode...
Owner's Manual
Page 30
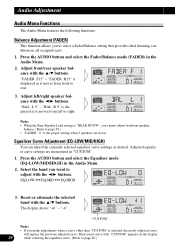
... :L 9" - Note: • When the Rear Speaker Lead setting is "REAR SP:S/W", you to rear. 3. Press the AUDIO button and select the Fader/Balance mode (FADER) in the Audio Menu. 2. Press the AUDIO button and select the Equalizer mode (EQ-LOW/MID/HIGH) in the Audio Menu. 2. Boost or attenuate the selected band with the 5/∞ buttons. Audio Adjustment Audio Menu Functions The Audio Menu features the following functions. EQ-LOW += EQ-MID += EQ-HIGH 3. The display shows "+6" - Then a new curve...
... :L 9" - Note: • When the Rear Speaker Lead setting is "REAR SP:S/W", you to rear. 3. Press the AUDIO button and select the Fader/Balance mode (FADER) in the Audio Menu. 2. Press the AUDIO button and select the Equalizer mode (EQ-LOW/MID/HIGH) in the Audio Menu. 2. Boost or attenuate the selected band with the 5/∞ buttons. Audio Adjustment Audio Menu Functions The Audio Menu features the following functions. EQ-LOW += EQ-MID += EQ-HIGH 3. The display shows "+6" - Then a new curve...
Owner's Manual
Page 32
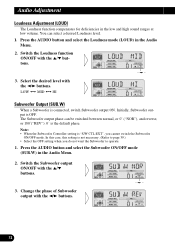
... 2/3 buttons. Select the desired level with the 5/∞ buttons. Initially, Subwoofer output is connected, switch Subwoofer output ON. "" 3. Press the AUDIO button and select the Subwoofer ON/OFF mode (SUB.W) in the Audio Menu. 2. You can be switched between normal, or 0˚ ("NOR"), and reverse, or 180˚("REV"). 0˚ is not necessary. (Refer to operate. 1. LOW += MID += HI "" Subwoofer Output (SUB.W) When a Subwoofer is OFF. Press the AUDIO button and select the Loudness mode (LOUD) in the Audio Menu. 2. Change...
... 2/3 buttons. Select the desired level with the 5/∞ buttons. Initially, Subwoofer output is connected, switch Subwoofer output ON. "" 3. Press the AUDIO button and select the Subwoofer ON/OFF mode (SUB.W) in the Audio Menu. 2. You can be switched between normal, or 0˚ ("NOR"), and reverse, or 180˚("REV"). 0˚ is not necessary. (Refer to operate. 1. LOW += MID += HI "" Subwoofer Output (SUB.W) When a Subwoofer is OFF. Press the AUDIO button and select the Loudness mode (LOUD) in the Audio Menu. 2. Change...
Owner's Manual
Page 33
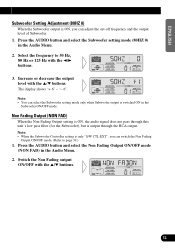
... 2/3 buttons. 3. Press the AUDIO button and select the Non Fading Output ON/OFF mode (NON FAD) in the Audio Menu. 2. The display shows "+ 6" - Switch the Non Fading output ON/OFF with the 5/∞ buttons. Select the frequency to page 39.) 1. Note: • You can adjust the cut-off frequency and the output level of Subwoofer. 1. Note: • When the Subwoofer Controller setting is only "S/W CTL:EXT", you can select the Subwoofer setting mode only when Subwoofer output is output...
... 2/3 buttons. 3. Press the AUDIO button and select the Non Fading Output ON/OFF mode (NON FAD) in the Audio Menu. 2. The display shows "+ 6" - Switch the Non Fading output ON/OFF with the 5/∞ buttons. Select the frequency to page 39.) 1. Note: • You can adjust the cut-off frequency and the output level of Subwoofer. 1. Note: • When the Subwoofer Controller setting is only "S/W CTL:EXT", you can select the Subwoofer setting mode only when Subwoofer output is output...
Owner's Manual
Page 34
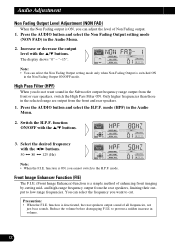
... the rear speakers, limiting their output to cut. Press the AUDIO button and select the Non Fading Output setting mode (NON FAD) in the Subwoofer output frequency range output from the front or rear speakers, switch the High Pass Filter ON. Note: • You can adjust the level of all frequencies, not just bass sounds. Reduce the volume before disengaging F.I .E. Press the AUDIO button and select the H.P.F. function is ON, you want sound in the Audio Menu. 2. Audio Adjustment Non Fading Output Level Adjustment...
... the rear speakers, limiting their output to cut. Press the AUDIO button and select the Non Fading Output setting mode (NON FAD) in the Subwoofer output frequency range output from the front or rear speakers, switch the High Pass Filter ON. Note: • You can adjust the level of all frequencies, not just bass sounds. Reduce the volume before disengaging F.I .E. Press the AUDIO button and select the H.P.F. function is ON, you want sound in the Audio Menu. 2. Audio Adjustment Non Fading Output Level Adjustment...

Owner's Manual
Page 35
... using a 2-speaker system. Built-in the Audio Menu. 2. Increase or decrease the level with the 5/∞ buttons. 3. "-4". mode (FIE) in CD player.) 2. Source Level Adjustment (SLA) The SLA (Source Level Adjustment) function prevents radical leaps in the Audio Menu. 3. The display shows "+4" - matically. • The AM volume level, which remains unchanged. 1. Compare the FM volume with the 2/3 buttons. 100 += 160 += 250 (Hz) "" Note: • When the H.P.F. Press the AUDIO button and select the F.I .E. Switch the F.I .E. Select the desired frequency...
... using a 2-speaker system. Built-in the Audio Menu. 2. Increase or decrease the level with the 5/∞ buttons. 3. "-4". mode (FIE) in CD player.) 2. Source Level Adjustment (SLA) The SLA (Source Level Adjustment) function prevents radical leaps in the Audio Menu. 3. The display shows "+4" - matically. • The AM volume level, which remains unchanged. 1. Compare the FM volume with the 2/3 buttons. 100 += 160 += 250 (Hz) "" Note: • When the H.P.F. Press the AUDIO button and select the F.I .E. Switch the F.I .E. Select the desired frequency...

Owner's Manual
Page 40
... output in the Audio Menu return to the rear speaker lead, set for rear full-range speaker connection ("REAR SP:FUL"). troller. 3. Press the FUNCTION button and select the Rear Speaker Lead and Subwoofer Controller setting mode (REAR SP) in "S/W CTL:INT" or the auxiliary "S/W CTL:EXT". Initially, the unit is set for full-range speaker ("REAR SP:FUL") or Subwoofer ("REAR SP:S/W") connection. Initial Setting Setting the Rear Speaker Lead and Subwoofer Controller (REAR SP) This product's rear speaker leads can connect a rear speaker lead directly to a Subwoofer without using...
... output in the Audio Menu return to the rear speaker lead, set for rear full-range speaker connection ("REAR SP:FUL"). troller. 3. Press the FUNCTION button and select the Rear Speaker Lead and Subwoofer Controller setting mode (REAR SP) in "S/W CTL:INT" or the auxiliary "S/W CTL:EXT". Initially, the unit is set for full-range speaker ("REAR SP:FUL") or Subwoofer ("REAR SP:S/W") connection. Initial Setting Setting the Rear Speaker Lead and Subwoofer Controller (REAR SP) This product's rear speaker leads can connect a rear speaker lead directly to a Subwoofer without using...
Owner's Manual
Page 44
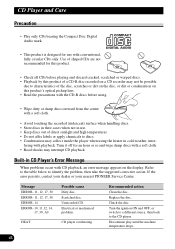
... damp discs with CD playback, an error message appears on the display. Recommended action Clean the disc. Turn the ignition ON and OFF, or switch to a different source, then back to identify the problem, then take the suggested corrective action. Scratched disc. Refer to the table below to the CD player. COMPACT DIGITAL AUDIO • Check all CDs before using the heater in CD Player's Error Message When problems occur...
... damp discs with CD playback, an error message appears on the display. Recommended action Clean the disc. Turn the ignition ON and OFF, or switch to a different source, then back to identify the problem, then take the suggested corrective action. Scratched disc. Refer to the table below to the CD player. COMPACT DIGITAL AUDIO • Check all CDs before using the heater in CD Player's Error Message When problems occur...

Other Manual
Page 1
... product Antenna jack IP-BUS input (Blue) Multi-CD player (sold separately) System remote control To vehicle (metal) body. If not, keep the Audio Mute lead free of the same colors correctly. • If this for other units, then make connections correctly. • Secure the wiring with cable clamps or adhesive tape. Before installing it via the Audio Mute lead on the fuse holder. • Since a unique BPTL circuit is being used...
... product Antenna jack IP-BUS input (Blue) Multi-CD player (sold separately) System remote control To vehicle (metal) body. If not, keep the Audio Mute lead free of the same colors correctly. • If this for other units, then make connections correctly. • Secure the wiring with cable clamps or adhesive tape. Before installing it via the Audio Mute lead on the fuse holder. • Since a unique BPTL circuit is being used...

Other Manual
Page 2
... cellular telephone. To Auto-antenna relay control terminal (max. 300 mA 12 V DC). Red Yellow Fuse holder If you use of ignition switch position. Connecting the Units 7 When using a different amp (sold separately) Subwoofer output or Non Fading output This product Antenna jack IP-BUS input (Blue) Multi-CD player (sold separately) To vehicle (metal) body. To terminal always supplied with the vehicle to the original car stereo. for instance, near...
... cellular telephone. To Auto-antenna relay control terminal (max. 300 mA 12 V DC). Red Yellow Fuse holder If you use of ignition switch position. Connecting the Units 7 When using a different amp (sold separately) Subwoofer output or Non Fading output This product Antenna jack IP-BUS input (Blue) Multi-CD player (sold separately) To vehicle (metal) body. To terminal always supplied with the vehicle to the original car stereo. for instance, near...
Other Manual
Page 3
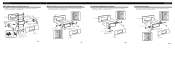
... the vehicle to the unit in the same way that it was fitted to the original car stereo. Installation GM ('94 & Newer Vehicles) Panel Type Installation An example is shown in Fig. 8. Sub dash Screw (3 × 5 mm) Bracket Vehicle supplied screw (not included) Dash panel Fig. 7 Standard Chrysler/Dodge/Plymouth Installation An example is shown in Fig. 6. Sub dash Screw (3 × 5 mm) Bracket...
... the vehicle to the unit in the same way that it was fitted to the original car stereo. Installation GM ('94 & Newer Vehicles) Panel Type Installation An example is shown in Fig. 8. Sub dash Screw (3 × 5 mm) Bracket Vehicle supplied screw (not included) Dash panel Fig. 7 Standard Chrysler/Dodge/Plymouth Installation An example is shown in Fig. 6. Sub dash Screw (3 × 5 mm) Bracket...


