Owner's Manual
Page 6
... Connecting to an AV amplifier 18 Connecting other AV sources 19 Plugging in 19 03 Controls and displays Front panel 20 Display 21 Remote control 22 06 Recording About DVD recording 42 Recording time and picture quality 42 Restrictions on video recording 43 Setting the picture quality... and playback 50 Recording from an external component 51 Automatic recording from a satellite tuner 51 Recording from a DV camcorder (DVR-320 only) . . . 52 Recording from the DV output (DVR-320 only 53 Playing your recordings on other DVD players . . . . . 54 Initializing a DVD-RW disc 55 07...
... Connecting to an AV amplifier 18 Connecting other AV sources 19 Plugging in 19 03 Controls and displays Front panel 20 Display 21 Remote control 22 06 Recording About DVD recording 42 Recording time and picture quality 42 Restrictions on video recording 43 Setting the picture quality... and playback 50 Recording from an external component 51 Automatic recording from a satellite tuner 51 Recording from a DV camcorder (DVR-320 only) . . . 52 Recording from the DV output (DVR-320 only 53 Playing your recordings on other DVD players . . . . . 54 Initializing a DVD-RW disc 55 07...

Owner's Manual
Page 7
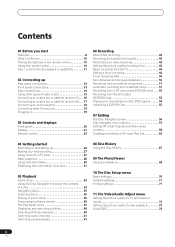
... Recording settings 82 Playback settings 83 13 Additional information Resetting the recorder 86 Setting up the remote to control your TV 86 Screen sizes and disc formats 87 Troubleshooting 88 Frequently asked questions 90 About DV (DVR-320 only 91 Manual recording modes 92 Information for cable/satellite/STB (set-top box) users...
... Recording settings 82 Playback settings 83 13 Additional information Resetting the recorder 86 Setting up the remote to control your TV 86 Screen sizes and disc formats 87 Troubleshooting 88 Frequently asked questions 90 About DV (DVR-320 only 91 Manual recording modes 92 Information for cable/satellite/STB (set-top box) users...
Owner's Manual
Page 10
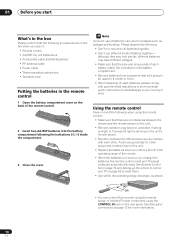
... of used batteries, please comply with each other equipment located close to this recorder using the remote sensor of another Pioneer component using remotes for more information. 10 En See Rear panel connections on the back of the remote control. 2 Insert two AA/R6P batteries into the battery compartment following accessories are in the...
... of used batteries, please comply with each other equipment located close to this recorder using the remote sensor of another Pioneer component using remotes for more information. 10 En See Rear panel connections on the back of the remote control. 2 Insert two AA/R6P batteries into the battery compartment following accessories are in the...

Owner's Manual
Page 13
... S-VIDEO VIDEO On the left side of the front panel a flip-down cover hides a third audio/video input, consisting of another Pioneer component with a CONTROL OUT terminal and bearing the Pioneer mark. Connecting up Chapter 2 Connecting up Rear panel connections 1 2 3 4 56 OUT IN VHF/UHF OUTPUT 1 R L R L INPUT 1/ ...CONTROL IN of this recorder from the remote sensor of an S-video and standard (composite) video jack, and stereo analog audio jacks. This is the DV input/output i.LINK connector. PULL-OPEN VIDEO/R/RW DV IN/OUT DV IN/OUT DVR-320 only: On the right side is ...
... S-VIDEO VIDEO On the left side of the front panel a flip-down cover hides a third audio/video input, consisting of another Pioneer component with a CONTROL OUT terminal and bearing the Pioneer mark. Connecting up Chapter 2 Connecting up Rear panel connections 1 2 3 4 56 OUT IN VHF/UHF OUTPUT 1 R L R L INPUT 1/ ...CONTROL IN of this recorder from the remote sensor of an S-video and standard (composite) video jack, and stereo analog audio jacks. This is the DV input/output i.LINK connector. PULL-OPEN VIDEO/R/RW DV IN/OUT DV IN/OUT DVR-320 only: On the right side is ...

Owner's Manual
Page 20
... 13) Pull the cover down where indicated to directly access the Disc Navigator screen. 4 IR remote sensor (page 10) 5 Disc tray 6 Front panel display See Display on page 21 for details. 7 DV IN/OUT jack (DVR-320 only) (page 13, 19, 51, 52, 53) Digital input/output jack for connecting camcorders... Front panel 1 2 34 STANDBY/ON DISC DISC HISTORY NAVIGATOR PULL-OPEN 5 VIDEO/R/RW 6 OPEN/CLOSE REC REC MODE DV IN/OUT 15 Illustration shows DVR-320 1 STANDBY/ON Press to switch the recorder on/into standby. 2 DISC HISTORY (page 67) Press to display the Disc History screen. 3 DISC NAVIGATOR ...
... 13) Pull the cover down where indicated to directly access the Disc Navigator screen. 4 IR remote sensor (page 10) 5 Disc tray 6 Front panel display See Display on page 21 for details. 7 DV IN/OUT jack (DVR-320 only) (page 13, 19, 51, 52, 53) Digital input/output jack for connecting camcorders... Front panel 1 2 34 STANDBY/ON DISC DISC HISTORY NAVIGATOR PULL-OPEN 5 VIDEO/R/RW 6 OPEN/CLOSE REC REC MODE DV IN/OUT 15 Illustration shows DVR-320 1 STANDBY/ON Press to switch the recorder on/into standby. 2 DISC HISTORY (page 67) Press to display the Disc History screen. 3 DISC NAVIGATOR ...
Owner's Manual
Page 21
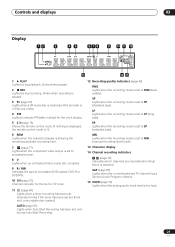
... recorder is in Play List mode. 4 PM Lights to indicate PM (after midday) for the clock display. 5 2 3 (page 76) Shows the remote control mode (if nothing is displayed, the remote control mode is 1). 6 REM Lights when the character display is showing the remaining available recording time. 7 (page 77) Lights when the component...
... recorder is in Play List mode. 4 PM Lights to indicate PM (after midday) for the clock display. 5 2 3 (page 76) Shows the remote control mode (if nothing is displayed, the remote control mode is 1). 6 REM Lights when the character display is showing the remaining available recording time. 7 (page 77) Lights when the component...
Owner's Manual
Page 22
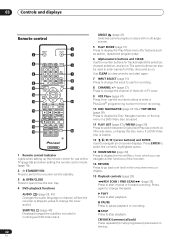
...discs, or display the disc menu if a DVD-Video disc is loaded. 03 Controls and displays Remote control ANGLE (page 41) Switches camera angles on discs with a TV (page 86) and when setting the remote control mode (page 76). 2 STANDBY/ON Press to switch the recorder on/into standby. 3 ...of the built-in TV tuner. 9 VCR Plus+ (page 47) Press, then use with multi-angle scenes. DVD RECORDER 1 Remote control indicator Lights when setting up the remote control for use the number buttons to enter a PlusCode® programming number for track/chapter/title selection; Press again to start ...
...discs, or display the disc menu if a DVD-Video disc is loaded. 03 Controls and displays Remote control ANGLE (page 41) Switches camera angles on discs with a TV (page 86) and when setting the remote control mode (page 76). 2 STANDBY/ON Press to switch the recorder on/into standby. 3 ...of the built-in TV tuner. 9 VCR Plus+ (page 47) Press, then use with multi-angle scenes. DVD RECORDER 1 Remote control indicator Lights when setting up the remote control for use the number buttons to enter a PlusCode® programming number for track/chapter/title selection; Press again to start ...

Owner's Manual
Page 24
... Setup Basic Tuner Video Out Audio In Audio Out Language Recording Playback Clock SLeatnguage On Screen Display Front Panel Display Remote Control SetEnglish Setup Mavigator français 4 Press ENTER again to start setting up using the recorder for the first...press ENTER. ENTER DVD RECORDER Initial Setup Basic Tuner Video Out Audio In Audio Out Language Recording Playback COFrlnooncSktcrPSeaeentnelDCstDioasimprstplpaullyaseyitnegtyhoisusrerteucporbdeefro.re you Remote Control Set Start Setup Mavigator Cancel Please use the Initial Setup if you want to use the recorder. 1 Switch on...
... Setup Basic Tuner Video Out Audio In Audio Out Language Recording Playback Clock SLeatnguage On Screen Display Front Panel Display Remote Control SetEnglish Setup Mavigator français 4 Press ENTER again to start setting up using the recorder for the first...press ENTER. ENTER DVD RECORDER Initial Setup Basic Tuner Video Out Audio In Audio Out Language Recording Playback COFrlnooncSktcrPSeaeentnelDCstDioasimprstplpaullyaseyitnegtyhoisusrerteucporbdeefro.re you Remote Control Set Start Setup Mavigator Cancel Please use the Initial Setup if you want to use the recorder. 1 Switch on...

Owner's Manual
Page 25
... Initial Setup Basic Tuner Video Out Audio In Audio Out Language Recording Playback Clock SAetuto Clock Setting On ScreeDnaDteisplay Front Panel Display Remote CTiomnetrol Set Setup MCavloigckatSoert CH 2 Start The recorder takes a short while to On or Off, then press ENTER. Off ... clock automatically. Initial Setup Basic Clock SMetanual Clock Setting 1/2 Tuner Video Out Audio In On Screen Display Front PTainmeel ZDoinspelay Remote Control Set USA Alaska Audio Out Language Setup Mavigator D.S.T. Initial Setup Basic Tuner Video Out Audio In Audio Out Language Recording...
... Initial Setup Basic Tuner Video Out Audio In Audio Out Language Recording Playback Clock SAetuto Clock Setting On ScreeDnaDteisplay Front Panel Display Remote CTiomnetrol Set Setup MCavloigckatSoert CH 2 Start The recorder takes a short while to On or Off, then press ENTER. Off ... clock automatically. Initial Setup Basic Clock SMetanual Clock Setting 1/2 Tuner Video Out Audio In On Screen Display Front PTainmeel ZDoinspelay Remote Control Set USA Alaska Audio Out Language Setup Mavigator D.S.T. Initial Setup Basic Tuner Video Out Audio In Audio Out Language Recording...
Owner's Manual
Page 26
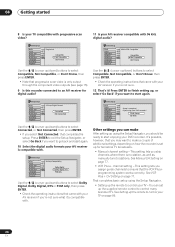
... Basic Tuner Video Out Audio In Audio Out Language Recording Playback Clock SAeVt Amp Digital Connect On Screen Display Front Panel Display Remote Control SetConnected Setup Mavigator Not Connected Initial Setup Basic Tuner Video Out Audio In Audio Out Language Recording Playback Clock Set On ...! Initial Setup Basic Tuner Video Out Audio In Audio Out Language Recording Playback Clock SPertogressive On Screen Display Front Panel Display Remote Control Set Compatible Setup Mavigator Not Compatible Don't Know Initial Setup Basic Tuner Video Out Audio In Audio Out Language Recording ...
... Basic Tuner Video Out Audio In Audio Out Language Recording Playback Clock SAeVt Amp Digital Connect On Screen Display Front Panel Display Remote Control SetConnected Setup Mavigator Not Connected Initial Setup Basic Tuner Video Out Audio In Audio Out Language Recording Playback Clock Set On ...! Initial Setup Basic Tuner Video Out Audio In Audio Out Language Recording Playback Clock SPertogressive On Screen Display Front Panel Display Remote Control Set Compatible Setup Mavigator Not Compatible Don't Know Initial Setup Basic Tuner Video Out Audio In Audio Out Language Recording ...

Owner's Manual
Page 27
... on. • Make sure that the video input on your TV is stopped. • Antenna channels are numbered 1 through 69. buttons on the remote - Recording is playing, you load a new, blank DVD-RW disc, the recorder will give you want to stop recording, press STOP REC. ENTER... 5 Press ì REC to start playback. If you around 2 hours of a TV program to select channel 4, press 4 then ENTER; buttons on the remote • Number buttons on the front panel 27 En for channel 34, press 3, 4, ENTER; Getting started 04 Making your first recording This quick guide shows...
... on. • Make sure that the video input on your TV is stopped. • Antenna channels are numbered 1 through 69. buttons on the remote - Recording is playing, you load a new, blank DVD-RW disc, the recorder will give you want to stop recording, press STOP REC. ENTER... 5 Press ì REC to start playback. If you around 2 hours of a TV program to select channel 4, press 4 then ENTER; buttons on the remote • Number buttons on the front panel 27 En for channel 34, press 3, 4, ENTER; Getting started 04 Making your first recording This quick guide shows...

Owner's Manual
Page 33
... one level from the on -screen displays. Timer Recording Disc Navigator Disc History PhotoViewer DV Record Disc Setup Initial Setup Video/Audio Adjust Play Mode DVR-320 screen 2 Select what . DVD Any kind of DVD, DVD-R or DVD-RW DVD-Video Commercially produced DVD or finalized Video mode DVD-R/RW... to help you quickly identify which instructions you need for a CD, Video CDor WMA/MP3 disc, you can press DISC NAVIGATOR (front panel or remote), which takes you straight to the Disc Navigator screen. • Some DVD-Video discs don't allow certain playback controls to operate at the bottom...
... one level from the on -screen displays. Timer Recording Disc Navigator Disc History PhotoViewer DV Record Disc Setup Initial Setup Video/Audio Adjust Play Mode DVR-320 screen 2 Select what . DVD Any kind of DVD, DVD-R or DVD-RW DVD-Video Commercially produced DVD or finalized Video mode DVD-R/RW... to help you quickly identify which instructions you need for a CD, Video CDor WMA/MP3 disc, you can press DISC NAVIGATOR (front panel or remote), which takes you straight to the Disc Navigator screen. • Some DVD-Video discs don't allow certain playback controls to operate at the bottom...
Owner's Manual
Page 35
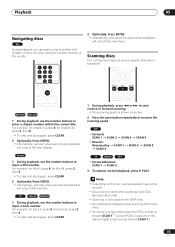
... 6; Playback 05 Navigating discs ALL During playback you can easily jump to another title, chapter or track on a disc using the number buttons on the remote. 2 Optionally: Press ENTER. • Alternatively, just wait a few seconds and playback will jump to enter a chapter number within the current title. for track 24, press...
... 6; Playback 05 Navigating discs ALL During playback you can easily jump to another title, chapter or track on a disc using the number buttons on the remote. 2 Optionally: Press ENTER. • Alternatively, just wait a few seconds and playback will jump to enter a chapter number within the current title. for track 24, press...

Owner's Manual
Page 43
... be displayed on-screen. • Video that if the On Screen Display setting (see Manual Recording on page 82). REC MODE • Press REC MODE (remote or front panel) repeatedly to set the Manual Recording option in VR mode (see Displaying disc information on-screen on page 31). Fine picture quality...
... be displayed on-screen. • Video that if the On Screen Display setting (see Manual Recording on page 82). REC MODE • Press REC MODE (remote or front panel) repeatedly to set the Manual Recording option in VR mode (see Displaying disc information on-screen on page 31). Fine picture quality...
Owner's Manual
Page 44
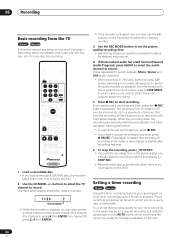
... picture quality/recording time above for channel 24, press 2, 4 then ENTER) • If the recorder is stopped, you to switch the audio channel on the remote to record. The recording time increases in 30 minute increments, up to a month in VR mode, both mono and SAP audio channels are recorded, allowing...
... picture quality/recording time above for channel 24, press 2, 4 then ENTER) • If the recorder is stopped, you to switch the audio channel on the remote to record. The recording time increases in 30 minute increments, up to a month in VR mode, both mono and SAP audio channels are recorded, allowing...

Owner's Manual
Page 49
... so that the timer settings are not changed . Programming a new end time 1 During timer recording, press TIMER REC to make all the front panel and remote control buttons inoperative using the child lock feature. REC STOPREC ì Timer Recording Date Start Stop CH Mode Confirm 12/13 WED 7:00 PM 8:00...
... so that the timer settings are not changed . Programming a new end time 1 During timer recording, press TIMER REC to make all the front panel and remote control buttons inoperative using the child lock feature. REC STOPREC ì Timer Recording Date Start Stop CH Mode Confirm 12/13 WED 7:00 PM 8:00...

Owner's Manual
Page 50
... selecting it 's OK. Also make sure that the disc is not locked (see Scanning discs on page 70) and that there are pressed on the remote or front panel, LOCK is briefly displayed again. • To unlock the recorder, press and hold STOP on the front panel for DVD recordings when...
... selecting it 's OK. Also make sure that the disc is not locked (see Scanning discs on page 70) and that there are pressed on the remote or front panel, LOCK is briefly displayed again. • To unlock the recorder, press and hold STOP on the front panel for DVD recordings when...

Owner's Manual
Page 52
...progress on , or 'Cancel' to switch off. 7 Switch the recorder into standby. Recording from a DV camcorder (DVR-320 only) VR mode Video mode You can 't control this recorder. Using the recorder's remote, you want to program a new end time for the timer recording, press the front panel + button for the ... to playpause. 52 En Before recording, make sure that the audio input for 3 seconds, then program the new time (see DV Input (DVR-320 only) on it, this recorder will automatically switch on and start recording when the other component comes on the front panel of this recorder. ...
...progress on , or 'Cancel' to switch off. 7 Switch the recorder into standby. Recording from a DV camcorder (DVR-320 only) VR mode Video mode You can 't control this recorder. Using the recorder's remote, you want to program a new end time for the timer recording, press the front panel + button for the ... to playpause. 52 En Before recording, make sure that the audio input for 3 seconds, then program the new time (see DV Input (DVR-320 only) on it, this recorder will automatically switch on and start recording when the other component comes on the front panel of this recorder. ...

Owner's Manual
Page 53
...camcorder using the DV IN/OUT jack. You cannot control the camcorder from this remote control during recording. • If you 're trying to control it still doesn't work with the recorder! Recording from the DV output (DVR-320 only) VR mode Video mode You can 't get my DV camcorder to start..., for detailed information. • Make sure a recordable disc is loaded. 3 From the Initial Settings menu, check that you want them (see DV Input (DVR-320 only) on page 91 if you want to record. • Depending on the DV tape. Note • Depending on the DV tape cannot be able...
...camcorder using the DV IN/OUT jack. You cannot control the camcorder from this remote control during recording. • If you 're trying to control it still doesn't work with the recorder! Recording from the DV output (DVR-320 only) VR mode Video mode You can 't get my DV camcorder to start..., for detailed information. • Make sure a recordable disc is loaded. 3 From the Initial Settings menu, check that you want them (see DV Input (DVR-320 only) on page 91 if you want to record. • Depending on the DV tape. Note • Depending on the DV tape cannot be able...
Owner's Manual
Page 59
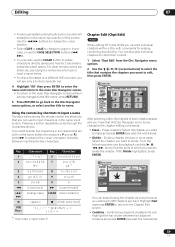
... 999 chapters per disc). Erase chapters: Select the chapter you want to erase and press ENTER (see Using the remote key shortcuts to input a name below shows the remote control key shortcuts that the Disc Navigator menu items change to the chapter editing commands: • Erase - Pressing ...Use the / buttons to change the cursor position. • Select CAPS or small to the Chapter Edit screen. • Combine - For other remote control key shortcuts, see also the note below ) 59 En Divide Chapter Original DVD Title 12/01Wed 12:18AM 1 Recording Time SP Chapter 0h01m24s...
... 999 chapters per disc). Erase chapters: Select the chapter you want to erase and press ENTER (see Using the remote key shortcuts to input a name below shows the remote control key shortcuts that the Disc Navigator menu items change to the chapter editing commands: • Erase - Pressing ...Use the / buttons to change the cursor position. • Select CAPS or small to the Chapter Edit screen. • Combine - For other remote control key shortcuts, see also the note below ) 59 En Divide Chapter Original DVD Title 12/01Wed 12:18AM 1 Recording Time SP Chapter 0h01m24s...


