Owner's Manual
Page 2
...the Initial Setting Screen Setting the Menu Lock 22 - Returns to the General Environment Setting Screen - When the Cover is Open Remote Controller and Care 8 Using the Remote Controller 8 Batteries 8 Before Using This Product 9 About This Product 9 About This Manual 9 Important 9 Precaution 10 Resetting the ... - Off Clock - Setting the Warning Tone - Warning Tone Setting Up the Environment for Use 15 Setting Up the Environment for Pioneer Products ........ 11 About the XM READY mark 12 Detaching and Replacing the Front Panel 13 Theft Protection 13 - Returns to the...
...the Initial Setting Screen Setting the Menu Lock 22 - Returns to the General Environment Setting Screen - When the Cover is Open Remote Controller and Care 8 Using the Remote Controller 8 Batteries 8 Before Using This Product 9 About This Product 9 About This Manual 9 Important 9 Precaution 10 Resetting the ... - Off Clock - Setting the Warning Tone - Warning Tone Setting Up the Environment for Use 15 Setting Up the Environment for Pioneer Products ........ 11 About the XM READY mark 12 Detaching and Replacing the Front Panel 13 Theft Protection 13 - Returns to the...
Owner's Manual
Page 4
... Installation Using the Mounting Base and the Bracket 80 - Contents Audio Adjustment 61 Switching to the Audio Adjustment Screen .... 61 - Installation without Audio Unit (DEQ-P9 71 Connecting with the rubber bush - Method A - Removing the Unit DIN Rear-mount 77 - Bass/Treble Adjustment - Fitting horizontally - AUX Title Input Cellular Telephone Muting... 3 Fader/Balance Adjustment - Installation using the screw holes on the side of the unit About the fixing screws for the front panel .... 78 Installing the Remote Control Unit ...... 79 Fitting the Remote Control Unit 79 -
... Installation Using the Mounting Base and the Bracket 80 - Contents Audio Adjustment 61 Switching to the Audio Adjustment Screen .... 61 - Installation without Audio Unit (DEQ-P9 71 Connecting with the rubber bush - Method A - Removing the Unit DIN Rear-mount 77 - Bass/Treble Adjustment - Fitting horizontally - AUX Title Input Cellular Telephone Muting... 3 Fader/Balance Adjustment - Installation using the screw holes on the side of the unit About the fixing screws for the front panel .... 78 Installing the Remote Control Unit ...... 79 Fitting the Remote Control Unit 79 -
Owner's Manual
Page 6
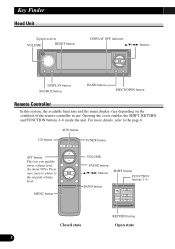
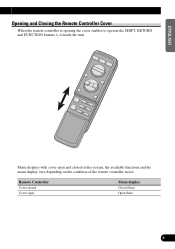
... receiver VOLUME RESET button DISPLAY OFF indicator 5/∞/2/3 buttons DISPLAY button SOURCE button BAND button EJECT/OPEN button Remote Controller In this system, the available functions and the menu display vary depending on the condition of the remote controller in use. Opening the cover enables the SHIFT, RETURN and FUNCTION buttons 1-6 inside the unit.
... receiver VOLUME RESET button DISPLAY OFF indicator 5/∞/2/3 buttons DISPLAY button SOURCE button BAND button EJECT/OPEN button Remote Controller In this system, the available functions and the menu display vary depending on the condition of the remote controller in use. Opening the cover enables the SHIFT, RETURN and FUNCTION buttons 1-6 inside the unit.
Owner's Manual
Page 7
ESPAÑOL DEUTSCH FRANÇAIS ITALIANO NEDERLANDS Menu displays with cover open and closed Cover open Menu display Closed State Open State 6 ENGLISH Opening and Closing the Remote Controller Cover When the remote controller is opening the cover enables to operate the SHIFT, RETURN and FUNCTION buttons 1-6 inside the unit. Remote Controller Cover closed in this system, the available functions and the menu display vary depending on the condition of the remote controller in use.
ESPAÑOL DEUTSCH FRANÇAIS ITALIANO NEDERLANDS Menu displays with cover open and closed Cover open Menu display Closed State Open State 6 ENGLISH Opening and Closing the Remote Controller Cover When the remote controller is opening the cover enables to operate the SHIFT, RETURN and FUNCTION buttons 1-6 inside the unit. Remote Controller Cover closed in this system, the available functions and the menu display vary depending on the condition of the remote controller in use.
Owner's Manual
Page 8
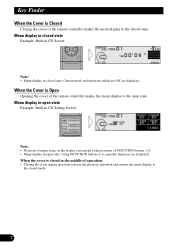
When the Cover is Open Opening the cover of the remote controller makes the menu display to the closed state. Menu display in closed state Example: Built-in CD Screen Note: • Menu display in closed mode. 7 ... cover is closed in open state: Using FUNCTION buttons 1-6, operable functions are displayed. Key Finder When the Cover is Closed Closing the cover of the remote controller makes the menu display to the open state. Menu display in open state Example: Built-in CD Setting Screen Note: • Positions of menu items...
When the Cover is Open Opening the cover of the remote controller makes the menu display to the closed state. Menu display in closed state Example: Built-in CD Screen Note: • Menu display in closed mode. 7 ... cover is closed in open state: Using FUNCTION buttons 1-6, operable functions are displayed. Key Finder When the Cover is Closed Closing the cover of the remote controller makes the menu display to the open state. Menu display in open state Example: Built-in CD Setting Screen Note: • Positions of menu items...
Owner's Manual
Page 9
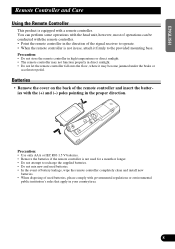
... the brake or accelerator pedal. You can perform some operations with the head unit, however, most of the remote controller and insert the batteries with a remote controller. Batteries • Remove the cover on the back of operations can be conducted with governmental regulations or environmental public...institution's rules that apply in your country/area. 8 FRANÇAIS ITALIANO NEDERLANDS ENGLISH ESPAÑOL DEUTSCH Remote Controller and Care Using the Remote Controller This product is not in use, attach it may not function properly in direct sunlight. • Do not let...
... the brake or accelerator pedal. You can perform some operations with the head unit, however, most of the remote controller and insert the batteries with a remote controller. Batteries • Remove the cover on the back of operations can be conducted with governmental regulations or environmental public...institution's rules that apply in your country/area. 8 FRANÇAIS ITALIANO NEDERLANDS ENGLISH ESPAÑOL DEUTSCH Remote Controller and Care Using the Remote Controller This product is not in use, attach it may not function properly in direct sunlight. • Do not let...
Owner's Manual
Page 10
...yourself with the functions and their potential and to maximize your own security and convenience, be conducted with the head unit, however, the remote controller offers a number of buttons such as ATT, PAUSE, SHIFT, MENU, RETURN and FUNCTION buttons 1-6 which are not self-explanatory. ...And most of operations can perform the same operations with the remote controller. It is especially important that you begin using this product. This operation manual is located on this product are allocated for the ...
...yourself with the functions and their potential and to maximize your own security and convenience, be conducted with the head unit, however, the remote controller offers a number of buttons such as ATT, PAUSE, SHIFT, MENU, RETURN and FUNCTION buttons 1-6 which are not self-explanatory. ...And most of operations can perform the same operations with the remote controller. It is especially important that you begin using this product. This operation manual is located on this product are allocated for the ...
Owner's Manual
Page 16
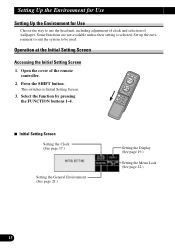
... Environment for Use Setting Up the Environment for Use Choose the way to use the head unit, including adjustment of clock and selection of the remote controller. 2.
... Environment for Use Setting Up the Environment for Use Choose the way to use the head unit, including adjustment of clock and selection of the remote controller. 2.
Owner's Manual
Page 17
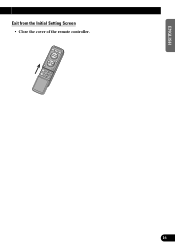
ENGLISH ESPAÑOL DEUTSCH Exit from the Initial Setting Screen • Close the cover of the remote controller. 16 FRANÇAIS ITALIANO NEDERLANDS
ENGLISH ESPAÑOL DEUTSCH Exit from the Initial Setting Screen • Close the cover of the remote controller. 16 FRANÇAIS ITALIANO NEDERLANDS
Owner's Manual
Page 23
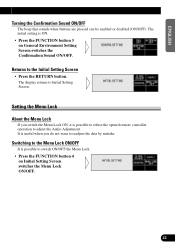
The initial setting is possible to refuse the opened remote controller operation to adjust the Audio Adjustment. Returns to switch ON/OFF the Menu Lock. • Press the FUNCTION button 4 on General Environment Setting Screen switches ...
The initial setting is possible to refuse the opened remote controller operation to adjust the Audio Adjustment. Returns to switch ON/OFF the Menu Lock. • Press the FUNCTION button 4 on General Environment Setting Screen switches ...
Owner's Manual
Page 24
...= Multi-CD player = DVD player = TV = Tuner = DAB (Digital Audio Broadcasting) Tuner = External Unit 1 = External Unit 2 = AUX 7 Remote Controller Each press of the button selects the desired source in the following order: CD button : Built-in CD player = Multi-CD player = DVD player = ...TV = Tuner = DAB (Digital Audio Broadcasting) Tuner = OFF Note: • External Unit refers to a Pioneer product (such as one available in the future) that, although incompatible as a source, enables control of them to External Unit 1 or External Unit 2 is automatically set by this product. (Refer to music....
...= Multi-CD player = DVD player = TV = Tuner = DAB (Digital Audio Broadcasting) Tuner = External Unit 1 = External Unit 2 = AUX 7 Remote Controller Each press of the button selects the desired source in the following order: CD button : Built-in CD player = Multi-CD player = DVD player = ...TV = Tuner = DAB (Digital Audio Broadcasting) Tuner = OFF Note: • External Unit refers to a Pioneer product (such as one available in the future) that, although incompatible as a source, enables control of them to External Unit 1 or External Unit 2 is automatically set by this product. (Refer to music....
Owner's Manual
Page 25
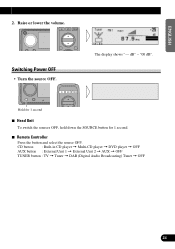
Hold for 1 second 7 Head Unit To switch the sources OFF, hold down the SOURCE button for 1 second. 7 Remote Controller Press the button and select the source OFF. CD button : Built-in CD player = Multi-CD player = DVD player = OFF AUX button : External Unit 1 = External Unit 2 = AUX = OFF TUNER button : TV = Tuner = DAB (Digital Audio Broadcasting) Tuner = OFF DEUTSCH FRANÇAIS ITALIANO NEDERLANDS 24 The display shows "--- dB" - "00 dB". Raise or lower the volume. Switching Power OFF • Turn the source OFF. ENGLISH ESPAÑOL 2.
Hold for 1 second 7 Head Unit To switch the sources OFF, hold down the SOURCE button for 1 second. 7 Remote Controller Press the button and select the source OFF. CD button : Built-in CD player = Multi-CD player = DVD player = OFF AUX button : External Unit 1 = External Unit 2 = AUX = OFF TUNER button : TV = Tuner = DAB (Digital Audio Broadcasting) Tuner = OFF DEUTSCH FRANÇAIS ITALIANO NEDERLANDS 24 The display shows "--- dB" - "00 dB". Raise or lower the volume. Switching Power OFF • Turn the source OFF. ENGLISH ESPAÑOL 2.
Owner's Manual
Page 27
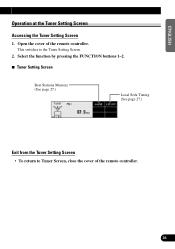
Select the function by pressing the FUNCTION buttons 1-2. 7 Tuner Setting Screen Best Stations Memory (See page 27.) Local Seek Tuning (See page 27.) Exit from the Tuner Setting Screen • To return to the Tuner Setting Screen. 2. This switches to Tuner Screen, close the cover of the remote controller. Open the cover of the remote controller. ENGLISH ESPAÑOL Operation at the Tuner Setting Screen Accessing the Tuner Setting Screen 1. DEUTSCH FRANÇAIS ITALIANO NEDERLANDS 26
Select the function by pressing the FUNCTION buttons 1-2. 7 Tuner Setting Screen Best Stations Memory (See page 27.) Local Seek Tuning (See page 27.) Exit from the Tuner Setting Screen • To return to the Tuner Setting Screen. 2. This switches to Tuner Screen, close the cover of the remote controller. Open the cover of the remote controller. ENGLISH ESPAÑOL Operation at the Tuner Setting Screen Accessing the Tuner Setting Screen 1. DEUTSCH FRANÇAIS ITALIANO NEDERLANDS 26
Owner's Manual
Page 32
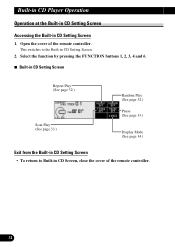
Built-in CD Player Operation Operation at the Built-in CD Setting Screen Accessing the Built-in CD Setting Screen. 2. This switches to Built-in CD Screen, close the cover of the remote controller. Select the function by pressing the FUNCTION buttons 1, 2, 3, 4 and 6. 7 Built-in CD Setting Screen Repeat Play (See page 32.) Scan Play (See page 33.) Random Play (See page 32.) Pause (See page 33.) Display Mode (See page 34.) Exit from the Built-in CD Setting Screen • To return to the Built-in CD Setting Screen 1. Open the cover of the remote controller. 31
Built-in CD Player Operation Operation at the Built-in CD Setting Screen Accessing the Built-in CD Setting Screen. 2. This switches to Built-in CD Screen, close the cover of the remote controller. Select the function by pressing the FUNCTION buttons 1, 2, 3, 4 and 6. 7 Built-in CD Setting Screen Repeat Play (See page 32.) Scan Play (See page 33.) Random Play (See page 32.) Pause (See page 33.) Display Mode (See page 34.) Exit from the Built-in CD Setting Screen • To return to the Built-in CD Setting Screen 1. Open the cover of the remote controller. 31
Owner's Manual
Page 37
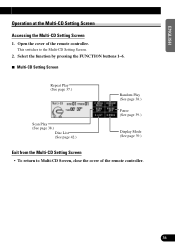
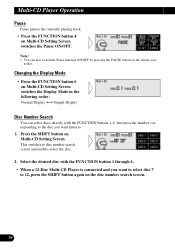
... switches to Multi-CD Screen, close the cover of the remote controller. ENGLISH ESPAÑOL Operation at the Multi-CD Setting Screen Accessing the Multi-CD Setting Screen 1. DEUTSCH FRANÇAIS ITALIANO NEDERLANDS 36 Select ...
... switches to Multi-CD Screen, close the cover of the remote controller. ENGLISH ESPAÑOL Operation at the Multi-CD Setting Screen Accessing the Multi-CD Setting Screen 1. DEUTSCH FRANÇAIS ITALIANO NEDERLANDS 36 Select ...
Owner's Manual
Page 40
... ON/OFF. Just press the number corresponding to the disc you want listen to. 1. This switches to 12, press the SHIFT button again on the remote controller. Note: • You can select discs directly with the FUNCTION button 1 through 6. • When a 12-Disc Multi-CD Player is connected and you want to...
... ON/OFF. Just press the number corresponding to the disc you want listen to. 1. This switches to 12, press the SHIFT button again on the remote controller. Note: • You can select discs directly with the FUNCTION button 1 through 6. • When a 12-Disc Multi-CD Player is connected and you want to...
Owner's Manual
Page 45
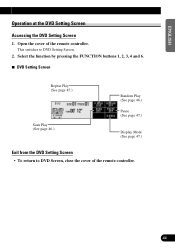
Open the cover of the remote controller. This switches to DVD Screen, close the cover of the remote controller. Select the function by pressing the FUNCTION buttons 1, 2, 3, 4 and 6. 7 DVD Setting Screen Repeat Play (See page 45.) Scan Play (See page 46.) Random Play (See page 46.) Pause (See page 47.) Display Mode (See page 47.) Exit from the DVD Setting Screen • To return to DVD Setting Screen. 2. ENGLISH ESPAÑOL Operation at the DVD Setting Screen Accessing the DVD Setting Screen 1. DEUTSCH FRANÇAIS ITALIANO NEDERLANDS 44
Open the cover of the remote controller. This switches to DVD Screen, close the cover of the remote controller. Select the function by pressing the FUNCTION buttons 1, 2, 3, 4 and 6. 7 DVD Setting Screen Repeat Play (See page 45.) Scan Play (See page 46.) Random Play (See page 46.) Pause (See page 47.) Display Mode (See page 47.) Exit from the DVD Setting Screen • To return to DVD Setting Screen. 2. ENGLISH ESPAÑOL Operation at the DVD Setting Screen Accessing the DVD Setting Screen 1. DEUTSCH FRANÇAIS ITALIANO NEDERLANDS 44
Owner's Manual
Page 50
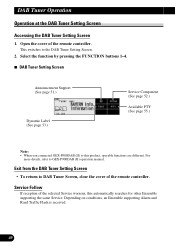
This switches to DAB Tuner Screen, close the cover of the remote controller. Service Follow If reception of the remote controller. Exit from the DAB Tuner Setting Screen • To return to the DAB Tuner Setting Screen. 2. Depending on conditions, an Ensemble supporting Alarm and Road ...
This switches to DAB Tuner Screen, close the cover of the remote controller. Service Follow If reception of the remote controller. Exit from the DAB Tuner Setting Screen • To return to the DAB Tuner Setting Screen. 2. Depending on conditions, an Ensemble supporting Alarm and Road ...
Owner's Manual
Page 59
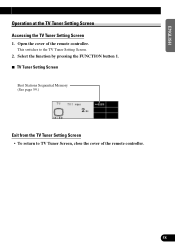
Select the function by pressing the FUNCTION button 1. 7 TV Tuner Setting Screen Best Stations Sequential Memory (See page 59.) Exit from the TV Tuner Setting Screen • To return to the TV Tuner Setting Screen. 2. This switches to TV Tuner Screen, close the cover of the remote controller. Open the cover of the remote controller. 58 FRANÇAIS ITALIANO NEDERLANDS ENGLISH ESPAÑOL DEUTSCH Operation at the TV Tuner Setting Screen Accessing the TV Tuner Setting Screen 1.
Select the function by pressing the FUNCTION button 1. 7 TV Tuner Setting Screen Best Stations Sequential Memory (See page 59.) Exit from the TV Tuner Setting Screen • To return to the TV Tuner Setting Screen. 2. This switches to TV Tuner Screen, close the cover of the remote controller. Open the cover of the remote controller. 58 FRANÇAIS ITALIANO NEDERLANDS ENGLISH ESPAÑOL DEUTSCH Operation at the TV Tuner Setting Screen Accessing the TV Tuner Setting Screen 1.
Owner's Manual
Page 62
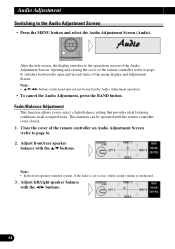
... 61 Note: • In the front-speaker-oriented system, if the fader is attenuated. 3. Adjust left/right speaker balance with the remote controller cover closed states of the Audio Adjustment Screen. After the title screen, the display switches to rear, whole sound volume is set to ...cancel the Audio Adjustment, press the BAND button. Fader/Balance Adjustment This function allows you to page 6). 2. Close the cover of the remote controller (refer to the Audio Adjustment Screen • Press the MENU button and select the Audio Adjustment Screen (Audio). Opening and closing the cover...
... 61 Note: • In the front-speaker-oriented system, if the fader is attenuated. 3. Adjust left/right speaker balance with the remote controller cover closed states of the Audio Adjustment Screen. After the title screen, the display switches to rear, whole sound volume is set to ...cancel the Audio Adjustment, press the BAND button. Fader/Balance Adjustment This function allows you to page 6). 2. Close the cover of the remote controller (refer to the Audio Adjustment Screen • Press the MENU button and select the Audio Adjustment Screen (Audio). Opening and closing the cover...


