Owner's Manual
Page 2
...Music 23 Switching Power OFF 24 1 Setting the Clock - Switching the AUX Mode - Accessing the Initial Setting Screen - Contents Dear Customer 4 Key Finder 5 Head Unit 5 Remote Controller 5 Opening and Closing the Remote Controller Cover 6 - When the Cover is Open Remote Controller and Care 8 Using the Remote Controller 8 ... to the Clock Adjustment Screen - Warning Tone Setting Up the Environment for Use 15 Setting Up the Environment for Pioneer Products ........ 11 About the XM READY mark 12 Detaching and Replacing the Front Panel 13 Theft Protection 13 -
...Music 23 Switching Power OFF 24 1 Setting the Clock - Switching the AUX Mode - Accessing the Initial Setting Screen - Contents Dear Customer 4 Key Finder 5 Head Unit 5 Remote Controller 5 Opening and Closing the Remote Controller Cover 6 - When the Cover is Open Remote Controller and Care 8 Using the Remote Controller 8 ... to the Clock Adjustment Screen - Warning Tone Setting Up the Environment for Use 15 Setting Up the Environment for Pioneer Products ........ 11 About the XM READY mark 12 Detaching and Replacing the Front Panel 13 Theft Protection 13 -
Owner's Manual
Page 6
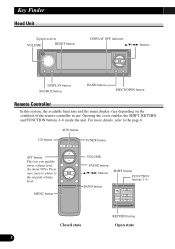
Opening the cover enables the SHIFT, RETURN and FUNCTION buttons 1-6 inside the unit. AUX button CD button TUNER button ATT button This lets you quickly lower volume level (by about 90%). Press once more details, refer to ... button 5/∞/2/3 buttons BAND button SHIFT button FUNCTION buttons 1-6 Closed state RETURN button Open state 5 For more to return to the page 6. Key Finder Head Unit Signal receiver VOLUME RESET button DISPLAY OFF indicator 5/∞/2/3 buttons DISPLAY button SOURCE button BAND button EJECT/OPEN button Remote Controller In this system, the...
Opening the cover enables the SHIFT, RETURN and FUNCTION buttons 1-6 inside the unit. AUX button CD button TUNER button ATT button This lets you quickly lower volume level (by about 90%). Press once more details, refer to ... button 5/∞/2/3 buttons BAND button SHIFT button FUNCTION buttons 1-6 Closed state RETURN button Open state 5 For more to return to the page 6. Key Finder Head Unit Signal receiver VOLUME RESET button DISPLAY OFF indicator 5/∞/2/3 buttons DISPLAY button SOURCE button BAND button EJECT/OPEN button Remote Controller In this system, the...
Owner's Manual
Page 9
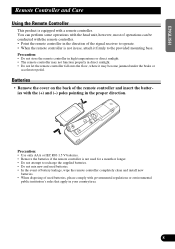
... the remote controller is not used batteries, please comply with the (+) and (-) poles pointing in the proper direction. You can perform some operations with the head unit, however, most of operations can be conducted with a remote controller.
... the remote controller is not used batteries, please comply with the (+) and (-) poles pointing in the proper direction. You can perform some operations with the head unit, however, most of operations can be conducted with a remote controller.
Owner's Manual
Page 10
...through the manual before you can be sure to maximize your listening enjoyment. For your own security and convenience, be conducted with the head unit, however, the remote controller offers a number of operations can perform the same operations with the remote controller. In some functions, .... And most of buttons such as ATT, PAUSE, SHIFT, MENU, RETURN and FUNCTION buttons 1-6 which are not provided on the head unit. It is located on the bottom of sophisticated functions ensuring superior reception and operation. Before Using This Product About This Product The tuner...
...through the manual before you can be sure to maximize your listening enjoyment. For your own security and convenience, be conducted with the head unit, however, the remote controller offers a number of operations can perform the same operations with the remote controller. In some functions, .... And most of buttons such as ATT, PAUSE, SHIFT, MENU, RETURN and FUNCTION buttons 1-6 which are not provided on the head unit. It is located on the bottom of sophisticated functions ensuring superior reception and operation. Before Using This Product About This Product The tuner...
Owner's Manual
Page 11
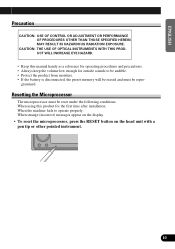
... Microprocessor The microprocessor must be repro- When strange (incorrect) messages appear on the display. • To reset the microprocessor, press the RESET button on the head unit with a pen tip or other pointed instrument. 10 FRANÇAIS ITALIANO NEDERLANDS grammed. CAUTION: THE USE OF OPTICAL INSTRUMENTS WITH THIS PRODUCT WILL INCREASE...
... Microprocessor The microprocessor must be repro- When strange (incorrect) messages appear on the display. • To reset the microprocessor, press the RESET button on the head unit with a pen tip or other pointed instrument. 10 FRANÇAIS ITALIANO NEDERLANDS grammed. CAUTION: THE USE OF OPTICAL INSTRUMENTS WITH THIS PRODUCT WILL INCREASE...

Owner's Manual
Page 14
... provided to discourage theft. Slide and remove the front panel toward you. Detaching and Replacing the Front Panel Theft Protection The front panel of the head unit is detachable to store/carry the detached front panel. 13 Open the front panel.
... provided to discourage theft. Slide and remove the front panel toward you. Detaching and Replacing the Front Panel Theft Protection The front panel of the head unit is detachable to store/carry the detached front panel. 13 Open the front panel.
Owner's Manual
Page 16
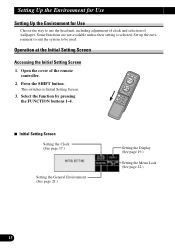
... the Menu Lock (See page 22.) 15 Setting Up the Environment for Use Setting Up the Environment for Use Choose the way to use the head unit, including adjustment of clock and selection of the remote controller. 2. Open the cover of wallpaper. Some functions are not available unless their setting is selected...
... the Menu Lock (See page 22.) 15 Setting Up the Environment for Use Setting Up the Environment for Use Choose the way to use the head unit, including adjustment of clock and selection of the remote controller. 2. Open the cover of wallpaper. Some functions are not available unless their setting is selected...
Owner's Manual
Page 24
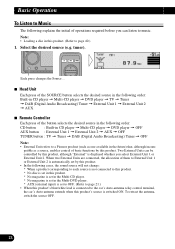
...CD player = Multi-CD player = DVD player = OFF AUX button : External Unit 1 = External Unit 2 = AUX = OFF TUNER button : TV = Tuner = DAB (Digital Audio Broadcasting) Tuner = OFF Note: • External Unit refers to a Pioneer product (such as one available in the future) that, although incompatible as a ...Basic Operation To Listen to Music The following explains the initial of operations required before you select External Unit 1 or External Unit 2. Each press changes the Source ... 7 Head Unit Each press of the SOURCE button selects the desired source in the following order: Built-in CD ...
...CD player = Multi-CD player = DVD player = OFF AUX button : External Unit 1 = External Unit 2 = AUX = OFF TUNER button : TV = Tuner = DAB (Digital Audio Broadcasting) Tuner = OFF Note: • External Unit refers to a Pioneer product (such as one available in the future) that, although incompatible as a ...Basic Operation To Listen to Music The following explains the initial of operations required before you select External Unit 1 or External Unit 2. Each press changes the Source ... 7 Head Unit Each press of the SOURCE button selects the desired source in the following order: Built-in CD ...
Owner's Manual
Page 25
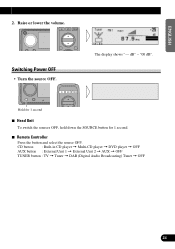
"00 dB". Hold for 1 second 7 Head Unit To switch the sources OFF, hold down the SOURCE button for 1 second. 7 Remote Controller Press the button and select the source OFF. Switching Power OFF • Turn the source OFF. ENGLISH ESPAÑOL 2. The display shows "--- dB" - CD button : Built-in CD player = Multi-CD player = DVD player = OFF AUX button : External Unit 1 = External Unit 2 = AUX = OFF TUNER button : TV = Tuner = DAB (Digital Audio Broadcasting) Tuner = OFF DEUTSCH FRANÇAIS ITALIANO NEDERLANDS 24 Raise or lower the volume.
"00 dB". Hold for 1 second 7 Head Unit To switch the sources OFF, hold down the SOURCE button for 1 second. 7 Remote Controller Press the button and select the source OFF. Switching Power OFF • Turn the source OFF. ENGLISH ESPAÑOL 2. The display shows "--- dB" - CD button : Built-in CD player = Multi-CD player = DVD player = OFF AUX button : External Unit 1 = External Unit 2 = AUX = OFF TUNER button : TV = Tuner = DAB (Digital Audio Broadcasting) Tuner = OFF DEUTSCH FRANÇAIS ITALIANO NEDERLANDS 24 Raise or lower the volume.
Owner's Manual
Page 62
... the open and closed . 1. Opening and closing the cover of the remote controller (refer to page 6). 2. Close the cover of the remote controller on the head unit can be used in all occupied seats.
... the open and closed . 1. Opening and closing the cover of the remote controller (refer to page 6). 2. Close the cover of the remote controller on the head unit can be used in all occupied seats.
Owner's Manual
Page 78
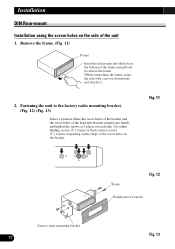
.... 13) Select a position where the screw holes of the bracket and the screw holes of the head unit become aligned (are fitted), and tighten the screws at 2 places on the side of the unit 1. Fig. 11 Factory radio mounting br1a2cket 77 1S1crew Fig. 12 1D3ashboard or Console Fig. 13 Installation... DIN Rear-mount Installation using the screw holes on each side. Fastening the unit to remove the frame. (When reattaching the frame, point...
.... 13) Select a position where the screw holes of the bracket and the screw holes of the head unit become aligned (are fitted), and tighten the screws at 2 places on the side of the unit 1. Fig. 11 Factory radio mounting br1a2cket 77 1S1crew Fig. 12 1D3ashboard or Console Fig. 13 Installation... DIN Rear-mount Installation using the screw holes on each side. Fastening the unit to remove the frame. (When reattaching the frame, point...

