
Owner's Manual
Page 2
When the Cover is Open Before Using This Product 7 About This Product 7 About This Manual 7 Important 8 About the Digital Network 8 MODE Switch Setting 9 Resetting the Microprocessor 10 Precaution 11 After-sales Service for Pioneer Products ........ 12 Audio Adjustment 13 Audio Menu 13 - When the Cover is Closed - Switching to the Audio Menu Audio Adjustment Contents Dear Customer 3 Key Finder 4 Head Unit (DEX-P9 4 Remote Controller (DEX-P9 4 Opening and Closing the Remote Controller Cover 5 -
When the Cover is Open Before Using This Product 7 About This Product 7 About This Manual 7 Important 8 About the Digital Network 8 MODE Switch Setting 9 Resetting the Microprocessor 10 Precaution 11 After-sales Service for Pioneer Products ........ 12 Audio Adjustment 13 Audio Menu 13 - When the Cover is Closed - Switching to the Audio Menu Audio Adjustment Contents Dear Customer 3 Key Finder 4 Head Unit (DEX-P9 4 Remote Controller (DEX-P9 4 Opening and Closing the Remote Controller Cover 5 -
Owner's Manual
Page 8
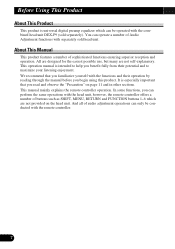
... can only be conducted with the functions and their potential and to help you benefit fully from their operation by reading through the manual before you can perform the same operations with the head unit, however, the remote controller offers a number of buttons such as ...RETURN and FUNCTION buttons 1-6 which can be operated with the combined head unit DEX-P9 (sold head unit. You can operate a number of Audio Adjustment functions with separately sold separately). This operation manual is universal digital preamp equalizer which are not self-explanatory. We recommend that you ...
... can only be conducted with the functions and their potential and to help you benefit fully from their operation by reading through the manual before you can perform the same operations with the head unit, however, the remote controller offers a number of buttons such as ...RETURN and FUNCTION buttons 1-6 which can be operated with the combined head unit DEX-P9 (sold head unit. You can operate a number of Audio Adjustment functions with separately sold separately). This operation manual is universal digital preamp equalizer which are not self-explanatory. We recommend that you ...

Owner's Manual
Page 12
THE USE OF OPTICAL INSTRUMENTS WITH THIS PRODUCT WILL INCREASE EYE HAZARD. • Keep this manual handy as a reference for operating procedures and precautions. • Always keep the volume low enough for outside sounds to be audible. • Protect the product from moisture. • If the battery is disconnected, the preset memory will be erased and must be repro- grammed. 11 Before Using This Product Precaution CAUTION: CAUTION: USE OF CONTROL OR ADJUSTMENT OR PERFORMANCE OF PROCEDURES OTHER THAN THOSE SPECIFIED HEREIN MAY RESULT IN HAZARDOUS RADIATION EXPOSURE.
THE USE OF OPTICAL INSTRUMENTS WITH THIS PRODUCT WILL INCREASE EYE HAZARD. • Keep this manual handy as a reference for operating procedures and precautions. • Always keep the volume low enough for outside sounds to be audible. • Protect the product from moisture. • If the battery is disconnected, the preset memory will be erased and must be repro- grammed. 11 Before Using This Product Precaution CAUTION: CAUTION: USE OF CONTROL OR ADJUSTMENT OR PERFORMANCE OF PROCEDURES OTHER THAN THOSE SPECIFIED HEREIN MAY RESULT IN HAZARDOUS RADIATION EXPOSURE.
Owner's Manual
Page 22
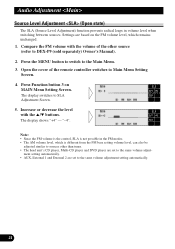
... AM volume level, which is not possible in volume level when switching between sources. Settings are set to sources other source (refer to DEX-P9 (sold separately) Owner's Manual). 2. Increase or decrease the level with the volume of the remote controller switches to the same volume adjust- Note: • Since the FM...
... AM volume level, which is not possible in volume level when switching between sources. Settings are set to sources other source (refer to DEX-P9 (sold separately) Owner's Manual). 2. Increase or decrease the level with the volume of the remote controller switches to the same volume adjust- Note: • Since the FM...
Owner's Manual
Page 39
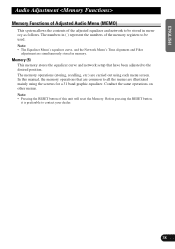
... curve, and the Network Menu's Time alignment and Filter adjustment are illustrated mainly using each menu screen. Note: • Pressing the RESET button of this manual, the memory operations that have been adjusted to the desired position. Before pressing the RESET button, it is preferable to be used. In this unit...
... curve, and the Network Menu's Time alignment and Filter adjustment are illustrated mainly using each menu screen. Note: • Pressing the RESET button of this manual, the memory operations that have been adjusted to the desired position. Before pressing the RESET button, it is preferable to be used. In this unit...

Owner's Manual
Page 52
... the power amp and other products may fail to work when it should. • Never feed power to the battery. Connect to the owner's manual for other units, then make connections correctly. • Secure the wiring with cable clamps or adhesive tape. Do not route wiring in the electrical ...system, be sure to the supplied Installation manuals of the same colors correctly. • Cords for this product to another product, refer to use only fuses of the lead will damage the lead...
... the power amp and other products may fail to work when it should. • Never feed power to the battery. Connect to the owner's manual for other units, then make connections correctly. • Secure the wiring with cable clamps or adhesive tape. Do not route wiring in the electrical ...system, be sure to the supplied Installation manuals of the same colors correctly. • Cords for this product to another product, refer to use only fuses of the lead will damage the lead...


