
Owner's Manual
Page 2
When the Cover is Open Before Using This Product 7 About This Product 7 About This Manual 7 Important 8 About the Digital Network 8 MODE Switch Setting 9 Resetting the Microprocessor 10 Precaution 11 After-sales Service for Pioneer Products ........ 12 Audio Adjustment 13 Audio Menu 13 - Switching to the Audio Menu Audio Adjustment When the Cover is Closed - Contents Dear Customer 3 Key Finder 4 Head Unit (DEX-P9 4 Remote Controller (DEX-P9 4 Opening and Closing the Remote Controller Cover 5 -
When the Cover is Open Before Using This Product 7 About This Product 7 About This Manual 7 Important 8 About the Digital Network 8 MODE Switch Setting 9 Resetting the Microprocessor 10 Precaution 11 After-sales Service for Pioneer Products ........ 12 Audio Adjustment 13 Audio Menu 13 - Switching to the Audio Menu Audio Adjustment When the Cover is Closed - Contents Dear Customer 3 Key Finder 4 Head Unit (DEX-P9 4 Remote Controller (DEX-P9 4 Opening and Closing the Remote Controller Cover 5 -
Owner's Manual
Page 5
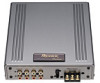
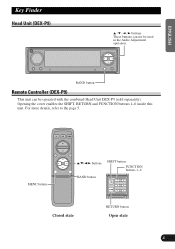
Opening the cover enables the SHIFT, RETURN and FUNCTION buttons 1-6 inside this unit. BAND button Remote Controller (DEX-P9) This unit can not be operated with the combined Head Unit DEX-P9 (sold separately). ENGLISH Key Finder Head Unit (DEX-P9) 5/∞/2/3 buttons These buttons can be used in the Audio Adjustment operation. ESPAÑOL DEUTSCH FRANÇAIS ITALIANO NEDERLANDS MENU button 5/∞/2/3 buttons BAND button SHIFT button FUNCTION buttons 1-6 Closed state RETURN button Open state 4 For more details, refer to the page 5.
Opening the cover enables the SHIFT, RETURN and FUNCTION buttons 1-6 inside this unit. BAND button Remote Controller (DEX-P9) This unit can not be operated with the combined Head Unit DEX-P9 (sold separately). ENGLISH Key Finder Head Unit (DEX-P9) 5/∞/2/3 buttons These buttons can be used in the Audio Adjustment operation. ESPAÑOL DEUTSCH FRANÇAIS ITALIANO NEDERLANDS MENU button 5/∞/2/3 buttons BAND button SHIFT button FUNCTION buttons 1-6 Closed state RETURN button Open state 4 For more details, refer to the page 5.
Owner's Manual
Page 8
... This product features a number of buttons such as SHIFT, MENU, RETURN and FUNCTION buttons 1-6 which can perform the same operations with the combined head unit DEX-P9 (sold head unit. It is intended to maximize your listening enjoyment. Before Using This Product About This Product This product is universal digital preamp equalizer...
... This product features a number of buttons such as SHIFT, MENU, RETURN and FUNCTION buttons 1-6 which can perform the same operations with the combined head unit DEX-P9 (sold head unit. It is intended to maximize your listening enjoyment. Before Using This Product About This Product This product is universal digital preamp equalizer...
Owner's Manual
Page 14
... Adjustment opera- The Equalizer function for the component can not be used for different sound ranges. Note: • The 5/∞/2/3 buttons on the head unit (DEX-P9) can make fine adjustments of sound quality for sound quality adjustments. Network (page 27) This adjusts the reproduced frequency band (cross-over frequency) and the...
... Adjustment opera- The Equalizer function for the component can not be used for different sound ranges. Note: • The 5/∞/2/3 buttons on the head unit (DEX-P9) can make fine adjustments of sound quality for sound quality adjustments. Network (page 27) This adjusts the reproduced frequency band (cross-over frequency) and the...
Owner's Manual
Page 22
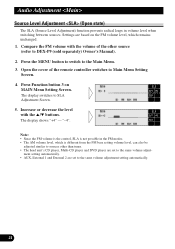
...) The SLA (Source Level Adjustment) function prevents radical leaps in the FM modes. • The AM volume level, which remains unchanged. 1. Settings are set to DEX-P9 (sold separately) Owner's Manual). 2.
...) The SLA (Source Level Adjustment) function prevents radical leaps in the FM modes. • The AM volume level, which remains unchanged. 1. Settings are set to DEX-P9 (sold separately) Owner's Manual). 2.
Owner's Manual
Page 46
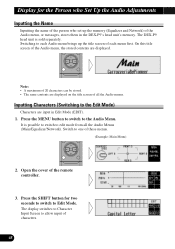
... (Equalizer and Network) of the Audio menu, or messages, stores them in Edit Mode (EDIT). 1. Switching to the Edit Mode) Characters are input in the DEX-P9's head unit's memory. Open the cover of the remote controller. 3. Press the MENU button to switch to one of these menus. (Example: Main Menu) 2. Switch... to the Audio Menu. Display for two seconds to switch to allow input of characters. 45 The DEX-P9 head unit is possible to switch to edit mode from all the Audio menus. It is sold separately.
... (Equalizer and Network) of the Audio menu, or messages, stores them in Edit Mode (EDIT). 1. Switching to the Edit Mode) Characters are input in the DEX-P9's head unit's memory. Open the cover of the remote controller. 3. Press the MENU button to switch to one of these menus. (Example: Main Menu) 2. Switch... to the Audio Menu. Display for two seconds to switch to allow input of characters. 45 The DEX-P9 head unit is possible to switch to edit mode from all the Audio menus. It is sold separately.
Owner's Manual
Page 48
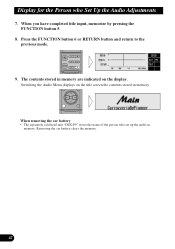
The contents stored in memory. Removing the car battery clears the memory. 47 When you have completed title input, memorize by pressing the FUNCTION button 5. 8. Switching the Audio Menu displays on the title screen the contents stored in memory are indicated on the display. When removing the car battery • The separately sold head unit "DEX-P9" stores the name of the person who Set Up the Audio Adjustments 7. Press the FUNCTION button 6 or RETURN button and return to the previous mode. 9. Display for the Person who set up the audio in memory.
The contents stored in memory. Removing the car battery clears the memory. 47 When you have completed title input, memorize by pressing the FUNCTION button 5. 8. Switching the Audio Menu displays on the title screen the contents stored in memory are indicated on the display. When removing the car battery • The separately sold head unit "DEX-P9" stores the name of the person who Set Up the Audio Adjustments 7. Press the FUNCTION button 6 or RETURN button and return to the previous mode. 9. Display for the Person who set up the audio in memory.
Owner's Manual
Page 53
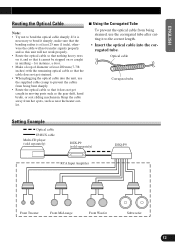
Optical cable Corrugated tube Setting Example Optical cable IP-BUS cable Multi-CD player (sold separately) DEX-P9 (sold separately) DEQ-P9 RCA Input Amplifier DEUTSCH FRANÇAIS ITALIANO NEDERLANDS Front Tweeter Front Mid-range Front Woofer Subwoofer 52 ENGLISH ESPAÑOL Routing the Optical ...
Optical cable Corrugated tube Setting Example Optical cable IP-BUS cable Multi-CD player (sold separately) DEX-P9 (sold separately) DEQ-P9 RCA Input Amplifier DEUTSCH FRANÇAIS ITALIANO NEDERLANDS Front Tweeter Front Mid-range Front Woofer Subwoofer 52 ENGLISH ESPAÑOL Routing the Optical ...
Owner's Manual
Page 54
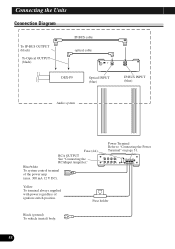
Blue/white To system control terminal of ignition switch position. Fuse holder Black (ground) To vehicle (metal) body. 53 Connecting the Units Connection Diagram To IP-BUS OUTPUT (black) To Optical OUTPUT (black) IP-BUS cable optical cable DEX-P9 Optical INPUT (blue) IP-BUS INPUT (blue) Audio system Fuse (4A) RCA OUTPUT See "Connecting the RCAInput Amprifier." Yellow To terminal always supplied with power regardless of the power amp (max. 300 mA 12 V DC). Power Terminal Refer to "Connecting the Power Terminal" on page 51.
Blue/white To system control terminal of ignition switch position. Fuse holder Black (ground) To vehicle (metal) body. 53 Connecting the Units Connection Diagram To IP-BUS OUTPUT (black) To Optical OUTPUT (black) IP-BUS cable optical cable DEX-P9 Optical INPUT (blue) IP-BUS INPUT (blue) Audio system Fuse (4A) RCA OUTPUT See "Connecting the RCAInput Amprifier." Yellow To terminal always supplied with power regardless of the power amp (max. 300 mA 12 V DC). Power Terminal Refer to "Connecting the Power Terminal" on page 51.


