
Owner's Manual
Page 2
Switching to the Audio Menu Audio Adjustment When the Cover is Open Before Using This Product 7 About This Product 7 About This Manual 7 Important 8 About the Digital Network 8 MODE Switch Setting 9 Resetting the Microprocessor 10 Precaution 11 After-sales Service for Pioneer Products ........ 12 Audio Adjustment 13 Audio Menu 13 - When the Cover is Closed - Contents Dear Customer 3 Key Finder 4 Head Unit (DEX-P9 4 Remote Controller (DEX-P9 4 Opening and Closing the Remote Controller Cover 5 -
Switching to the Audio Menu Audio Adjustment When the Cover is Open Before Using This Product 7 About This Product 7 About This Manual 7 Important 8 About the Digital Network 8 MODE Switch Setting 9 Resetting the Microprocessor 10 Precaution 11 After-sales Service for Pioneer Products ........ 12 Audio Adjustment 13 Audio Menu 13 - When the Cover is Closed - Contents Dear Customer 3 Key Finder 4 Head Unit (DEX-P9 4 Remote Controller (DEX-P9 4 Opening and Closing the Remote Controller Cover 5 -
Owner's Manual
Page 3
ENGLISH ESPAÑOL Audio Adjustment
ENGLISH ESPAÑOL Audio Adjustment
Owner's Manual
Page 16
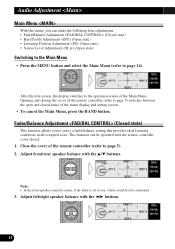
... the remote controller (refer to page 14). Close the cover of the menu display and setting screen. • To cancel the Main Menu, press the BAND button. Note: • In the front-speaker-oriented system, if the fader is set to the operation screen of the Main Menu. Adjust left/right speaker balance with the 5/∞ buttons. Adjust front/rear speaker balance with the 2/3 buttons. 15 After the title screen, the display switches to rear, whole sound level...
... the remote controller (refer to page 14). Close the cover of the menu display and setting screen. • To cancel the Main Menu, press the BAND button. Note: • In the front-speaker-oriented system, if the fader is set to the operation screen of the Main Menu. Adjust left/right speaker balance with the 5/∞ buttons. Adjust front/rear speaker balance with the 2/3 buttons. 15 After the title screen, the display switches to rear, whole sound level...
Owner's Manual
Page 17
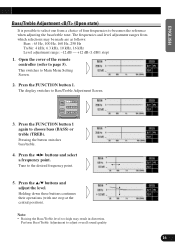
... 1. The frequencies and level adjustment ranges from a choice of the remote controller (refer to page 5). Press the 2/3 buttons and select a frequency point. Tune to choose bass (BASS) or treble (TREB). Holding down these buttons continues their operations (with one from which selections may result in distortion. The display switches to Main Menu Setting Screen. 2. This switches to Bass/Treble Adjustment Screen. 3. Perform Bass/Treble Adjustment to adjust overall sound quality. 16 FRANÇAIS ITALIANO NEDERLANDS Pressing the button switches bass/treble. 4. ENGLISH...
... 1. The frequencies and level adjustment ranges from a choice of the remote controller (refer to page 5). Press the 2/3 buttons and select a frequency point. Tune to choose bass (BASS) or treble (TREB). Holding down these buttons continues their operations (with one from which selections may result in distortion. The display switches to Main Menu Setting Screen. 2. This switches to Bass/Treble Adjustment Screen. 3. Perform Bass/Treble Adjustment to adjust overall sound quality. 16 FRANÇAIS ITALIANO NEDERLANDS Pressing the button switches bass/treble. 4. ENGLISH...
Owner's Manual
Page 18
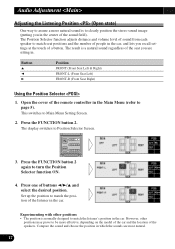
... to turn the Position Selector function ON. 4. Press the FUNCTION button 2 again to match the listener's position in the Main Menu (refer to page 5). However, other positions • The position is to clearly position the stereo sound image (putting you recall settings at the touch of the remote controller in the car. The Position Selector function adjusts distance and volume level of sound from each speaker to...
... to turn the Position Selector function ON. 4. Press the FUNCTION button 2 again to match the listener's position in the Main Menu (refer to page 5). However, other positions • The position is to clearly position the stereo sound image (putting you recall settings at the touch of the remote controller in the car. The Position Selector function adjusts distance and volume level of sound from each speaker to...
Owner's Manual
Page 19
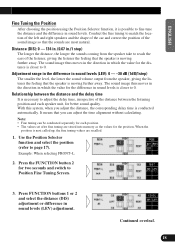
... adjust the time alignment without calculating. Example: When selecting FRONT-L 2. Press FUNCTION buttons 1 or 2 and select the distance (DIS) adjustment or difference in sound levels (LEV): 0 - -30 dB (1dB/1step) The smaller the level, the lower the sound volume output from the speaker take to Position Fine Tuning Screen. Adjustment range in the difference in sound levels (LEV) adjustment. Relationship between the listening position and each position. • The values set...
... adjust the time alignment without calculating. Example: When selecting FRONT-L 2. Press FUNCTION buttons 1 or 2 and select the distance (DIS) adjustment or difference in sound levels (LEV): 0 - -30 dB (1dB/1step) The smaller the level, the lower the sound volume output from the speaker take to Position Fine Tuning Screen. Adjustment range in the difference in sound levels (LEV) adjustment. Relationship between the listening position and each position. • The values set...
Owner's Manual
Page 22
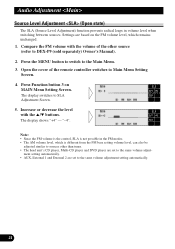
... the volume of the remote controller switches to the same volume adjustment setting automatically. 21 "-4". Settings are set to Main Menu Setting Screen. 4. ment setting automatically. • AUX, External 1 and External 2 are set to DEX-P9 (sold separately) Owner's Manual). 2. Open the cover of the other than tuner. • The head unit's CD player, Multi-CD player and DVD player are based on MAIN Menu Setting Screen. The display shows "+4" - Press the MENU button to switch to SLA Adjustment Screen. 5. Press Function button 3 on the FM volume level...
... the volume of the remote controller switches to the same volume adjustment setting automatically. 21 "-4". Settings are set to Main Menu Setting Screen. 4. ment setting automatically. • AUX, External 1 and External 2 are set to DEX-P9 (sold separately) Owner's Manual). 2. Open the cover of the other than tuner. • The head unit's CD player, Multi-CD player and DVD player are based on MAIN Menu Setting Screen. The display shows "+4" - Press the MENU button to switch to SLA Adjustment Screen. 5. Press Function button 3 on the FM volume level...
Owner's Manual
Page 26
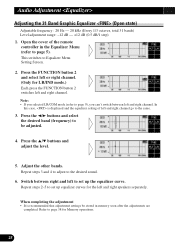
... is displayed and the equalizer setting of the remote controller in memory soon after the adjustments are completed. Repeat steps 2-5 to set up equalizer curves for Memory operations. 25 Refer to set up the equalizer curve. Note: • If you selected LR/COM mode (refer to be stored in the Equalizer Menu (refer to the same. 3. Repeat steps 3 and 4 to adjust to Equalizer Menu Setting Screen. 2. Audio Adjustment Adjusting the 31 Band Graphic Equalizer (Open state) Adjustable frequency...
... is displayed and the equalizer setting of the remote controller in memory soon after the adjustments are completed. Repeat steps 2-5 to set up equalizer curves for Memory operations. 25 Refer to set up the equalizer curve. Note: • If you selected LR/COM mode (refer to be stored in the Equalizer Menu (refer to the same. 3. Repeat steps 3 and 4 to adjust to Equalizer Menu Setting Screen. 2. Audio Adjustment Adjusting the 31 Band Graphic Equalizer (Open state) Adjustable frequency...
Owner's Manual
Page 27
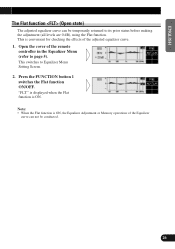
... FRANÇAIS ITALIANO NEDERLANDS ENGLISH ESPAÑOL DEUTSCH The Flat function (Open state) The adjusted equalizer curve can not be temporarily returned to its prior status before making the adjustment (all levels are 0 dB), using the Flat function. This is ON. Note: • When the Flat function is ON, the Equalizer Adjustment or Memory operations of the remote controller in the Equalizer Menu (refer to Equalizer Menu Setting Screen. 2.
... FRANÇAIS ITALIANO NEDERLANDS ENGLISH ESPAÑOL DEUTSCH The Flat function (Open state) The adjusted equalizer curve can not be temporarily returned to its prior status before making the adjustment (all levels are 0 dB), using the Flat function. This is ON. Note: • When the Flat function is ON, the Equalizer Adjustment or Memory operations of the remote controller in the Equalizer Menu (refer to Equalizer Menu Setting Screen. 2.
Owner's Manual
Page 28
... exclusive power amplifier for the difference in the form of the exclusive speaker unit for installing speakers, and it is working, the sound characteristics that best fit the vehicle interior may be conducted within the vehicle. • Time Alignment Adjustment function : adjusts for each speaker unit. Under the multi-amp system, it is necessary to divide the audio signals into each frequency range (band) and strictly control the set...
... exclusive power amplifier for the difference in the form of the exclusive speaker unit for installing speakers, and it is working, the sound characteristics that best fit the vehicle interior may be conducted within the vehicle. • Time Alignment Adjustment function : adjusts for each speaker unit. Under the multi-amp system, it is necessary to divide the audio signals into each frequency range (band) and strictly control the set...
Owner's Manual
Page 29
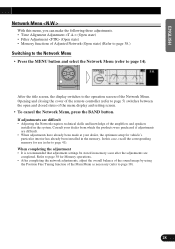
... the MENU button and select the Network Menu (refer to page 18). 28 FRANÇAIS ITALIANO NEDERLANDS If adjustments are difficult • Adjusting the Network requires technical skills and knowledge of the amplifiers and speakers installed in the memory. In this menu, you can make the following three adjustments. • Time Alignment Adjustment (Open state) • Filter Adjustment (Open state) • Memory functions of the menu display and setting screen. •...
... the MENU button and select the Network Menu (refer to page 18). 28 FRANÇAIS ITALIANO NEDERLANDS If adjustments are difficult • Adjusting the Network requires technical skills and knowledge of the amplifiers and speakers installed in the memory. In this menu, you can make the following three adjustments. • Time Alignment Adjustment (Open state) • Filter Adjustment (Open state) • Memory functions of the menu display and setting screen. •...
Owner's Manual
Page 30
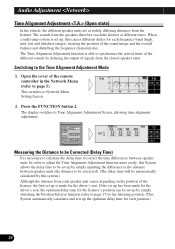
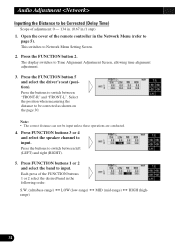
... arrival times of the different sounds by delaying the output of the remote controller in the distance between speaker units. Measuring the Distance to be Corrected (Delay Time) It is set up , this System allows the delay time to be automatically calculated by simply inputting the difference in the Network Menu (refer to Time Alignment Adjustment Screen, allowing time alignment adjustment. Switching to correct the time differences between speaker units (the...
... arrival times of the different sounds by delaying the output of the remote controller in the distance between speaker units. Measuring the Distance to be Corrected (Delay Time) It is set up , this System allows the delay time to be automatically calculated by simply inputting the difference in the Network Menu (refer to Time Alignment Adjustment Screen, allowing time alignment adjustment. Switching to correct the time differences between speaker units (the...
Owner's Manual
Page 32
... remote controller in the following order: S.W. (ultrabass-range) Ô LOW (low-range) Ô MID (mid-range) Ô HIGH (highrange) 31 Press the buttons to switch between left (LEFT) and right (RIGHT). 5. The display switches to input. Press FUNCTION buttons 3 or 4 and select the speaker channel to Time Alignment Adjustment Screen, allowing time alignment adjustment. 3. This switches to input. Press FUNCTION buttons 1 or 2 and select the band to Network Menu Setting Screen. 2. Press the FUNCTION button 5 and select the driver...
... remote controller in the following order: S.W. (ultrabass-range) Ô LOW (low-range) Ô MID (mid-range) Ô HIGH (highrange) 31 Press the buttons to switch between left (LEFT) and right (RIGHT). 5. The display switches to input. Press FUNCTION buttons 3 or 4 and select the speaker channel to Time Alignment Adjustment Screen, allowing time alignment adjustment. 3. This switches to input. Press FUNCTION buttons 1 or 2 and select the band to Network Menu Setting Screen. 2. Press the FUNCTION button 5 and select the driver...
Owner's Manual
Page 35
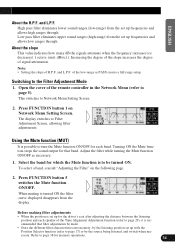
... Adjustment Screen, allowing filter adjustments. and L.P.F. When muting is to be made. • Store the different filter characteristics into memory, by the source being listened, and switch when nec- Before making filter adjustments • When the position is rec- of the Time Alignment Adjustment function (refer to turn the Mute function ON/OFF for memory operations. 34 The display switches to page 17) or by the listening position set up frequencies...
... Adjustment Screen, allowing filter adjustments. and L.P.F. When muting is to be made. • Store the different filter characteristics into memory, by the source being listened, and switch when nec- Before making filter adjustments • When the position is rec- of the Time Alignment Adjustment function (refer to turn the Mute function ON/OFF for memory operations. 34 The display switches to page 17) or by the listening position set up frequencies...
Owner's Manual
Page 36
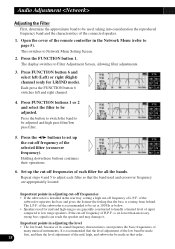
... subwoofer be used, taking into consideration the reproduced frequency band and the characteristics of the connected speaker. 1. Open the cover of the remote controller in adjusting the level • The low band, because of its sound frequency characteristics, incorporates the basic frequencies of the selected filter (crossover frequency). Each press the FUNCTION button 6 switches left (Left) or right (Right) channel (only for mid and high-ranges are appropriately located. Set...
... subwoofer be used, taking into consideration the reproduced frequency band and the characteristics of the connected speaker. 1. Open the cover of the remote controller in adjusting the level • The low band, because of its sound frequency characteristics, incorporates the basic frequencies of the selected filter (crossover frequency). Each press the FUNCTION button 6 switches left (Left) or right (Right) channel (only for mid and high-ranges are appropriately located. Set...
Owner's Manual
Page 38
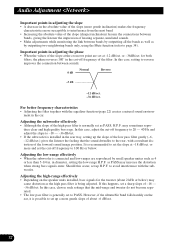
... than 5-1/4 in. If this case, setting to reverse improves the connection between bands by outputting all the bands as well as by small speaker unites such as PASS may sometimes repro- Audio Adjustment Important points in adjusting the slope • A decrease in the absolute value of the slope (more gentle inclination) makes the frequency characteristics more susceptible to interference from...
... than 5-1/4 in. If this case, setting to reverse improves the connection between bands by outputting all the bands as well as by small speaker unites such as PASS may sometimes repro- Audio Adjustment Important points in adjusting the slope • A decrease in the absolute value of the slope (more gentle inclination) makes the frequency characteristics more susceptible to interference from...
Owner's Manual
Page 48
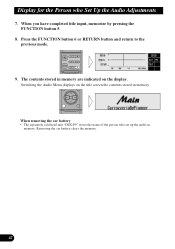
Display for the Person who set up the audio in memory. Switching the Audio Menu displays on the display. The contents stored in memory are indicated on the title screen the contents stored in memory. Press the FUNCTION button 6 or RETURN button and return to the previous mode. 9. Removing the car battery clears the memory. 47 When removing the car battery • The separately sold head unit "DEX-P9" stores the name of the person who Set Up the Audio Adjustments 7. When you have completed title input, memorize by pressing the FUNCTION button 5. 8.
Display for the Person who set up the audio in memory. Switching the Audio Menu displays on the display. The contents stored in memory are indicated on the title screen the contents stored in memory. Press the FUNCTION button 6 or RETURN button and return to the previous mode. 9. Removing the car battery clears the memory. 47 When removing the car battery • The separately sold head unit "DEX-P9" stores the name of the person who Set Up the Audio Adjustments 7. When you have completed title input, memorize by pressing the FUNCTION button 5. 8.

Owner's Manual
Page 52
... protection circuit may be different colors even if they lie against metal parts. • Route and secure all wiring so it in a recreational vehicle, truck, or bus, check the battery voltage. • To avoid shorts in places that have the same function. Connect to an external power amp's system remote control (max. 300 mA 12 V DC). • When an external power amp is being used...
... protection circuit may be different colors even if they lie against metal parts. • Route and secure all wiring so it in a recreational vehicle, truck, or bus, check the battery voltage. • To avoid shorts in places that have the same function. Connect to an external power amp's system remote control (max. 300 mA 12 V DC). • When an external power amp is being used...
Owner's Manual
Page 54
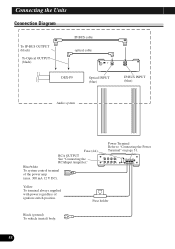
Fuse holder Black (ground) To vehicle (metal) body. 53 Power Terminal Refer to "Connecting the Power Terminal" on page 51. Yellow To terminal always supplied with power regardless of the power amp (max. 300 mA 12 V DC). Blue/white To system control terminal of ignition switch position. Connecting the Units Connection Diagram To IP-BUS OUTPUT (black) To Optical OUTPUT (black) IP-BUS cable optical cable DEX-P9 Optical INPUT (blue) IP-BUS INPUT (blue) Audio system Fuse (4A) RCA OUTPUT See "Connecting the RCAInput Amprifier."
Fuse holder Black (ground) To vehicle (metal) body. 53 Power Terminal Refer to "Connecting the Power Terminal" on page 51. Yellow To terminal always supplied with power regardless of the power amp (max. 300 mA 12 V DC). Blue/white To system control terminal of ignition switch position. Connecting the Units Connection Diagram To IP-BUS OUTPUT (black) To Optical OUTPUT (black) IP-BUS cable optical cable DEX-P9 Optical INPUT (blue) IP-BUS INPUT (blue) Audio system Fuse (4A) RCA OUTPUT See "Connecting the RCAInput Amprifier."
Owner's Manual
Page 59
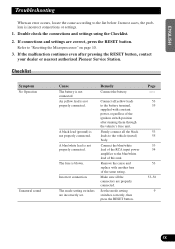
... after pressing the RESET button, contact your dealer or nearest authorized Pioneer Service Station. Set the mode setting switches correctly, then press the RESET button. ENGLISH ESPAÑOL DEUTSCH Troubleshooting When an error occurs, locate the cause according to "Resetting the Microprocessor" on page 10. 3. Double check the connections and settings using the Checklist. 2. Checklist Symptom No Operation Unnatural sound Cause The battery is not properly connected. Page ------- 53 55 53...
... after pressing the RESET button, contact your dealer or nearest authorized Pioneer Service Station. Set the mode setting switches correctly, then press the RESET button. ENGLISH ESPAÑOL DEUTSCH Troubleshooting When an error occurs, locate the cause according to "Resetting the Microprocessor" on page 10. 3. Double check the connections and settings using the Checklist. 2. Checklist Symptom No Operation Unnatural sound Cause The battery is not properly connected. Page ------- 53 55 53...


