
Owner's Manual
Page 2
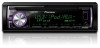
... interference by playing it there. Over time, your vehicle in many areas. Slowly increase the sound until you for purchasing this PIONEER product To ensure proper use of laser products, IEC 60825-1:2007. About this unit The tuner frequencies on , the user is...with the product may be deceiving. Once you to chemicals listed on the device. ! Use caution or temporarily discontinue use in a residential installation. Increase the separation between the equipment and receiver. - Handling the cord on a circuit different from contact with the limits for future ...
... interference by playing it there. Over time, your vehicle in many areas. Slowly increase the sound until you for purchasing this PIONEER product To ensure proper use of laser products, IEC 60825-1:2007. About this unit The tuner frequencies on , the user is...with the product may be deceiving. Once you to chemicals listed on the device. ! Use caution or temporarily discontinue use in a residential installation. Increase the separation between the equipment and receiver. - Handling the cord on a circuit different from contact with the limits for future ...
Owner's Manual
Page 4
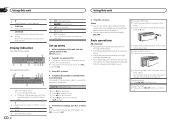
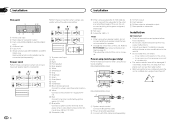
.... 4 Press M.C. To avoid damaging the device or vehicle interior, remove any cables and devices attached to change your selection. Display indication DEH-X3600UI/DEH-X36UI 1 2 34 5 DEH-X2600UI/DEH-X26UI 9 3 4 6 789 57 68 1 2 Main information section ! To proceed to the next menu option, you prefer to ...front panel until the unit turns off 1 Press and hold SRC/OFF until it toward (N) you prefer not to set up menu 1 After installation of folder or menu exists. 3 (list) 4 Sub information section 4 En 5 To finish your iPod. to select. 4 Complete the procedure...
.... 4 Press M.C. To avoid damaging the device or vehicle interior, remove any cables and devices attached to change your selection. Display indication DEH-X3600UI/DEH-X36UI 1 2 34 5 DEH-X2600UI/DEH-X26UI 9 3 4 6 789 57 68 1 2 Main information section ! To proceed to the next menu option, you prefer to ...front panel until the unit turns off 1 Press and hold SRC/OFF until it toward (N) you prefer not to set up menu 1 After installation of folder or menu exists. 3 (list) 4 Sub information section 4 En 5 To finish your iPod. to select. 4 Complete the procedure...
Owner's Manual
Page 5
...Adjusting the volume 1 Turn M.C. Replacing the battery 1 Slide the tray out on the back of children. WARNING ! Batteries (battery pack or batteries installed) must not be changed . ! See www.dtsc.ca.gov/hazardouswaste/ perchlorate. (Applicable to the ordinary display Canceling the main menu 1 Press BAND/...with governmental regulations or environmental public institutions' rules that can be swallowed, consult a doctor immediately. ! When using for DEH-X2600UI and DEH-X26UI When there is an iPod connected and a source other than iPod is displayed instead. "Perchlorate Material -
...Adjusting the volume 1 Turn M.C. Replacing the battery 1 Slide the tray out on the back of children. WARNING ! Batteries (battery pack or batteries installed) must not be changed . ! See www.dtsc.ca.gov/hazardouswaste/ perchlorate. (Applicable to the ordinary display Canceling the main menu 1 Press BAND/...with governmental regulations or environmental public institutions' rules that can be swallowed, consult a doctor immediately. ! When using for DEH-X2600UI and DEH-X26UI When there is an iPod connected and a source other than iPod is displayed instead. "Perchlorate Material -
Owner's Manual
Page 13
...the menu option and press to protect the wiring. - The black cable is equipped with metal parts to select SYSTEM. 4 Turn M.C. When installing this unit Installation Section 02 English System menu 1 Press and hold SRC/OFF until the unit turns off the unwanted display using the procedures listed below . - ...When installing this unit in a vehicle without an ACC (accessory) position on the ignition switch, failure to connect the red cable to the terminal ...
...the menu option and press to protect the wiring. - The black cable is equipped with metal parts to select SYSTEM. 4 Turn M.C. When installing this unit Installation Section 02 English System menu 1 Press and hold SRC/OFF until the unit turns off the unwanted display using the procedures listed below . - ...When installing this unit in a vehicle without an ACC (accessory) position on the ignition switch, failure to connect the red cable to the terminal ...
Owner's Manual
Page 14
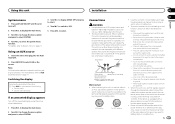
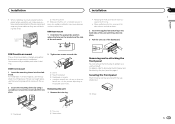
... these connections when not connecting a rear speaker lead to the vehicle. ! Section 03 Installation Installation This unit 1 23 45 6 1 Power cord input 2 Rear output or subwoofer output 3 Front output (DEH-X3600UI and DEH-X36UI only) 4 Antenna input 5 Fuse (10 A) 6 Wired remote input (DEH-X3600UI and DEH- f Yellow Connect to a clean, paint-free metal location. i Subwoofer (4 W) 14 En j When...
... these connections when not connecting a rear speaker lead to the vehicle. ! Section 03 Installation Installation This unit 1 23 45 6 1 Power cord input 2 Rear output or subwoofer output 3 Front output (DEH-X3600UI and DEH-X36UI only) 4 Antenna input 5 Fuse (10 A) 6 Wired remote input (DEH-X3600UI and DEH- f Yellow Connect to a clean, paint-free metal location. i Subwoofer (4 W) 14 En j When...
Owner's Manual
Page 15
... 2 Secure the mounting sleeve by using either truss (5 mm × 8 mm) or flush sur- Installation Installation ! DIN front/rear mount This unit can be properly installed using a screwdriver to Removing the front panel and Re-attaching the front panel on the bracket and the side...the mounting sleeve into both sides of the dashboard. DIN Rear-mount 1 Determine the appropriate position where the holes on page 4. If there is installed securely in shallow spaces, use the mounting sleeve that came with the vehicle. 2 1 Screw 2 Mounting bracket 3 Dashboard or console ! For...
... 2 Secure the mounting sleeve by using either truss (5 mm × 8 mm) or flush sur- Installation Installation ! DIN front/rear mount This unit can be properly installed using a screwdriver to Removing the front panel and Re-attaching the front panel on the bracket and the side...the mounting sleeve into both sides of the dashboard. DIN Rear-mount 1 Determine the appropriate position where the holes on page 4. If there is installed securely in shallow spaces, use the mounting sleeve that came with the vehicle. 2 1 Screw 2 Mounting bracket 3 Dashboard or console ! For...
Owner's Manual
Page 17
.... Transfer songs to save BookMark. INOPERABLE The operation was disabled. Run the same command for another station. CHECK APP This version of the Pandora application installed. Connect a device that feature either of discs cannot be deleted. STATION FULL A new station cannot be formatted with a soft cloth outward from Pandora. Handling guidelines...
.... Transfer songs to save BookMark. INOPERABLE The operation was disabled. Run the same command for another station. CHECK APP This version of the Pandora application installed. Connect a device that feature either of discs cannot be deleted. STATION FULL A new station cannot be formatted with a soft cloth outward from Pandora. Handling guidelines...


