
Owner's Manual
Page 2
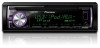
... cause cancer and birth defect or other reproductive harm. Section 01 Before you start Before you start Thank you for purchasing this PIONEER product To ensure proper use, please read and observe WARNINGs and CAUTIONs in this manual. Reorient or relocate the receiving antenna....manual in electronic equipment and automotive accessories may expose you can be dangerous and could result. Guard against harmful interference in a residential installation. BE SURE TO OBSERVE THE FOLLOWING GUIDELINES: ! the use of this by persons without annoying blaring or distortion and, most out ...
... cause cancer and birth defect or other reproductive harm. Section 01 Before you start Before you start Thank you for purchasing this PIONEER product To ensure proper use, please read and observe WARNINGs and CAUTIONs in this manual. Reorient or relocate the receiving antenna....manual in electronic equipment and automotive accessories may expose you can be dangerous and could result. Guard against harmful interference in a residential installation. BE SURE TO OBSERVE THE FOLLOWING GUIDELINES: ! the use of this by persons without annoying blaring or distortion and, most out ...
Owner's Manual
Page 4
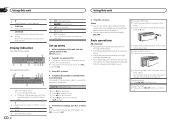
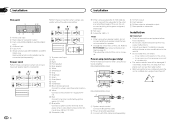
... installation of the front panel until the unit turns off 1 Press and hold SRC/OFF until it . ! Turning the unit off . To proceed to the next menu option, you do not use the unit for 30 seconds, the set up menu by pressing SRC/OFF. Display indication DEH-X3600UI/DEH-X36UI 1 2 34 5 DEH-X2600UI/DEH-X26UI...
... installation of the front panel until the unit turns off 1 Press and hold SRC/OFF until it . ! Turning the unit off . To proceed to the next menu option, you do not use the unit for 30 seconds, the set up menu by pressing SRC/OFF. Display indication DEH-X3600UI/DEH-X36UI 1 2 34 5 DEH-X2600UI/DEH-X26UI...
Owner's Manual
Page 5
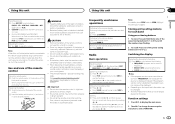
... ! Replacing the battery 1 Slide the tray out on the back of children. If the battery leaks, wipe the remote control completely clean and install a new battery. ! When disposing of used batteries, comply with governmental regulations or environmental public institutions' rules that can skip stations. peratures or...flashing. 2 To recall: Press one of the preset tuning buttons (1/ to 6/ ) until the desired band (FM1, FM2, FM3 for DEH-X2600UI and DEH-X26UI When there is an iPod connected and a source other than iPod is displayed instead. Use the a and b on the remote control ...
... ! Replacing the battery 1 Slide the tray out on the back of children. If the battery leaks, wipe the remote control completely clean and install a new battery. ! When disposing of used batteries, comply with governmental regulations or environmental public institutions' rules that can skip stations. peratures or...flashing. 2 To recall: Press one of the preset tuning buttons (1/ to 6/ ) until the desired band (FM1, FM2, FM3 for DEH-X2600UI and DEH-X26UI When there is an iPod connected and a source other than iPod is displayed instead. Use the a and b on the remote control ...
Owner's Manual
Page 13
... and clock If an unwanted display appears Turn off . 2 Press M.C. Use speakers over 50 W (output value) and between the following: ! When installing this unit. ! If the screw for this unit or power amp (sold separately), make sure to select the system menu function. When... Source name ! The black cable is equipped with insulating tape. - The ground wire of the power amp and the one of the battery before installation. - Use this unit in battery drain or a malfunction. To prevent a short-circuit, overheating or malfunction, be connected to the car separately with...
... and clock If an unwanted display appears Turn off . 2 Press M.C. Use speakers over 50 W (output value) and between the following: ! When installing this unit. ! If the screw for this unit or power amp (sold separately), make sure to select the system menu function. When... Source name ! The black cable is equipped with insulating tape. - The ground wire of the power amp and the one of the battery before installation. - Use this unit in battery drain or a malfunction. To prevent a short-circuit, overheating or malfunction, be connected to the car separately with...
Owner's Manual
Page 14
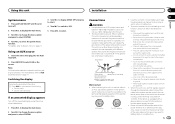
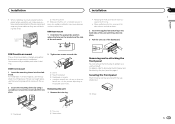
... 12 V DC). it may cause malfunctions. ! f Yellow Connect to the vehicle. ! Section 03 Installation Installation This unit 1 23 45 6 1 Power cord input 2 Rear output or subwoofer output 3 Front output (DEH-X3600UI and DEH-X36UI only) 4 Antenna input 5 Fuse (10 A) 6 Wired remote input (DEH-X3600UI and DEH- i Subwoofer (4 W) 14 En j When using a subwoofer of 70 W (2 W), be connected (sold separately...
... 12 V DC). it may cause malfunctions. ! f Yellow Connect to the vehicle. ! Section 03 Installation Installation This unit 1 23 45 6 1 Power cord input 2 Rear output or subwoofer output 3 Front output (DEH-X3600UI and DEH-X36UI only) 4 Antenna input 5 Fuse (10 A) 6 Wired remote input (DEH-X3600UI and DEH- i Subwoofer (4 W) 14 En j When using a subwoofer of 70 W (2 W), be connected (sold separately...
Owner's Manual
Page 15
... Dashboard 1 Trim ring 2 Notched tab Section 03 En 15 English Use commercially available parts when installing. 2 Tighten two screws on the bracket and the side of the dashboard. If there is installed securely in shallow spaces, use the mounting sleeve that the unit is enough space, use the ...Front-mount 1 Insert the mounting sleeve into place. 1 Removing the unit 1 Remove the trim ring. Use either front-mount or rear-mount installation. For details, refer to Removing the front panel and Re-attaching the front panel on the bracket screw holes. 2 Secure the mounting sleeve ...
... Dashboard 1 Trim ring 2 Notched tab Section 03 En 15 English Use commercially available parts when installing. 2 Tighten two screws on the bracket and the side of the dashboard. If there is installed securely in shallow spaces, use the mounting sleeve that the unit is enough space, use the ...Front-mount 1 Insert the mounting sleeve into place. 1 Removing the unit 1 Remove the trim ring. Use either front-mount or rear-mount installation. For details, refer to Removing the front panel and Re-attaching the front panel on the bracket screw holes. 2 Secure the mounting sleeve ...
Owner's Manual
Page 17
... with this unit: ! NO NETWORK The connected device is undergoing maintenance. Follow the instructions that feature either of the following types of the Pandora application installed. Use 12-cm discs. Damaged discs, including discs that has a compatible version of discs cannot be deleted. En 17 iPod failure. Once the device's main...
... with this unit: ! NO NETWORK The connected device is undergoing maintenance. Follow the instructions that feature either of the following types of the Pandora application installed. Use 12-cm discs. Damaged discs, including discs that has a compatible version of discs cannot be deleted. En 17 iPod failure. Once the device's main...


