
Operation Manual
Page 6
... that you begin using this product for the first time after installation. When strange (incorrect) messages appear on the display. • To reset the microprocessor, remove the front panel as merely playing music. In this product. When the machine fails to help you benefit fully from their operation by reading through...
... that you begin using this product for the first time after installation. When strange (incorrect) messages appear on the display. • To reset the microprocessor, remove the front panel as merely playing music. In this product. When the machine fails to help you benefit fully from their operation by reading through...

Operation Manual
Page 9
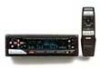
Batteries • Remove the cover on the back of the remote controller and insert the batteries with the (+) and (-) poles pointing in the Cn proper direction. 00' O Precaution: • Use only AAA or IEC R03 1.5 V batteries. • Remove the batteries if the remote controller is not used for a month or longer. • Do not attempt to recharge the supplied batteries. • Do not mix new and used batteries. • If the event of battery leakage, wipe the remote controller completely clean and install new batteries. • •
Batteries • Remove the cover on the back of the remote controller and insert the batteries with the (+) and (-) poles pointing in the Cn proper direction. 00' O Precaution: • Use only AAA or IEC R03 1.5 V batteries. • Remove the batteries if the remote controller is not used for a month or longer. • Do not attempt to recharge the supplied batteries. • Do not mix new and used batteries. • If the event of battery leakage, wipe the remote controller completely clean and install new batteries. • •
Operation Manual
Page 25
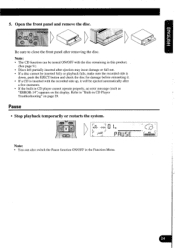
... and check the disc for damage before reinserting it. • If a CD is inserted with the recorded side up, it will be ejected automatically after removing the disc. To , Be sure to "Built-in CD player cannot operate properly, an error message (such as "ERROR-14") appears on page 29. 5. Open...
... and check the disc for damage before reinserting it. • If a CD is inserted with the recorded side up, it will be ejected automatically after removing the disc. To , Be sure to "Built-in CD player cannot operate properly, an error message (such as "ERROR-14") appears on page 29. 5. Open...
Operation Manual
Page 43
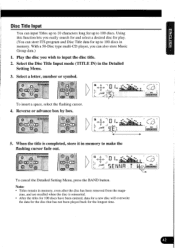
... .se".. L I "4 Ti TI To cancel the Detailed Setting Menu, press the BAND button. Note: • Titles remain in memory, even after the disc has been removed from the magazine, and are recalled when the disc is completed, store it in the Detailed Setting Menu. ( 3. Using this function lets you easily search...
... .se".. L I "4 Ti TI To cancel the Detailed Setting Menu, press the BAND button. Note: • Titles remain in memory, even after the disc has been removed from the magazine, and are recalled when the disc is completed, store it in the Detailed Setting Menu. ( 3. Using this function lets you easily search...
Operation Manual
Page 46
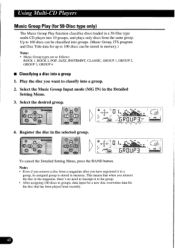
...PIONEEF 0 0 CID 5 S4'EH> L I : N.rit L GROUP _ :1 ( 4. rism ;tlilsEna 45 Select the Music Group Input mode (MG IN) in the selected group. PIONEER r 0 ( U I „asusil L a" 1 a" te"..a s•• o " n; Select the desired group. GROLIP3 To cancel the Detailed Setting Menu, press the BAND button...a new disc overwrites data for the disc that when you want to classify into a group 1. Note: • Even if you remove a disc from the same group. Using Multi-CD Players Music Group Play (for up to 100 discs can be stored in memory.)...
...PIONEEF 0 0 CID 5 S4'EH> L I : N.rit L GROUP _ :1 ( 4. rism ;tlilsEna 45 Select the Music Group Input mode (MG IN) in the selected group. PIONEER r 0 ( U I „asusil L a" 1 a" te"..a s•• o " n; Select the desired group. GROLIP3 To cancel the Detailed Setting Menu, press the BAND button...a new disc overwrites data for the disc that when you want to classify into a group 1. Note: • Even if you remove a disc from the same group. Using Multi-CD Players Music Group Play (for up to 100 discs can be stored in memory.)...
Operation Manual
Page 49
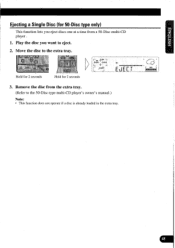
c as g Ai i Hold for 2 seconds 7 rum A t)" L V E :mord L TAX EJECT 3. Play the disc you eject discs one at a time from the extra tray. (Refer to the extra tray. ) Hold for 2 seconds Li! Move the disc to the 50-Disc type multi-CD player's owner's manual.) Note: • This function does not operate if a disc is already loaded in the extra tray. • • Remove the disc from a 50-Disc multi-CD player . 1. Ejecting a Single Disc (for 50-Disc type only) This function lets you want to eject. 2.
c as g Ai i Hold for 2 seconds 7 rum A t)" L V E :mord L TAX EJECT 3. Play the disc you eject discs one at a time from the extra tray. (Refer to the extra tray. ) Hold for 2 seconds Li! Move the disc to the 50-Disc type multi-CD player's owner's manual.) Note: • This function does not operate if a disc is already loaded in the extra tray. • • Remove the disc from a 50-Disc multi-CD player . 1. Ejecting a Single Disc (for 50-Disc type only) This function lets you want to eject. 2.
Operation Manual
Page 59
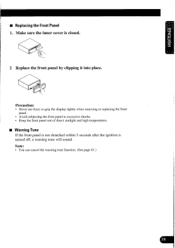
... the warning tone function. (See page 61.) • • ■ Replacing the Front Panel 1. Precaution: • Never use force or grip the display tightly when removing or replacing the front panel. • Avoid subjecting the front panel to excessive shocks. • Keep the front panel out of direct sunlight and high...
... the warning tone function. (See page 61.) • • ■ Replacing the Front Panel 1. Precaution: • Never use force or grip the display tightly when removing or replacing the front panel. • Avoid subjecting the front panel to excessive shocks. • Keep the front panel out of direct sunlight and high...
Operation Manual
Page 60
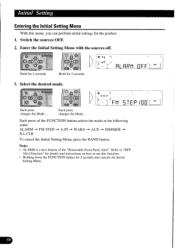
... can perform initial settings for the product. 1. O. ( 10 5 .4 7 • (C.: L OFF.i J 6 D CD L J Hold for 2 seconds Hold for 2 seconds FILRPri :OFF1 MODE 3. MODE Each press of the "Removable Front Panel Alert". Switch the sources OFF. 2. AUX -0. Note: • ALARM is a new feature of the FUNCTION button selects the mode in the following order...
... can perform initial settings for the product. 1. O. ( 10 5 .4 7 • (C.: L OFF.i J 6 D CD L J Hold for 2 seconds Hold for 2 seconds FILRPri :OFF1 MODE 3. MODE Each press of the "Removable Front Panel Alert". Switch the sources OFF. 2. AUX -0. Note: • ALARM is a new feature of the FUNCTION button selects the mode in the following order...
Operation Manual
Page 64
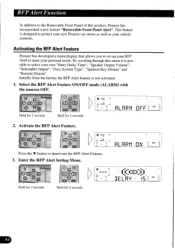
...personal needs. Initially from the factory the RFP Alert feature is designed to protect your new Pioneer car stereo as well as your vehicle contents. Activating the RFP Alert Feature Pioneer has developed a menu display that allows you to set-up your RFP Alert to deactivate the... :0t1 Lr "" 1, __A4_1 Bo IIELRY IS MODE 63 Activate the RFP Alert Feature. Pioneer has incorporated a new feature "Removable Front Panel Alert". By scrolling through this menu it is possible to the Removable Front Panel of this product. RFP Alert Function In addition to select your own "Entry ...
...personal needs. Initially from the factory the RFP Alert feature is designed to protect your new Pioneer car stereo as well as your vehicle contents. Activating the RFP Alert Feature Pioneer has developed a menu display that allows you to set-up your RFP Alert to deactivate the... :0t1 Lr "" 1, __A4_1 Bo IIELRY IS MODE 63 Activate the RFP Alert Feature. Pioneer has incorporated a new feature "Removable Front Panel Alert". By scrolling through this menu it is possible to the Removable Front Panel of this product. RFP Alert Function In addition to select your own "Entry ...
Operation Manual
Page 69
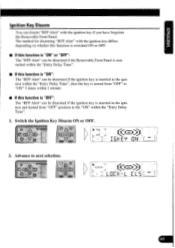
... on whether this function is switched ON or OFF. • If this function is "ON" or "OFF": The "RFP Alert" can be disarmed if the Removable Front Panel is reattached within the "Entry Delay Time". ■ If this function is "ON": The "RFP Alert" can be disarmed if the ignition key... the ignition and turned from "OFF" position to next selection. The method for disarming "RFP Alert" with the ignition key if you have forgotten the Removable Front Panel. Advance to the "ON" within the "Entry Delay Time". 1.
... on whether this function is switched ON or OFF. • If this function is "ON" or "OFF": The "RFP Alert" can be disarmed if the Removable Front Panel is reattached within the "Entry Delay Time". ■ If this function is "ON": The "RFP Alert" can be disarmed if the ignition key... the ignition and turned from "OFF" position to next selection. The method for disarming "RFP Alert" with the ignition key if you have forgotten the Removable Front Panel. Advance to the "ON" within the "Entry Delay Time". 1.

Operation Manual
Page 70
... disarmed by the change in the LED's blinking speed.) Note: • If the "RFP Alert" is released, this unit's RFP Alert will not operate. • Pioneer recommends that both a shock sensor and glass sensor be disarmed by Un-Locking the doors with a central door lock but the glass or shock sensor... system, it will remain dis- armed. To reset, turn the ignition on, reattach the front panel then turn the ignition to the off position and remove the front panel . • If your vehicle is equipped with a remote key-less entry system.
... disarmed by the change in the LED's blinking speed.) Note: • If the "RFP Alert" is released, this unit's RFP Alert will not operate. • Pioneer recommends that both a shock sensor and glass sensor be disarmed by Un-Locking the doors with a central door lock but the glass or shock sensor... system, it will remain dis- armed. To reset, turn the ignition on, reattach the front panel then turn the ignition to the off position and remove the front panel . • If your vehicle is equipped with a remote key-less entry system.
Operation Manual
Page 72
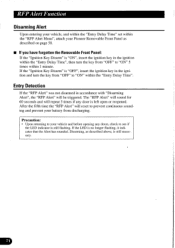
...then turn the key from "OFF" to "ON" within the "Entry Delay Time". Disarming, as described on page 58. ■ If you have forgotten the Removable Front Panel: If the "Ignition Key Disarm" is "ON", insert the ignition key in the ignition and turn the key from "OFF" to "ON" 5 times... sounded. RFP Alert Function Disarming Alert Upon entering your vehicle, and within the "Entry Delay Time" set within the "RFP Alert Menu", attach your Pioneer Removable Front Panel as described above, is still necessary. Precaution: • Upon returning to see if the LED indicator is still flashing.
...then turn the key from "OFF" to "ON" within the "Entry Delay Time". Disarming, as described on page 58. ■ If you have forgotten the Removable Front Panel: If the "Ignition Key Disarm" is "ON", insert the ignition key in the ignition and turn the key from "OFF" to "ON" 5 times... sounded. RFP Alert Function Disarming Alert Upon entering your vehicle, and within the "Entry Delay Time" set within the "RFP Alert Menu", attach your Pioneer Removable Front Panel as described above, is still necessary. Precaution: • Upon returning to see if the LED indicator is still flashing.


