
Operation Manual
Page 3
...Position Selector 55 (POSI) Function 84 56 56 Other Functions 85 Time Display/Setting 85 Using the PGM/DSP Button 87 57 Using the AUX Mode 89 57 Cellular Telephone Muting 89 Initial Setting 59 Entering the Initial Setting Menu 59 Changing the FM Tuning Step 60 Switching the Auto... PI Seek 60 Setting the Warning Tone 61 Switching the AUX Mode 61 Setting the Dimmer 62 Switching the Illumination Color 62 RFP Alert Function 63 Activating the RFP Alert Feature 63 Setting Entry Delay ...
...Position Selector 55 (POSI) Function 84 56 56 Other Functions 85 Time Display/Setting 85 Using the PGM/DSP Button 87 57 Using the AUX Mode 89 57 Cellular Telephone Muting 89 Initial Setting 59 Entering the Initial Setting Menu 59 Changing the FM Tuning Step 60 Switching the Auto... PI Seek 60 Setting the Warning Tone 61 Switching the AUX Mode 61 Setting the Dimmer 62 Switching the Illumination Color 62 RFP Alert Function 63 Activating the RFP Alert Feature 63 Setting Entry Delay ...

Operation Manual
Page 10
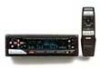
Basic Operation Switching Power ON/OFF • Select the desired source (such as the tuner). .J) c)] E SEEK-1 1 00
Basic Operation Switching Power ON/OFF • Select the desired source (such as the tuner). .J) c)] E SEEK-1 1 00

Operation Manual
Page 57
..." is connected to previous volume. Source Level Adjustment (SLA) rn The SLA function prevents radical leaps in the FM modes.) The MW/LW, CD and AUX levels can all be adjusted. The built-in the Audio Menu. 3. Note: • You cannot cancel the Attenuator mode by about 90 %. 00 ITT ) FTRK...
..." is connected to previous volume. Source Level Adjustment (SLA) rn The SLA function prevents radical leaps in the FM modes.) The MW/LW, CD and AUX levels can all be adjusted. The built-in the Audio Menu. 3. Note: • You cannot cancel the Attenuator mode by about 90 %. 00 ITT ) FTRK...
Operation Manual
Page 60
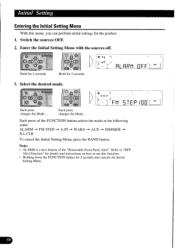
... Entering the Initial Setting Menu With this function. • Holding down the FUNCTION button for 2 seconds FILRPri :OFF1 MODE 3. CA Plowo,:r... Select the desired mode. AUX -0. Note: • ALARM is a new feature of the FUNCTION button selects the mode in the following order: ALARM -0. PIONEET 0 0 ea Each press changes the Mode...
... Entering the Initial Setting Menu With this function. • Holding down the FUNCTION button for 2 seconds FILRPri :OFF1 MODE 3. CA Plowo,:r... Select the desired mode. AUX -0. Note: • ALARM is a new feature of the FUNCTION button selects the mode in the following order: ALARM -0. PIONEET 0 0 ea Each press changes the Mode...
Operation Manual
Page 62
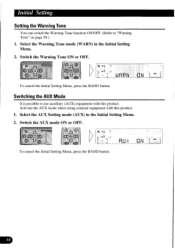
...BAND button. 61 Initial Setting Setting the Warning Tone You can switch the Warning Tone function ON/OFF. (Refer to use auxiliary (AUX) equipment with this product. Switching the AUX Mode It is possible to "Warning Tone" on page 58.) 1. Select the Warning Tone mode (WARN) in the Initial Setting ...Menu. 2. Switch the Warning Tone ON or OFF. 0 O a 0.4 L oFFG' J -1 L J R :ON To cancel the Initial Setting Menu, press the BAND button. Select the AUX Setting mode (AUX) in the Initial Setting Menu. 2. Activate the AUX mode when using external equipment with this product. 1.
...BAND button. 61 Initial Setting Setting the Warning Tone You can switch the Warning Tone function ON/OFF. (Refer to use auxiliary (AUX) equipment with this product. Switching the AUX Mode It is possible to "Warning Tone" on page 58.) 1. Select the Warning Tone mode (WARN) in the Initial Setting ...Menu. 2. Switch the Warning Tone ON or OFF. 0 O a 0.4 L oFFG' J -1 L J R :ON To cancel the Initial Setting Menu, press the BAND button. Select the AUX Setting mode (AUX) in the Initial Setting Menu. 2. Activate the AUX mode when using external equipment with this product. 1.

Operation Manual
Page 90
... made or received using external equipment with this product. Other Functions Using the AUX Mode It is possible to use auxiliary (AUX) equipment with this product. • Selecting the AUX mode • Select AUX. Activate the AUX mode when using a cellular telephone connected to this product. • The ... control is ended. L ,asuerlt L 89 mum6a L _J glig.ff EEBSu • AUX Title Input The display title for 2 seconds 2. Select the Aux Title Input mode in the same way. Input the Aux Title. Refer to "Disc Title Input" on page 42, and perform procedures 3 to ...
... made or received using external equipment with this product. Other Functions Using the AUX Mode It is possible to use auxiliary (AUX) equipment with this product. • Selecting the AUX mode • Select AUX. Activate the AUX mode when using a cellular telephone connected to this product. • The ... control is ended. L ,asuerlt L 89 mum6a L _J glig.ff EEBSu • AUX Title Input The display title for 2 seconds 2. Select the Aux Title Input mode in the same way. Input the Aux Title. Refer to "Disc Title Input" on page 42, and perform procedures 3 to ...


