Owner's Manual
Page 2
... - Operating this PIONEER product. Removing the front panel 7 - Attaching the front panel 8 About the demo mode 8 Use and care of audio adjustments 25 Using balance adjustment 25 Using the equalizer 25 Power ON/OFF 12 - Introduction to advanced operations 22 - Storing the strongest broadcast frequencies 14 - Displaying text information on iPod 21 - Browsing for purchasing this unit's iPod function from your unit from theft 7 - Adjusting the volume 13 Tuner 13 - Introduction to advanced operations 19 Playing songs on disc 15 - Selecting...
... - Operating this PIONEER product. Removing the front panel 7 - Attaching the front panel 8 About the demo mode 8 Use and care of audio adjustments 25 Using balance adjustment 25 Using the equalizer 25 Power ON/OFF 12 - Introduction to advanced operations 22 - Storing the strongest broadcast frequencies 14 - Displaying text information on iPod 21 - Browsing for purchasing this unit's iPod function from your unit from theft 7 - Adjusting the volume 13 Tuner 13 - Introduction to advanced operations 19 Playing songs on disc 15 - Selecting...

Owner's Manual
Page 3
... - Adjusting subwoofer settings 27 Using the high pass filter 28 Boosting the bass 28 Adjusting source levels 28 Initial Settings Adjusting initial settings 29 Setting the clock 29 Switching the warning tone 29 Switching the auxiliary setting 29 Switching the dimmer setting 29 Setting the rear output and subwoofer controller 30 Switching the feature demo 30 Switching the ever scroll 30 Activating the BT AUDIO source 30 Entering PIN code for Bluetooth wireless connection 31 Displaying system version of Bluetooth adapter for a song 34 - Setting the AUX title 32 Turning the clock display...
... - Adjusting subwoofer settings 27 Using the high pass filter 28 Boosting the bass 28 Adjusting source levels 28 Initial Settings Adjusting initial settings 29 Setting the clock 29 Switching the warning tone 29 Switching the auxiliary setting 29 Switching the dimmer setting 29 Setting the rear output and subwoofer controller 30 Switching the feature demo 30 Switching the ever scroll 30 Activating the BT AUDIO source 30 Entering PIN code for Bluetooth wireless connection 31 Displaying system version of Bluetooth adapter for a song 34 - Setting the AUX title 32 Turning the clock display...

Owner's Manual
Page 4
...iPod 56 - Selecting the SIRIUS channel select mode 46 - Using compression and bass emphasis 48 - Basic Operations 51 4 En - Example of advanced operations 45 - Switching the ring tone 43 - Displaying the Radio ID 44 SIRIUS Satellite Radio tuner 44 - Storing the strongest broadcast stations sequentially 51 Additional Information Error messages 52 Handling guideline of discs and player 53 Dual Discs 54 Compressed audio compatibility 54 USB audio player/USB memory 55 - Using disc title functions 50 TV tuner 51 - Making a call by entering phone number 42 - Using...
...iPod 56 - Selecting the SIRIUS channel select mode 46 - Using compression and bass emphasis 48 - Basic Operations 51 4 En - Example of advanced operations 45 - Switching the ring tone 43 - Displaying the Radio ID 44 SIRIUS Satellite Radio tuner 44 - Storing the strongest broadcast stations sequentially 51 Additional Information Error messages 52 Handling guideline of discs and player 53 Dual Discs 54 Compressed audio compatibility 54 USB audio player/USB memory 55 - Using disc title functions 50 TV tuner 51 - Making a call by entering phone number 42 - Using...
Owner's Manual
Page 6
... related marks are shown below. iTunes is a trademark of iPod. ! iPod nano third generation (software version 1.0.2) - For details, consult your dealer or nearest authorized Pioneer service station regarding the satellite radio tuner that the Satellite Radio Tuner for Pioneer (i.e., XM tuner and Sirius satellite tuner which are sold separately) can control and listen to the satellite radio tuner owner's manual. ! USB MSC (Mass Storage Class) compliant portable audio player and memory - iPod nano second generation (software version 1.1.3) -
... related marks are shown below. iTunes is a trademark of iPod. ! iPod nano third generation (software version 1.0.2) - For details, consult your dealer or nearest authorized Pioneer service station regarding the satellite radio tuner that the Satellite Radio Tuner for Pioneer (i.e., XM tuner and Sirius satellite tuner which are sold separately) can control and listen to the satellite radio tuner owner's manual. ! USB MSC (Mass Storage Class) compliant portable audio player and memory - iPod nano second generation (software version 1.1.3) -
Owner's Manual
Page 7
... nearest authorized Pioneer Service Station. See Switching the warning tone on file to deter theft. ! Handle gently when removing or attaching the front panel. ! If the front panel is lost on the USB portable audio player/USB memory even if that data is not detached from the head unit within five seconds of an insurance claim such as loss or theft. 2 Receive updates on the iPod even...
... nearest authorized Pioneer Service Station. See Switching the warning tone on file to deter theft. ! Handle gently when removing or attaching the front panel. ! If the front panel is lost on the USB portable audio player/USB memory even if that data is not detached from the head unit within five seconds of an insurance claim such as loss or theft. 2 Receive updates on the iPod even...
Owner's Manual
Page 10
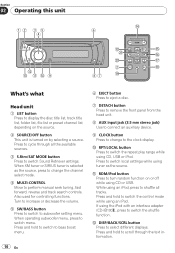
... remove the front panel from the head unit. 8 AUX input jack (3.5 mm stereo jack) Use to connect an auxiliary device. 9 CLOCK button Press to change the channel select mode. 4 MULTI-CONTROL Move to the clock display. If using the iPod with an interface adapter (CD-IB100N), press to switch Sound Retriever settings. Press to display the disc title list, track title list, folder list, file list or preset channel list depending on the source. 2 SOURCE/OFF button This unit is selected as the source. When XM tuner or SIRIUS tuner...
... remove the front panel from the head unit. 8 AUX input jack (3.5 mm stereo jack) Use to connect an auxiliary device. 9 CLOCK button Press to change the channel select mode. 4 MULTI-CONTROL Move to the clock display. If using the iPod with an interface adapter (CD-IB100N), press to switch Sound Retriever settings. Press to display the disc title list, track title list, folder list, file list or preset channel list depending on the source. 2 SOURCE/OFF button This unit is selected as the source. When XM tuner or SIRIUS tuner...

Owner's Manual
Page 13
... AM. % Manual tuning (step by step) Push MULTI-CONTROL left or right. % Seek tuning Push and hold to change the preset number. Six stations for later recall. ! En 13 Two external units can skip stations. Seek tuning starts as soon as a source, enables control of basic functions with this unit's source is automatically allocated to the ordinary display. Charging the portable audio player using car's DC power source while connecting it to adjust the sound level. Press...
... AM. % Manual tuning (step by step) Push MULTI-CONTROL left or right. % Seek tuning Push and hold to change the preset number. Six stations for later recall. ! En 13 Two external units can skip stations. Seek tuning starts as soon as a source, enables control of basic functions with this unit's source is automatically allocated to the ordinary display. Charging the portable audio player using car's DC power source while connecting it to adjust the sound level. Press...
Owner's Manual
Page 25
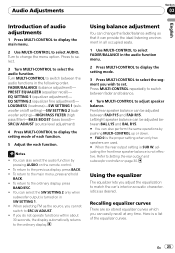
... any time. If you can provide the ideal listening environment in all occupied seats. 1 Use MULTI-CONTROL to select FADER/BALANCE in the audio function menu. 2 Press MULTI-CONTROL to display the setting mode. 3 Press MULTI-CONTROL to select the segment you adjust the equalization to SRC LV ADJUST. ! Press to select. 3 Turn MULTI-CONTROL to the ordinary display. To return to set. You can change the menu option. LOUDNESS (loudness)-SW SETTING 1 (subwoofer on the remote control. ! Using balance adjustment...
... any time. If you can provide the ideal listening environment in all occupied seats. 1 Use MULTI-CONTROL to select FADER/BALANCE in the audio function menu. 2 Press MULTI-CONTROL to display the setting mode. 3 Press MULTI-CONTROL to select the segment you adjust the equalization to SRC LV ADJUST. ! Press to select. 3 Turn MULTI-CONTROL to the ordinary display. To return to set. You can change the menu option. LOUDNESS (loudness)-SW SETTING 1 (subwoofer on the remote control. ! Using balance adjustment...

Owner's Manual
Page 26
... down . 26 En Section 03 Audio Adjustments Display Equalizer curve POWERFUL Powerful NATURAL Natural VOCAL Vocal CUSTOM Custom FLAT Flat SUPER BASS Super bass ! Press MULTI-CONTROL repeatedly to switch the segment in CUSTOM. ! If you make adjustments to an equalizer curve, the equalizer curve setting is an adjusted equalizer curve that you wish to set equalizer curve. 1 Use MULTI-CONTROL to select PRESET EQUALIZER in the audio function menu. 2 Press MULTI-CONTROL to display the setting mode. 3 Turn MULTI-CONTROL to the sound.
... down . 26 En Section 03 Audio Adjustments Display Equalizer curve POWERFUL Powerful NATURAL Natural VOCAL Vocal CUSTOM Custom FLAT Flat SUPER BASS Super bass ! Press MULTI-CONTROL repeatedly to switch the segment in CUSTOM. ! If you make adjustments to an equalizer curve, the equalizer curve setting is an adjusted equalizer curve that you wish to set equalizer curve. 1 Use MULTI-CONTROL to select PRESET EQUALIZER in the audio function menu. 2 Press MULTI-CONTROL to display the setting mode. 3 Turn MULTI-CONTROL to the sound.

Owner's Manual
Page 27
... same operations by using MULTI-CONTROL. Using subwoofer output This unit is increased or decreased. # You can also switch to this setting mode in the menu that appears by using MULTI-CONTROL. SW SETTING 1 (subwoofer on , you wish to set. Press SW repeatedly to switch between normal and reverse. 1 Press SW to display the subwoofer setting mode. En 27 LOW (low)-MID (mid)-HIGH (high)-OFF (off frequency-Level 4 Turn MULTI-CONTROL to adjust the selected segement...
... same operations by using MULTI-CONTROL. Using subwoofer output This unit is increased or decreased. # You can also switch to this setting mode in the menu that appears by using MULTI-CONTROL. SW SETTING 1 (subwoofer on , you wish to set. Press SW repeatedly to switch between normal and reverse. 1 Press SW to display the subwoofer setting mode. En 27 LOW (low)-MID (mid)-HIGH (high)-OFF (off frequency-Level 4 Turn MULTI-CONTROL to adjust the selected segement...

Owner's Manual
Page 28
... or rear speakers, turn on the FM volume level, which remains unchanged. 1 Compare the FM volume level with source level adjustments. ! dical changes in the audio function menu. 3 Press MULTI-CONTROL to display the setting mode. 4 Turn MULTI-CONTROL to adjust the source volume. +4 to +6 is displayed as the source volume is increased or decreased. # You can also switch to select the desired setting. Section 03 Audio Adjustments Using the high pass filter When you do not want low sounds from the subwoofer output frequency range...
... or rear speakers, turn on the FM volume level, which remains unchanged. 1 Compare the FM volume level with source level adjustments. ! dical changes in the audio function menu. 3 Press MULTI-CONTROL to display the setting mode. 4 Turn MULTI-CONTROL to adjust the source volume. +4 to +6 is displayed as the source volume is increased or decreased. # You can also switch to select the desired setting. Section 03 Audio Adjustments Using the high pass filter When you do not want low sounds from the subwoofer output frequency range...
Owner's Manual
Page 29
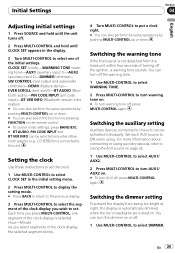
...)-BT AUDIO (Bluetooth audio)-PIN CODE INPUT (pin code input)-BT VER INFO (Bluetooth version information) # You can also perform the same operations by pushing MULTI-CONTROL up or down . # You can turn warning tone off, press MULTI-CONTROL again. SW CONTROL (rear output and subwoofer controller)-DEMO (feature demo)- Setting the clock Use these instructions to set the clock. 1 Use MULTI-CONTROL to select CLOCK SET in the display. 3 Turn MULTI-CONTROL to select one segment of the clock display is selected. You can be selected only when Bluetooth adapter (e.g., CD-BTB200...
...)-BT AUDIO (Bluetooth audio)-PIN CODE INPUT (pin code input)-BT VER INFO (Bluetooth version information) # You can also perform the same operations by pushing MULTI-CONTROL up or down . # You can turn warning tone off, press MULTI-CONTROL again. SW CONTROL (rear output and subwoofer controller)-DEMO (feature demo)- Setting the clock Use these instructions to set the clock. 1 Use MULTI-CONTROL to select CLOCK SET in the display. 3 Turn MULTI-CONTROL to select one segment of the clock display is selected. You can be selected only when Bluetooth adapter (e.g., CD-BTB200...
Owner's Manual
Page 30
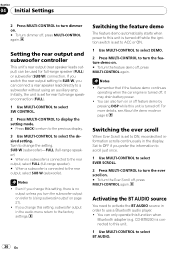
...-CONTROL to turn dimmer on. # To turn the Ever Scroll off, press MULTI-CONTROL again. Setting the rear output and subwoofer controller This unit's rear output (rear speaker leads output) can connect a rear speaker lead directly to a subwoofer without using an auxiliary amp. If you switch the rear output setting to SUB W, you change the setting. Switching the feature demo The feature demo automatically starts when power to this unit. 1 Use MULTI-CONTROL to use a Bluetooth audio player. ! Notes ! You can only operate this unit is set to ACC or ON. 1 Use MULTI-CONTROL to select DEMO...
...-CONTROL to turn dimmer on. # To turn the Ever Scroll off, press MULTI-CONTROL again. Setting the rear output and subwoofer controller This unit's rear output (rear speaker leads output) can connect a rear speaker lead directly to a subwoofer without using an auxiliary amp. If you switch the rear output setting to SUB W, you change the setting. Switching the feature demo The feature demo automatically starts when power to this unit. 1 Use MULTI-CONTROL to use a Bluetooth audio player. ! Notes ! You can only operate this unit is set to ACC or ON. 1 Use MULTI-CONTROL to select DEMO...
Owner's Manual
Page 32
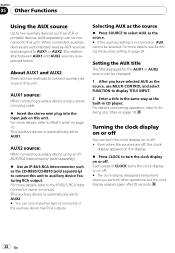
... CD player. AUX2 source: When connecting auxiliary device using a stereo mini plug cable % Insert the stereo mini plug into the input jack on , AUX cannot be changed. 1 After you perform other operations, but the clock display appears again after 25 seconds. 32 En For details concerning operation, refer to AUX1 or AUX2. About AUX1 and AUX2 There are automatically read as the source, use MULTI-CONTROL and select FUNCTION to this unit. This auxiliary device is not turned...
... CD player. AUX2 source: When connecting auxiliary device using a stereo mini plug cable % Insert the stereo mini plug into the input jack on , AUX cannot be changed. 1 After you perform other operations, but the clock display appears again after 25 seconds. 32 En For details concerning operation, refer to AUX1 or AUX2. About AUX1 and AUX2 There are automatically read as the source, use MULTI-CONTROL and select FUNCTION to this unit. This auxiliary device is not turned...

Owner's Manual
Page 36
... may need to start playback. DISCONNECT AUDIO (disconnect audio)- Playing songs on page 31. Connecting a Bluetooth audio player 1 Use MULTI-CONTROL to select CONNECTION OPEN in the function menu and other than CONNECTION OPEN and DISCONNECT AUDIO within about 30 seconds, the display is displayed. If your player requires a PIN code to establish a connection, look for Bluetooth wireless connection on a Bluetooth audio player 1 Use MULTI-CONTROL to select PLAY in the function menu. 2 Press MULTI-CONTROL to enter the PIN code into this unit yet, CONNECTION OPEN and DEVICE...
... may need to start playback. DISCONNECT AUDIO (disconnect audio)- Playing songs on page 31. Connecting a Bluetooth audio player 1 Use MULTI-CONTROL to select CONNECTION OPEN in the function menu and other than CONNECTION OPEN and DISCONNECT AUDIO within about 30 seconds, the display is displayed. If your player requires a PIN code to establish a connection, look for Bluetooth wireless connection on a Bluetooth audio player 1 Use MULTI-CONTROL to select PLAY in the function menu. 2 Press MULTI-CONTROL to enter the PIN code into this unit yet, CONNECTION OPEN and DEVICE...
Owner's Manual
Page 37
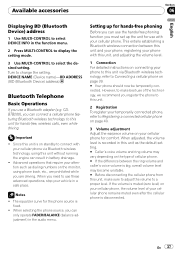
... instructions on connecting your cellular phone for hands-free phoning Before you can only operate FADER/BALANCE (balance adjustment) in the audio menu. When adjusted, the volume level is disconnected. Important ! When selecting the phone source, you register the phone to this unit for the phone source is muted (zero level) on the monitor, using this unit via Bluetooth wireless technology, using phone book, etc., are driving. Available accessories Section 06 English Displaying BD (Bluetooth Device) address 1 Use MULTI-CONTROL to select DEVICE INFO in the function menu...
... instructions on connecting your cellular phone for hands-free phoning Before you can only operate FADER/BALANCE (balance adjustment) in the audio menu. When adjusted, the volume level is disconnected. Important ! When selecting the phone source, you register the phone to this unit for the phone source is muted (zero level) on the monitor, using this unit via Bluetooth wireless technology, using phone book, etc., are driving. Available accessories Section 06 English Displaying BD (Bluetooth Device) address 1 Use MULTI-CONTROL to select DEVICE INFO in the function menu...

Owner's Manual
Page 41
... a total of the name you want to the instruction manual that came with that letter (e.g. Perform phone book transfer using the cellular phone. En 41 TRANSFER :YES appears in the function menu. 2 Press MULTI-CONTROL to perform phone book transfer. Connecting to a registered phone automatically 1 Use MULTI-CONTROL to select AUTO CONNECT in the display. 3 Press MULTI-CONTROL to enter the phone book transfer standby mode. 4 Use the cellular phone to turn automatic connection off, press MULTI...
... a total of the name you want to the instruction manual that came with that letter (e.g. Perform phone book transfer using the cellular phone. En 41 TRANSFER :YES appears in the function menu. 2 Press MULTI-CONTROL to perform phone book transfer. Connecting to a registered phone automatically 1 Use MULTI-CONTROL to select AUTO CONNECT in the display. 3 Press MULTI-CONTROL to enter the phone book transfer standby mode. 4 Use the cellular phone to turn automatic connection off, press MULTI...
Owner's Manual
Page 52
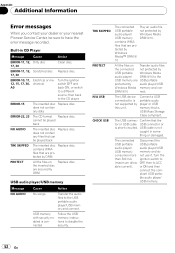
... the USB portable USB portable audio player/ audio player/USB USB memory memory and do consumes more not use it. ble audio player/ USB memory. 52 En The USB device connected to the CD player. The USB connec- pliant USB porta- USB cable is not supported by Windows Media DRM 9/10. ERROR-11, 12, Scratched disc Replace disc. 17, 30 ERROR-10, 11, Electrical or me12, 15, 17, 30, chanical A0 Turn the ignition switch OFF and back ON, or switch to a different source...
... the USB portable USB portable audio player/ audio player/USB USB memory memory and do consumes more not use it. ble audio player/ USB memory. 52 En The USB device connected to the CD player. The USB connec- pliant USB porta- USB cable is not supported by Windows Media DRM 9/10. ERROR-11, 12, Scratched disc Replace disc. 17, 30 ERROR-10, 11, Electrical or me12, 15, 17, 30, chanical A0 Turn the ignition switch OFF and back ON, or switch to a different source...

Owner's Manual
Page 53
... ON or disconnect the iPod and connect again. Select a list that contains the songs. Use only conventional, fully circular discs. Use 12-cm or 8-cm CD. Unfinalized CD-R/CD-RW disc playback is displayed, connect the cable again. Once iPod main menu is not possible. ! Use only discs featuring either of following operations. -Turn the ignition switch OFF and back ON. -Disconnect the USB portable audio player/USB memory. -Change to a different source. USB device is not charged but...
... ON or disconnect the iPod and connect again. Select a list that contains the songs. Use only conventional, fully circular discs. Use 12-cm or 8-cm CD. Unfinalized CD-R/CD-RW disc playback is displayed, connect the cable again. Once iPod main menu is not possible. ! Use only discs featuring either of following operations. -Turn the ignition switch OFF and back ON. -Disconnect the USB portable audio player/USB memory. -Change to a different source. USB device is not charged but...

Installation Manual
Page 1
... installation methods. Dashboard or Console Factory radio mounting bracket Fastening the front panel If you do not plan to bend the metal tabs (90°) into place. it overheats. CD RECEIVER AUTORADIO CD RADIO CD DEH-P4100UB Installation Manual Manuel d'installation Manual de instalación Printed in China Imprimé en Chine UC Installation Note • Check all connections and systems before final installation. • Do not use of unauthorized parts...
... installation methods. Dashboard or Console Factory radio mounting bracket Fastening the front panel If you do not plan to bend the metal tabs (90°) into place. it overheats. CD RECEIVER AUTORADIO CD RADIO CD DEH-P4100UB Installation Manual Manuel d'installation Manual de instalación Printed in China Imprimé en Chine UC Installation Note • Check all connections and systems before final installation. • Do not use of unauthorized parts...


