

Operation Manual
Page 4
... hearing "comfort level" adapts to excessive noise. Guard against this now will provide a lifetime of your equipment offers. This list of sound levels is only the start of fun and enjoyment. Decibel Level Example 30 Quiet library, soft whispers 40 Living room, refrigerator, bedroom ... Over time your protection. Selecting fine audio equipment such as the unit you can hear it comfortably and clearly, and without distor- So what sounds "normal" can actually be deceiving. To establish a safe level: • Start your sensitive hearing. Taking a minute to do this by ...
... hearing "comfort level" adapts to excessive noise. Guard against this now will provide a lifetime of your equipment offers. This list of sound levels is only the start of fun and enjoyment. Decibel Level Example 30 Quiet library, soft whispers 40 Living room, refrigerator, bedroom ... Over time your protection. Selecting fine audio equipment such as the unit you can hear it comfortably and clearly, and without distor- So what sounds "normal" can actually be deceiving. To establish a safe level: • Start your sensitive hearing. Taking a minute to do this by ...
Operation Manual
Page 7
... Ontario L3R 0P2 (905) 479-4411 1-877-283-5901 For warranty information please see the Limited Warranty sheet included with your product to be repro- Pioneer Electronics Service, Inc. FRANÇAIS ITALIANO NEDERLANDS 6 ENGLISH ESPAÑOL DEUTSCH Precaution CAUTION: CAUTION: USE OF CONTROL OR ADJUSTMENT OR PERFORMANCE OF ...INCREASE EYE HAZARD. • Keep this manual handy as a reference for operating procedures and precautions. • Always keep the volume low enough for outside sounds to the companies at the addresses listed below : Please do not ship your product.
... Ontario L3R 0P2 (905) 479-4411 1-877-283-5901 For warranty information please see the Limited Warranty sheet included with your product to be repro- Pioneer Electronics Service, Inc. FRANÇAIS ITALIANO NEDERLANDS 6 ENGLISH ESPAÑOL DEUTSCH Precaution CAUTION: CAUTION: USE OF CONTROL OR ADJUSTMENT OR PERFORMANCE OF ...INCREASE EYE HAZARD. • Keep this manual handy as a reference for operating procedures and precautions. • Always keep the volume low enough for outside sounds to the companies at the addresses listed below : Please do not ship your product.
Operation Manual
Page 9
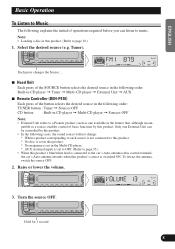
... source in the following order: Built-in CD player = Tuner = Multi-CD player = External Unit = AUX 7 Remote Controller (DEH-P410) Each press of the button selects the desired source in the following cases, the sound source will not change: * When a product corresponding to each source is not connected to this product. * No disc... Note: • External Unit refers to the car's Auto-antenna relay control terminal, the car's Auto-antenna extends when this product's source is connected to a Pioneer product (such as one External Unit can listen to page 10.) 1.
... source in the following order: Built-in CD player = Tuner = Multi-CD player = External Unit = AUX 7 Remote Controller (DEH-P410) Each press of the button selects the desired source in the following cases, the sound source will not change: * When a product corresponding to each source is not connected to this product. * No disc... Note: • External Unit refers to the car's Auto-antenna relay control terminal, the car's Auto-antenna extends when this product's source is connected to a Pioneer product (such as one External Unit can listen to page 10.) 1.

Operation Manual
Page 15
... : Operation 2 or 3:Select (Play range) 1 2 or 3:Select (Disc Title) 2 5:Play 5:ON ∞:OFF 5:ON ∞:OFF 5:ON ∞:OFF 5:ON ∞:OFF 5 or ∞:Select (Sound Quality Function) Page 19 24 19 20 21 20 25 Entering the Detailed Setting Menu In the Detailed Setting Menu, you can operate convenient, complex...
... : Operation 2 or 3:Select (Play range) 1 2 or 3:Select (Disc Title) 2 5:Play 5:ON ∞:OFF 5:ON ∞:OFF 5:ON ∞:OFF 5:ON ∞:OFF 5 or ∞:Select (Sound Quality Function) Page 19 24 19 20 21 20 25 Entering the Detailed Setting Menu In the Detailed Setting Menu, you can operate convenient, complex...

Operation Manual
Page 26
...a CD TEXT compatible Multi-CD player. COMP/DBE ON/OFF Switching 7 COMP The COMP (Compression) function adjusts imbalances between loud and subdued sounds at higher volumes. 7 DBE DBE (Dynamic Bass Emphasis) boosts bass levels to use them . Title Display Switching • Select the desired... Function Menu. 2. Using Multi-CD Players Compression and DBE (COMP/DBE) Using the COMP (Compression) and DBE (Dynamic Bass Emphasis) functions enables Multi-CD player sound quality adjustment. Select the desired mode with the DISPLAY button. COMP OFF = COMP 1 = COMP 2 = COMP OFF = DBE 1 = DBE 2 Note:...
...a CD TEXT compatible Multi-CD player. COMP/DBE ON/OFF Switching 7 COMP The COMP (Compression) function adjusts imbalances between loud and subdued sounds at higher volumes. 7 DBE DBE (Dynamic Bass Emphasis) boosts bass levels to use them . Title Display Switching • Select the desired... Function Menu. 2. Using Multi-CD Players Compression and DBE (COMP/DBE) Using the COMP (Compression) and DBE (Dynamic Bass Emphasis) functions enables Multi-CD player sound quality adjustment. Select the desired mode with the DISPLAY button. COMP OFF = COMP 1 = COMP 2 = COMP OFF = DBE 1 = DBE 2 Note:...

Operation Manual
Page 28
... an equalizer curve you have made adjustments to. (Refer to select the desired Equalizer curve. Audio Adjustment Selecting the Equalizer Curve You can adjust the sound quality. Select the desired mode in CD player and Multi-CD player are set to the same Equalizer Curve Adjustment setting automatically.) Entering the Audio...
... an equalizer curve you have made adjustments to. (Refer to select the desired Equalizer curve. Audio Adjustment Selecting the Equalizer Curve You can adjust the sound quality. Select the desired mode in CD player and Multi-CD player are set to the same Equalizer Curve Adjustment setting automatically.) Entering the Audio...
Operation Manual
Page 31
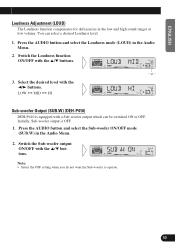
... output ON/OFF with a Sub-woofer output which can select a desired Loudness level. 1. LOW Ô MID Ô HI Sub-woofer Output (SUB.W) (DEH-P410) DEH-P410 is OFF. 1. ENGLISH ESPAÑOL DEUTSCH Loudness Adjustment (LOUD) The Loudness function compensates for deficiencies in the Audio Menu. 2. Press the AUDIO button and... select the Sub-woofer ON/OFF mode (SUB.W) in the low and high sound ranges at low volume. You can be switched ON or OFF. Press the AUDIO button and select the Loudness mode (LOUD) in the Audio...
... output ON/OFF with a Sub-woofer output which can select a desired Loudness level. 1. LOW Ô MID Ô HI Sub-woofer Output (SUB.W) (DEH-P410) DEH-P410 is OFF. 1. ENGLISH ESPAÑOL DEUTSCH Loudness Adjustment (LOUD) The Loudness function compensates for deficiencies in the Audio Menu. 2. Press the AUDIO button and... select the Sub-woofer ON/OFF mode (SUB.W) in the low and high sound ranges at low volume. You can be switched ON or OFF. Press the AUDIO button and select the Loudness mode (LOUD) in the Audio...
Operation Manual
Page 32
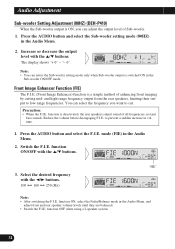
... the Fader/Balance mode in the Audio Menu. 2. to low-range frequencies. Switch the F.I .E. Audio Adjustment Sub-woofer Setting Adjustment (80HZ) (DEH-P410) When the Sub-woofer output is ON, you want to cut. function is a simple method of Sub-woofer. 1. Press the AUDIO button and...levels until they are balanced. • Switch the F.I .E. (Front Image Enhancer) function is deactivated, the rear speakers output sound of all frequencies, not just bass sounds. The display shows "+ 6" - and high-range frequency output from the rear speakers, limiting their output to prevent a sudden...
... the Fader/Balance mode in the Audio Menu. 2. to low-range frequencies. Switch the F.I .E. Audio Adjustment Sub-woofer Setting Adjustment (80HZ) (DEH-P410) When the Sub-woofer output is ON, you want to cut. function is a simple method of Sub-woofer. 1. Press the AUDIO button and...levels until they are balanced. • Switch the F.I .E. (Front Image Enhancer) function is deactivated, the rear speakers output sound of all frequencies, not just bass sounds. The display shows "+ 6" - and high-range frequency output from the rear speakers, limiting their output to prevent a sudden...

Operation Manual
Page 34
... to discourage theft. Take care not to excessive shocks. • Keep the front panel out of the head unit is turned off, a warning tone will sound. Detaching and Replacing the Front Panel Theft Protection The front panel of direct sunlight and high temperatures. Precaution: • Never use force or grip the...
... to discourage theft. Take care not to excessive shocks. • Keep the front panel out of the head unit is turned off, a warning tone will sound. Detaching and Replacing the Front Panel Theft Protection The front panel of direct sunlight and high temperatures. Precaution: • Never use force or grip the...

Operation Manual
Page 38
... 5, ∞ buttons allows you can not change the "TEST MODE". Select the "TEST MODE" with the +/- In this menu will sound. 3. If you switch the speaker output OFF, you to deactivate or activate the "Internal Speaker". Speaker Volume Output Adjustment If the "Internal...After setting volume, switch the "TEST MODE" OFF with the 2 button. 6. button. Press the 5 button to select whether or not the speaker output is sounded when the "DFS Alarm" is triggered. Display shows 10 - 30. 4. Cancel the "TEST MODE" with the ∞ button. 5. DFS Alarm Function Activating...
... 5, ∞ buttons allows you can not change the "TEST MODE". Select the "TEST MODE" with the +/- In this menu will sound. 3. If you switch the speaker output OFF, you to deactivate or activate the "Internal Speaker". Speaker Volume Output Adjustment If the "Internal...After setting volume, switch the "TEST MODE" OFF with the 2 button. 6. button. Press the 5 button to select whether or not the speaker output is sounded when the "DFS Alarm" is triggered. Display shows 10 - 30. 4. Cancel the "TEST MODE" with the ∞ button. 5. DFS Alarm Function Activating...

Operation Manual
Page 40
After closing all of the doors, ensure that the Alarm as described on the head unit will reset to prevent continuous sounding and prevent your vehicle, and within the "Entry Delay Time" set within the "Entry Delay Time". If you have forgotten your Detachable Face, ... it indicates that they are closed . Disarming Alarm Upon entering your battery from "OFF" to see if the LED indicator is now protected by your Pioneer Detachable Face as a visual deterrent. Precaution: • Upon returning to your vehicle and before opening any door is very simple. Arming Alarm To arm...
After closing all of the doors, ensure that the Alarm as described on the head unit will reset to prevent continuous sounding and prevent your vehicle, and within the "Entry Delay Time" set within the "Entry Delay Time". If you have forgotten your Detachable Face, ... it indicates that they are closed . Disarming Alarm Upon entering your battery from "OFF" to see if the LED indicator is now protected by your Pioneer Detachable Face as a visual deterrent. Precaution: • Upon returning to your vehicle and before opening any door is very simple. Arming Alarm To arm...


