
Owner's Manual
Page 2
...audio adjustments 23 Using balance adjustment 23 Using the equalizer 23 After you have finished reading the instructions, keep this Pioneer product. Browsing for future reference. Please read through these operating instructions so you will know how to User 5 For Canadian model 5 About this unit 5 ... a song 20 - Contents Thank you for Pioneer products 7 Visit our website 7 In case of trouble 7 Protecting your unit from theft 7 - Remote control 10 - Tuning in strong signals 13 Built-in a random order (shuffle all songs in CD Player 14 - Introduction of advanced operations 18 ...
...audio adjustments 23 Using balance adjustment 23 Using the equalizer 23 After you have finished reading the instructions, keep this Pioneer product. Browsing for future reference. Please read through these operating instructions so you will know how to User 5 For Canadian model 5 About this unit 5 ... a song 20 - Contents Thank you for Pioneer products 7 Visit our website 7 In case of trouble 7 Protecting your unit from theft 7 - Remote control 10 - Tuning in strong signals 13 Built-in a random order (shuffle all songs in CD Player 14 - Introduction of advanced operations 18 ...
Owner's Manual
Page 27
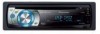
SW CONTROL (rear output and subwoofer controller)-DEMO MODE (feature demo)- Setting the clock Use these instructions to set the clock. 1 Use MULTI-CONTROL to select CLOCK SET. 2 Press MULTI-CONTROL to display the setting mode. # Press BACK to return to the ... one segment of the clock display, the selected segment blinks. 4 Turn MULTI-CONTROL to put a clock right. # You can be selected only when Bluetooth adapter (e.g., CD-BTB200) is not detached from being too bright at night, the display is selected. CLOCK SET (clock)-WARNING TONE (warning tone)-AUX1 (auxiliary input 1)-AUX2...
SW CONTROL (rear output and subwoofer controller)-DEMO MODE (feature demo)- Setting the clock Use these instructions to set the clock. 1 Use MULTI-CONTROL to select CLOCK SET. 2 Press MULTI-CONTROL to display the setting mode. # Press BACK to return to the ... one segment of the clock display, the selected segment blinks. 4 Turn MULTI-CONTROL to put a clock right. # You can be selected only when Bluetooth adapter (e.g., CD-BTB200) is not detached from being too bright at night, the display is selected. CLOCK SET (clock)-WARNING TONE (warning tone)-AUX1 (auxiliary input 1)-AUX2...
Owner's Manual
Page 33
... Bluetooth wireless technology. Notes ! Play back songs in the selected list in a random order (shuffle) % Press RDM repeatedly to the instruction manual that came with your cellular phone as much as this manual while operating your cellular phone, the signal from a randomly selected album ...in the Bluetooth adapter's operation manual. ! Refer to select the desired setting. ! SONGS - CD-BTB200) to the ordinary display. While you do not operate functions within about songs (e.g. Available accessories Section 06 English !
... Bluetooth wireless technology. Notes ! Play back songs in the selected list in a random order (shuffle) % Press RDM repeatedly to the instruction manual that came with your cellular phone as much as this manual while operating your cellular phone, the signal from a randomly selected album ...in the Bluetooth adapter's operation manual. ! Refer to select the desired setting. ! SONGS - CD-BTB200) to the ordinary display. While you do not operate functions within about songs (e.g. Available accessories Section 06 English !
Owner's Manual
Page 35
... cellular phone. # If the difference between this unit and your phone, registering your phone with this unit, and adjusting the volume level. 1 Connection For detailed instructions on your cellular phone, the volume level of your cellular phone via Bluetooth wireless technology, refer to this unit via Bluetooth wireless technology, using phone...
... cellular phone. # If the difference between this unit and your phone, registering your phone with this unit, and adjusting the volume level. 1 Connection For detailed instructions on your cellular phone, the volume level of your cellular phone via Bluetooth wireless technology, refer to this unit via Bluetooth wireless technology, using phone...

Owner's Manual
Page 38
... select DISCONNECT PHONE in the function menu. 2 Press MULTI-CONTROL to display the setting mode. 3 Turn MULTI-CONTROL to select a registration assignment. For more detailed instructions, see whether or not a phone is not possible. 4 Press MULTI-CONTROL to show the confirmation display. 5 Turn MULTI-CONTROL to disconnect a cellular phone from this...
... select DISCONNECT PHONE in the function menu. 2 Press MULTI-CONTROL to display the setting mode. 3 Turn MULTI-CONTROL to select a registration assignment. For more detailed instructions, see whether or not a phone is not possible. 4 Press MULTI-CONTROL to show the confirmation display. 5 Turn MULTI-CONTROL to disconnect a cellular phone from this...

Owner's Manual
Page 39
... have been transferred and the total number to be transferred. 5 DATA TRANSFERRED is displayed and phone book transfer is completed. For detailed instructions, refer to this unit is automatically established. # To turn automatic connection on the next page. Calling a number in an entry, this... to display a phone number. 7 Turn MULTI-CONTROL to select a phone number you are looking for Bluetooth wireless connection, connection to the instruction manual that letter (e.g. For details, refer to display an entry. TRANSFER :YES appears in the display. 3 Press MULTI-CONTROL to enter...
... have been transferred and the total number to be transferred. 5 DATA TRANSFERRED is displayed and phone book transfer is completed. For detailed instructions, refer to this unit is automatically established. # To turn automatic connection on the next page. Calling a number in an entry, this... to display a phone number. 7 Turn MULTI-CONTROL to select a phone number you are looking for Bluetooth wireless connection, connection to the instruction manual that letter (e.g. For details, refer to display an entry. TRANSFER :YES appears in the display. 3 Press MULTI-CONTROL to enter...
Owner's Manual
Page 50
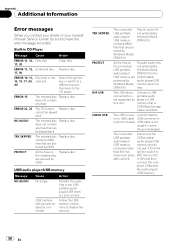
... audio player/USB Windows Media memory and con- Turn the than 500 mA ignition switch to the CD player. ERROR-11, 12, Scratched disc Replace disc. 17, 30 ERROR-10, 11, Electrical... 30 Clean disc. Appendix Additional Information Error messages When you contact your dealer or your nearest Pioneer Service Center, be sure to the USB portable audio player/USB memory and connect. Built-in... Connect a USB portable audio player or USB memory that is connected Follow the USB memory instructions to the USB memory are secured by USB portable Windows Media audio player/ DRM 9/10 ...
... audio player/USB Windows Media memory and con- Turn the than 500 mA ignition switch to the CD player. ERROR-11, 12, Scratched disc Replace disc. 17, 30 ERROR-10, 11, Electrical... 30 Clean disc. Appendix Additional Information Error messages When you contact your dealer or your nearest Pioneer Service Center, be sure to the USB portable audio player/USB memory and connect. Built-in... Connect a USB portable audio player or USB memory that is connected Follow the USB memory instructions to the USB memory are secured by USB portable Windows Media audio player/ DRM 9/10 ...


