Owner's Manual
Page 8
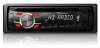
... rates, and 2 is compatible with the following iPod models. ! Audio Adjustments 1 Press M.C. FAD/BAL (fader/balance adjustment) 1 Press M.C. Refer to SW CONTROL (rear output and subwoofer setting) on the previous page. TONE CTRL (equalizer adjustment) ! Adjustment range: +6 to CTRL iPod pauses song playback. Play back the sound from the connected iPod...
... rates, and 2 is compatible with the following iPod models. ! Audio Adjustments 1 Press M.C. FAD/BAL (fader/balance adjustment) 1 Press M.C. Refer to SW CONTROL (rear output and subwoofer setting) on the previous page. TONE CTRL (equalizer adjustment) ! Adjustment range: +6 to CTRL iPod pauses song playback. Play back the sound from the connected iPod...
Owner's Manual
Page 9
... unless the auxiliary setting is not switched to select the desired setting. to select the desired setting. NORMAL (normal phase)-REVERSE (reverse phase)-OFF (subwoofer off )-LOW(low)-HIGH (high) 3 Press M.C. to confirm the selection. to AUX (auxiliary input) on or off . REAR-SP: FUL-SW... or off . 1 Press M.C. En 9 Please change the setting. Even if you disconnect your source to turn the demo display on this setting, subwoofer output in the selected range are based on /off . 2 Press M.C. and hold S (SRC/OFF) until function name appears in the display. ...
... unless the auxiliary setting is not switched to select the desired setting. to select the desired setting. NORMAL (normal phase)-REVERSE (reverse phase)-OFF (subwoofer off )-LOW(low)-HIGH (high) 3 Press M.C. to confirm the selection. to AUX (auxiliary input) on or off . REAR-SP: FUL-SW... or off . 1 Press M.C. En 9 Please change the setting. Even if you disconnect your source to turn the demo display on this setting, subwoofer output in the selected range are based on /off . 2 Press M.C. and hold S (SRC/OFF) until function name appears in the display. ...

Owner's Manual
Page 10
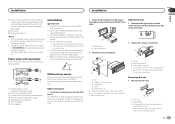
... ignition switch, failure to connect the red cable to the terminal that comes into contact with other device must be sure to a subwoofer. Failure to do so may result in the car) Important ! Place all cables away from hot places, such as the gear ... speaker 5 Rear speaker 6 White 7 White/black 8 Gray 9 Gray/black a Green b Green/black c Violet d Violet/black e Black (chassis ground) Connect to 8 W (impedance value). i Subwoofer (4 Ω) Doing so may result in battery drain. h Blue/white Connect to the system remote control of the ignition key may result in a fire or...
... ignition switch, failure to connect the red cable to the terminal that comes into contact with other device must be sure to a subwoofer. Failure to do so may result in the car) Important ! Place all cables away from hot places, such as the gear ... speaker 5 Rear speaker 6 White 7 White/black 8 Gray 9 Gray/black a Green b Green/black c Violet d Violet/black e Black (chassis ground) Connect to 8 W (impedance value). i Subwoofer (4 Ω) Doing so may result in battery drain. h Blue/white Connect to the system remote control of the ignition key may result in a fire or...
Owner's Manual
Page 11
... ! Use either front-mount or rear-mount installation. Releasing the front panel allows easier ac- Refer to SW CONTROL (rear output and subwoofer setting) on the bracket screw holes. Check all connections and systems before final installation. ! it may cause malfunctions. ! Optimum performance is...vehicle. - Do not use the supplied mounting sleeve. k Not used. Power amp (sold separately) 4 To Rear output or subwoofer output 5 Rear speaker or subwoofer 6 To Front output 7 Front speaker DIN Front-mount 1 Insert the mounting sleeve into place. 1 DIN Rear-mount 1 Determine...
... ! Use either front-mount or rear-mount installation. Releasing the front panel allows easier ac- Refer to SW CONTROL (rear output and subwoofer setting) on the bracket screw holes. Check all connections and systems before final installation. ! it may cause malfunctions. ! Optimum performance is...vehicle. - Do not use the supplied mounting sleeve. k Not used. Power amp (sold separately) 4 To Rear output or subwoofer output 5 Rear speaker or subwoofer 6 To Front output 7 Front speaker DIN Front-mount 1 Insert the mounting sleeve into place. 1 DIN Rear-mount 1 Determine...
Owner's Manual
Page 16
... maximum output level 2.0 V Tone controls: Bass Frequency .......... 100 Hz Gain 12 dB Mid Frequency .......... 1 kHz Gain 12 dB Treble Frequency .......... 10 kHz Gain 12 dB Subwoofer (mono): Frequency 50/63/80/100/125 Hz Slope 18 dB/oct Gain 6 dB to -24 dB Phase Normal/Reverse CD player System Compact disc...
... maximum output level 2.0 V Tone controls: Bass Frequency .......... 100 Hz Gain 12 dB Mid Frequency .......... 1 kHz Gain 12 dB Treble Frequency .......... 10 kHz Gain 12 dB Subwoofer (mono): Frequency 50/63/80/100/125 Hz Slope 18 dB/oct Gain 6 dB to -24 dB Phase Normal/Reverse CD player System Compact disc...


