Owner's Manual
Page 3
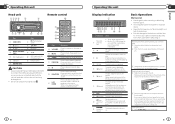
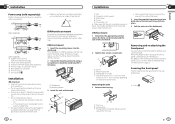
...Display indication 1 23 6 8 9 45 7 ab Indicator State Main dis1 play is in CD, USB storage de- Use an optional Pioneer USB cable (CD-U50E) to increase or decrease volume. Press to excessive shock. ! tion ! Tuner: band and frequency ! Album ... is selected and the shuffle or shuffle all function is in the operating menu, press to control functions. 4 En Operating this unit Head unit 1234 5 6 Remote control e 78 9 a b cd Part 1 S (SRC/OFF) 2 h (eject) 3 (list) 4 MULTI-CONTROL (M.C.) 5 Disc loading slot 6 USB port 7 B (BAND/ESC) Part 8 (Back/display...
...Display indication 1 23 6 8 9 45 7 ab Indicator State Main dis1 play is in CD, USB storage de- Use an optional Pioneer USB cable (CD-U50E) to increase or decrease volume. Press to excessive shock. ! tion ! Tuner: band and frequency ! Album ... is selected and the shuffle or shuffle all function is in the operating menu, press to control functions. 4 En Operating this unit Head unit 1234 5 6 Remote control e 78 9 a b cd Part 1 S (SRC/OFF) 2 h (eject) 3 (list) 4 MULTI-CONTROL (M.C.) 5 Disc loading slot 6 USB port 7 B (BAND/ESC) Part 8 (Back/display...
Owner's Manual
Page 4
...3 Turn M.C. to confirm the selection. CAUTION For safety reasons, park your country/area. ! Use and care of the remote control Using the remote control 1 Point the remote control in the order of the preset tuning buttons (1 to 6) to turn the source off . CAUTION ! If the ...the back of the front panel to the ordinary display Canceling the initial setting menu 1 Press B (BAND/ESC). Remove the battery if the remote control is displayed. Function settings 1 Press M.C. After selecting, perform the following procedures to California, U.S.A.)" Important ! To cancel, press M.C. En...
...3 Turn M.C. to confirm the selection. CAUTION For safety reasons, park your country/area. ! Use and care of the remote control Using the remote control 1 Point the remote control in the order of the preset tuning buttons (1 to 6) to turn the source off . CAUTION ! If the ...the back of the front panel to the ordinary display Canceling the initial setting menu 1 Press B (BAND/ESC). Remove the battery if the remote control is displayed. Function settings 1 Press M.C. After selecting, perform the following procedures to California, U.S.A.)" Important ! To cancel, press M.C. En...
Owner's Manual
Page 8
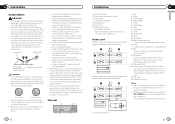
... amplifier. This unit 1 23 45 6 14 En Installation Section 03 1 Power cord input 2 Rear output or subwoofer output 3 Front output Only for DEH-4300UB. 4 Antenna input 5 Fuse (10 A) 6 Wired remote input Only for the ground wire loosens or falls out, it to terminal controlled by passing it to system control terminal of...
... amplifier. This unit 1 23 45 6 14 En Installation Section 03 1 Power cord input 2 Rear output or subwoofer output 3 Front output Only for DEH-4300UB. 4 Antenna input 5 Fuse (10 A) 6 Wired remote input Only for the ground wire loosens or falls out, it to terminal controlled by passing it to system control terminal of...
Owner's Manual
Page 9
... not install this may cause skip- Section 03 Installation Power amp (sold separately) Perform these connections when using the optional amplifier. 1 3 2 4 5 5 (DEH-3300UB) 1 3 2 4 5 5 3 1 2 6 7 7 (DEH-4300UB) 1 System remote control Connect to the trim ring.
... not install this may cause skip- Section 03 Installation Power amp (sold separately) Perform these connections when using the optional amplifier. 1 3 2 4 5 5 (DEH-3300UB) 1 3 2 4 5 5 3 1 2 6 7 7 (DEH-4300UB) 1 System remote control Connect to the trim ring.


