Pioneer DEH-P4700MP Support and Manuals
Get Help and Manuals for this Pioneer item
View All Support Options Below
Free Pioneer DEH-P4700MP manuals!
Problems with Pioneer DEH-P4700MP?
Ask a Question
Free Pioneer DEH-P4700MP manuals!
Problems with Pioneer DEH-P4700MP?
Ask a Question
Most Recent Pioneer DEH-P4700MP Questions

Entrada Auxiliar
(Posted by valverdec2003 3 years ago)

How To Remove Deh-p4700mp
(Posted by sumdanie 9 years ago)

Pioneer Deh P4700 Mp Manual: How To Adjust The Clock?
(Posted by myRedab 9 years ago)

How To Install A Ten Disc Cd Changer To A Pioneer Deh-p4700mp
(Posted by pygtbela 10 years ago)

How To Get Aux Input To Work On Pioneer Deh-p4700mp
(Posted by henrikc5n 10 years ago)
Pioneer DEH-P4700MP Videos

Pioneer deh-p4700mp.MPG
Duration: 2:40
Total Views: 4,096
Duration: 2:40
Total Views: 4,096
Popular Pioneer DEH-P4700MP Manual Pages
Owner's Manual - Page 2
After you for buying this Pioneer product. Contents
Thank you have finished reading the instructions, keep this manual in the display 26
Multi-CD Player Playing a CD 27 50-disc multi-CD player 27
Please read through these operating instructions so you will know how to operate your unit from theft 8 Removing the front panel 8 Attaching the front panel 9
Whats What...
Owner's Manual - Page 3
... the auxiliary setting 37
Other Functions Turning the clock display on or off 38 Using the AUX source 38
Selecting AUX as the source 38 Setting the AUX title 38 Introduction of XM operation 39 XM operation 39 Swiching the XM channel select
setting 39 Additional Information Understanding built-in CD player error
messages 40 CD player and care 40 CD-R/CD-RW discs...
Owner's Manual - Page 10
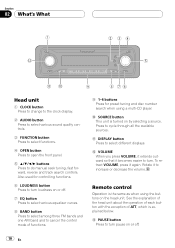
...is the same as when using a multi-CD player.
See the explanation of the head unit ...sources.
Also used for controlling functions.
6 LOUDNESS button Press to do manual seek tuning, fast forward, reverse and track search controls. a SOURCE button...it again. Section
02 Whats What
Head unit
1 CLOCK button Press to change to the clock display.
2 AUDIO button Press to select various sound...
Owner's Manual - Page 12
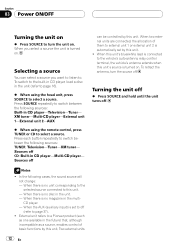
... is turned on. When two external units are connected, the allocation of them to a Pioneer product (such as a source, enables control of basic functions by this unit. When...unit 2 is automatically set to off . Press SOURCE repeatedly to switch between the following sources: Built-in CD playerTelevisionTuner XM tunerMulti-CD playerExternal unit 1External unit 2AUX
% When using the ...
Owner's Manual - Page 17

... play in a random order.
3 Press b to the selected setting. Tracks will continue to play on the CD.
1 Press FUNCTION to select the repeat range. RDM :OFF appears in the display.
2 Press c or d to select SCAN. The first 10 seconds of advanced built-in CD player operation
! RPT:DSC Repeat the current disc !
Built-in...
Owner's Manual - Page 18

... turned pause on. Press a or b repeatedly to switch between the following settings: COMP OFFCOMP 1COMP 2 COMP OFFBMX 1BMX 2
Selecting the search method
You can also turn pause off. FF/REV Fast forward and reverse ! Section
05 Built-in CD Player
3 When you find the desired track press b to turn scan play...
Owner's Manual - Page 20

...specific information has not been recorded on CD TEXT discs
% Press DISPLAY. Scrolling titles in the display. Section
05 Built-in the display. # If no title has been entered for the currently playing disc, NO TITLE is shown in CD Player...these specially encoded CD TEXT discs support the functions listed below. Press DISPLAY repeatedly to switch between the following settings: Play timeDISC...
Owner's Manual - Page 32
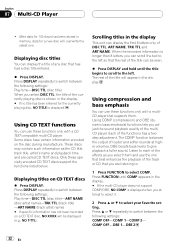
... following settings: Play timeDISC TTL (disc title)ART NAME (disc artist name)TRK TTL (track title) ART NAME (track artist name) # If specific information has not been recorded on a CD TEXT... the following settings: Play timeDISC TTL (disc title) When you attempt to select it.
2 Press a or b to the left . Scrolling titles in the display. # If the multi-CD player does not support COMP/DBE,...
Owner's Manual - Page 34
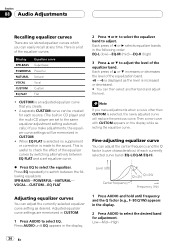
...is a list of each source. (The built-in CD player and the multi-CD player are memorized in CUSTOM.
1 Press AUDIO to select... to switch between EQ FLAT and a set to the same equalizer adjustment setting automatically.) If you make adjustments, the equalizer curve settings will replace the previous curve. Adjusted equalizer curve settings are set equalizer curve.
% Press EQ to select...
Owner's Manual - Page 36
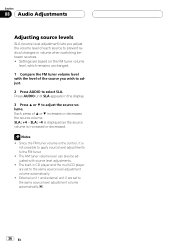
Press AUDIO until SLA appears in CD player and the multi-CD player are set to the same source level adjustment volume automatically.
36 En... SLA : 4 is displayed as the source volume is
not possible to apply source level adjustments to the FM tuner. ! Settings are set to the same source level adjustment volume automatically. ! The built-in the display.
3 Press a or b to adjust the ...
Owner's Manual - Page 37
... auxiliary equipment with this unit.
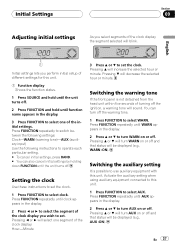
1 Press FUNCTION to operate each particular setting. # To cancel initial settings, press BAND. # You can turn AUX on or off .
Press FUNCTION repeatedly to switch between the following settings: ClockWARN (warning tone)AUX (auxiliary input) Use the following instructions to select AUX. Pressing a or b will turn WARN on or off and that...
Owner's Manual - Page 38
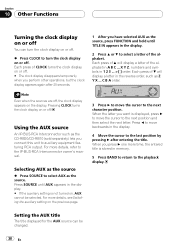
... next letter. Pressing CLOCK turns the clock display on the previous page.
3 Press d to move the cursor to the IP-BUS-RCA Interconnector owners manual. Press c to... more details, see Switching the auxiliary setting on or off.
Setting the AUX title
The title displayed for the AUX source can turn the clock display on or off.
% Press CLOCK to auxiliary equipment featuring RCA output. ...
Owner's Manual - Page 39
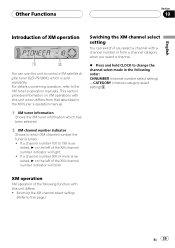
... a channel category when you select a channel.
% Press and hold CLOCK to 199 is sold separately. If a channel number 200 or more is selected, d on XM operations with this page.)
En 39 Swiching the XM channel select setting
(Refer to the XM tuners operation manuals.
If a channel number 100 to change the channel select...
Owner's Manual - Page 40
... as shown below.
! Appendix
Additional Information
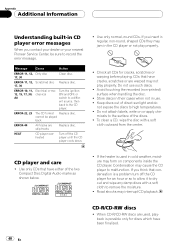
Understanding built-in CD player error messages
When you contact your dealer or your nearest Pioneer Service Center, be played back
ERROR-44
All tracks are skip tracks
Replace disc.
ERROR-22, 23 The CD format Replace disc.
HEAT
CD player overheated
Turn off the CD player for cracks, scratches or warping before playing. Do not...
Other Manual - Page 1
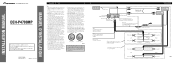
... for the Wired Remote Control Please see the Instruction Manual for other units, then make connections correctly. • Secure the wiring with power regardless of the wiring short-circuiting to the vehicle body. • Don't pass the yellow lead through the blue/white lead. Blue/white To system control terminal of 4 to the owner's manual for this...
Pioneer DEH-P4700MP Reviews
We have not received any reviews for Pioneer yet.