Owner's Manual
Page 4
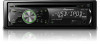
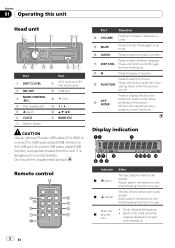
... this unit Head unit Part 1 DISP/ /SCRL 2 SRC/OFF 3 MULTI-CONTROL (M.C.) 4 Disc loading slot 5 h (eject) 6 CLOCK 7 Detach button Part 8 AUX input jack (3.5 mm stereo jack) 9 USB port a (list) b 1 to 6 c a/b/c/d d BAND/ESC CAUTION Use an optional Pioneer USB cable (CD-U50E) to connect the USB audio player/USB memory to mute. Do not...
... this unit Head unit Part 1 DISP/ /SCRL 2 SRC/OFF 3 MULTI-CONTROL (M.C.) 4 Disc loading slot 5 h (eject) 6 CLOCK 7 Detach button Part 8 AUX input jack (3.5 mm stereo jack) 9 USB port a (list) b 1 to 6 c a/b/c/d d BAND/ESC CAUTION Use an optional Pioneer USB cable (CD-U50E) to connect the USB audio player/USB memory to mute. Do not...
Owner's Manual
Page 12
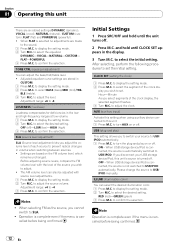
... levels, compare the FM volume level with source level adjustments. 1 Press M.C. to confirm the selection. Adjustment range: +4 to adjust the clock. Initial Settings 1 Press SRC/OFF and hold until the unit turns off. 2 Press M.C. After selecting, perform the following procedures to switch... are six stored settings DYNAMIC (dynamic), VOCAL (vocal), NATURAL (natural), CUSTOM (custom), FLAT (flat) and POWERFUL (powerful). ! and hold until CLOCK SET appears in volume when switching between sources. ! to this unit There are based on or off )-LOW(low)-HIGH (high) 3 Press M.C....
... levels, compare the FM volume level with source level adjustments. 1 Press M.C. to confirm the selection. Adjustment range: +4 to adjust the clock. Initial Settings 1 Press SRC/OFF and hold until the unit turns off. 2 Press M.C. After selecting, perform the following procedures to switch... are six stored settings DYNAMIC (dynamic), VOCAL (vocal), NATURAL (natural), CUSTOM (custom), FLAT (flat) and POWERFUL (powerful). ! and hold until CLOCK SET appears in volume when switching between sources. ! to this unit There are based on or off )-LOW(low)-HIGH (high) 3 Press M.C....
Owner's Manual
Page 13
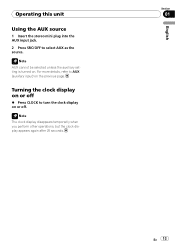
Turning the clock display on or off . Note The clock display disappears temporarily when you perform other operations, but the clock display appears again after 25 seconds. English Section 01 En 13 Operating this unit Using the AUX source 1 Insert the stereo mini plug into the AUX input jack. 2 Press SRC/OFF to turn the clock display on the previous page. For more details, refer to AUX (auxiliary input) on or off % Press CLOCK to select AUX as the source. Note AUX cannot be selected unless the auxiliary setting is turned on.
Turning the clock display on or off . Note The clock display disappears temporarily when you perform other operations, but the clock display appears again after 25 seconds. English Section 01 En 13 Operating this unit Using the AUX source 1 Insert the stereo mini plug into the AUX input jack. 2 Press SRC/OFF to turn the clock display on the previous page. For more details, refer to AUX (auxiliary input) on or off % Press CLOCK to select AUX as the source. Note AUX cannot be selected unless the auxiliary setting is turned on.


