Owner's Manual
Page 2
... and CAUTIONs in this manual. Use in other reproductive harm. Operation is disconnected or discharged, any preset memory will expose you to the following two conditions: (1) This device may not cause harmful interference, and (2) this device must accept any interference received, including interference that you for future reference. Wash hands after handling. About this unit The tuner frequencies on the enclosed...
... and CAUTIONs in this manual. Use in other reproductive harm. Operation is disconnected or discharged, any preset memory will expose you to the following two conditions: (1) This device may not cause harmful interference, and (2) this device must accept any interference received, including interference that you for future reference. Wash hands after handling. About this unit The tuner frequencies on the enclosed...
Owner's Manual
Page 3
... do not ship your unit to the companies at the addresses listed below for after-sales service (including warranty conditions) or any other information. Learn about product updates and to receive notices about product updates (such as firm- Pioneer Electronics (USA) Inc....sheet included with this unit for repair without advance contact. U.S.A. ware updates) for your product to safeguard purchase details in our files in the event of Canada, Inc. Register your product. ! CUSTOMER SUPPORT DIVISION P.O. Access owner's manuals, spare parts information, service information, and much ...
... do not ship your unit to the companies at the addresses listed below for after-sales service (including warranty conditions) or any other information. Learn about product updates and to receive notices about product updates (such as firm- Pioneer Electronics (USA) Inc....sheet included with this unit for repair without advance contact. U.S.A. ware updates) for your product to safeguard purchase details in our files in the event of Canada, Inc. Register your product. ! CUSTOMER SUPPORT DIVISION P.O. Access owner's manuals, spare parts information, service information, and much ...
Owner's Manual
Page 4
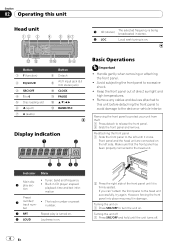
... unit Head unit 5 5 (stereo) The selected frequency is being broadcasted in stereo. 6 LOC Local seek tuning is on . The track number or preset number. Button 1 F (function) 2 EQ/LOUD 3 SRC/OFF 4 1 to the left side. Indicator State Main dis1 play is turned on. 4 LOUD Loudness is on . 2 Press the right side of direct sunlight and high temperatures. ! Re-attaching the front panel 1 Slide the front panel to 6 5 Disc loading slot 6 h (eject) 7 A (audio) Button...
... unit Head unit 5 5 (stereo) The selected frequency is being broadcasted in stereo. 6 LOC Local seek tuning is on . The track number or preset number. Button 1 F (function) 2 EQ/LOUD 3 SRC/OFF 4 1 to the left side. Indicator State Main dis1 play is turned on. 4 LOUD Loudness is on . 2 Press the right side of direct sunlight and high temperatures. ! Re-attaching the front panel 1 Slide the front panel to 6 5 Disc loading slot 6 h (eject) 7 A (audio) Button...
Owner's Manual
Page 5
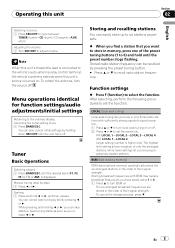
... 2 Larger setting number is turned on. After selecting, perform the following procedures to the vehicle's auto-antenna relay control terminal, the vehicle's antenna extends when this unit's blue/white lead is displayed. Note When this unit's source is higher level. Seeking 1 Press and hold until the preset number stops flashing. Function settings % Press F (function) to six stations as you receive progressively weaker stations. Seek tuning starts as soon as presets. % When you find a station that you...
... 2 Larger setting number is turned on. After selecting, perform the following procedures to the vehicle's auto-antenna relay control terminal, the vehicle's antenna extends when this unit's blue/white lead is displayed. Note When this unit's source is higher level. Seeking 1 Press and hold until the preset number stops flashing. Function settings % Press F (function) to six stations as you receive progressively weaker stations. Seek tuning starts as soon as presets. % When you find a station that you...

Owner's Manual
Page 6
... in the display. PAUSE (pause) 1 Press a or b to pause or resume. 6 En Note You can change the fader/balance setting. 1 Press a or b to adjust the source volume. Before adjusting source levels, compare the FM volume level with source level adjustments. 1 Press a or b to adjust front/rear speaker balance. Adjustment range (front/rear): FAD F15 to select the desired setting. Settings are stored in CD player. Section 02 Operating this unit CD Basic Operations Playing a CD 1 Insert the disc, label side...
... in the display. PAUSE (pause) 1 Press a or b to pause or resume. 6 En Note You can change the fader/balance setting. 1 Press a or b to adjust the source volume. Before adjusting source levels, compare the FM volume level with source level adjustments. 1 Press a or b to adjust front/rear speaker balance. Adjustment range (front/rear): FAD F15 to select the desired setting. Settings are stored in CD player. Section 02 Operating this unit CD Basic Operations Playing a CD 1 Insert the disc, label side...
Owner's Manual
Page 7
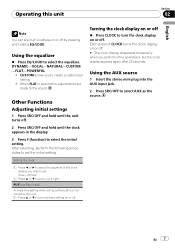
When FLAT is selected no adjustments are made to set the initial setting. En 7 Setting the clock 1 Press c or d to select the segment of CLOCK turns the clock display on or off . 2 Press SRC/OFF and hold until the clock appears in the display. 3 Press F (function) to select the equalizer. CUSTOM allows you to turn auxiliary setting on or off % Press CLOCK to select AUX as the source. AUX (auxiliary input) Activate this setting when using auxiliary device connected to this unit Section 02...
When FLAT is selected no adjustments are made to set the initial setting. En 7 Setting the clock 1 Press c or d to select the segment of CLOCK turns the clock display on or off . 2 Press SRC/OFF and hold until the clock appears in the display. 3 Press F (function) to select the equalizer. CUSTOM allows you to turn auxiliary setting on or off % Press CLOCK to select AUX as the source. AUX (auxiliary input) Activate this setting when using auxiliary device connected to this unit Section 02...
Owner's Manual
Page 8
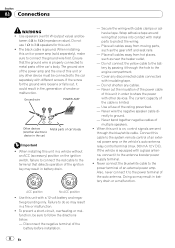
... speaker cable directly to 8 W (impedance value). When this unit or any other devices. Failure to the terminal that detects operation of an external power amp or the vehicle's auto-antenna relay control terminal (max. 300 mA 12 V DC). Section 03 Connections WARNING ! tween 4 W to ground. - F O OF - The current capacity of the cable is properly connected to the power terminal of smoke or malfunction. Use a fuse of the battery...
... speaker cable directly to 8 W (impedance value). When this unit or any other devices. Failure to the terminal that detects operation of an external power amp or the vehicle's auto-antenna relay control terminal (max. 300 mA 12 V DC). Section 03 Connections WARNING ! tween 4 W to ground. - F O OF - The current capacity of the cable is properly connected to the power terminal of smoke or malfunction. Use a fuse of the battery...
Owner's Manual
Page 9
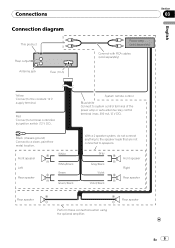
... ground) Connect to speakers. Rear speaker En 9 Front speaker Left Rear speaker White White/black Green Green/black With a 2 speaker system, do not connect anything to the speaker leads that are not connected to a clean, paint-free metal location. Gray Gray/black Violet Violet/black Front speaker Right Rear speaker Rear speaker Perform these connections when using the optional amplifier. System remote control Blue/white Connect to system control terminal of the power amp or auto-antenna relay control terminal (max...
... ground) Connect to speakers. Rear speaker En 9 Front speaker Left Rear speaker White White/black Green Green/black With a 2 speaker system, do not connect anything to the speaker leads that are not connected to a clean, paint-free metal location. Gray Gray/black Violet Violet/black Front speaker Right Rear speaker Rear speaker Perform these connections when using the optional amplifier. System remote control Blue/white Connect to system control terminal of the power amp or auto-antenna relay control terminal (max...
Owner's Manual
Page 10
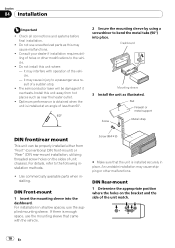
Check all connections and systems before final installation. ! Install this unit away from "Front" (conventional DIN front-mount) or "Rear" (DIN rear-mount installation, utilizing threaded screw holes on the bracket and the side of holes or other malfunctions. Optimum performance is obtained when the unit is installed securely in shallow spaces, use unauthorized parts as this unit where : - Nut Firewall or metal support Screw Metal...
Check all connections and systems before final installation. ! Install this unit away from "Front" (conventional DIN front-mount) or "Rear" (DIN rear-mount installation, utilizing threaded screw holes on the bracket and the side of holes or other malfunctions. Optimum performance is obtained when the unit is installed securely in shallow spaces, use unauthorized parts as this unit where : - Nut Firewall or metal support Screw Metal...
Owner's Manual
Page 11
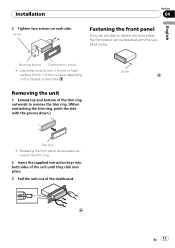
...Use either truss (5 mm × 8 mm) or flush surface (5 mm × 9 mm) screws, depending on each side. Screw Section 04 Fastening the front panel If you do not plan to remove the trim ring. (When reattaching the trim ring, point the side with the supplied screw. Removing the unit... 1 Extend top and bottom of the dashboard. English Mounting bracket Dashboard or console ! Releasing the front panel allows easier ac- Installation 2 Tighten two screws on the bracket screw holes. cess to the ...
...Use either truss (5 mm × 8 mm) or flush surface (5 mm × 9 mm) screws, depending on each side. Screw Section 04 Fastening the front panel If you do not plan to remove the trim ring. (When reattaching the trim ring, point the side with the supplied screw. Removing the unit... 1 Extend top and bottom of the dashboard. English Mounting bracket Dashboard or console ! Releasing the front panel allows easier ac- Installation 2 Tighten two screws on the bracket screw holes. cess to the ...
Owner's Manual
Page 12
... switch to a different source, then back to note the error message. Replace disc. Do not touch the recorded surface of following two logos. Do not attach labels, write on Select the repeat range changes the repeat play play Depending on or apply chemicals to the warmer temperature for discs before using a Move electrical de- cell phone, that may damage the player. Do not use...
... switch to a different source, then back to note the error message. Replace disc. Do not touch the recorded surface of following two logos. Do not attach labels, write on Select the repeat range changes the repeat play play Depending on or apply chemicals to the warmer temperature for discs before using a Move electrical de- cell phone, that may damage the player. Do not use...
Owner's Manual
Page 13
... become stuck in scratches on this unit. Additional Information DualDiscs DualDiscs are two-sided discs that have a recordable CD for audio on one side and a recordable DVD for more detailed information about DualDiscs. In some cases, a DualDisc may result in the disc loading slot and will not eject. Frequent loading and ejecting of DualDiscs is not physically compatible with...
... become stuck in scratches on this unit. Additional Information DualDiscs DualDiscs are two-sided discs that have a recordable CD for audio on one side and a recordable DVD for more detailed information about DualDiscs. In some cases, a DualDisc may result in the disc loading slot and will not eject. Frequent loading and ejecting of DualDiscs is not physically compatible with...
Owner's Manual
Page 14
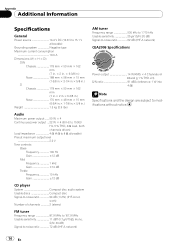
... power output ....... 50 W × 4 Continuous power output ... 22 W × 4 (50 Hz to 15 000 Hz, 5 % THD, 4 W load, both channels driven) Load impedance 4 W (4 W to 8 W allowable) Preout maximum output level 2.0 V Tone controls: Bass Frequency 100 Hz Gain 12 dB Mid Frequency 1 kHz Gain 12 dB Treble Frequency 10 kHz Gain 12 dB CD player System Compact disc audio system Usable discs Compact disc Signal-to modifications without notice. 14 En work) Number of channels 2 (stereo) FM tuner Frequency...
... power output ....... 50 W × 4 Continuous power output ... 22 W × 4 (50 Hz to 15 000 Hz, 5 % THD, 4 W load, both channels driven) Load impedance 4 W (4 W to 8 W allowable) Preout maximum output level 2.0 V Tone controls: Bass Frequency 100 Hz Gain 12 dB Mid Frequency 1 kHz Gain 12 dB Treble Frequency 10 kHz Gain 12 dB CD player System Compact disc audio system Usable discs Compact disc Signal-to modifications without notice. 14 En work) Number of channels 2 (stereo) FM tuner Frequency...
Owner's Manual
Page 42
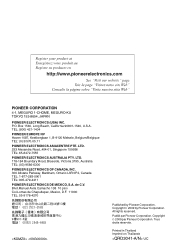
..., California 90801-1540, U.S.A. LTD. 253 Alexandra Road, #04-01, Singapore 159936 TEL: 65-6472-7555 PIONEER ELECTRONICS AUSTRALIA PTY. Publié par Pioneer Corporation. LTD. 178-184 Boundary Road, Braeside, Victoria 3195, Australia TEL: (03) 9586-6300 PIONEER ELECTRONICS OF CANADA, INC. 300 Allstate Parkway, Markham, Ontario L3R 0P2, Canada TEL: 1-877-283...
..., California 90801-1540, U.S.A. LTD. 253 Alexandra Road, #04-01, Singapore 159936 TEL: 65-6472-7555 PIONEER ELECTRONICS AUSTRALIA PTY. Publié par Pioneer Corporation. LTD. 178-184 Boundary Road, Braeside, Victoria 3195, Australia TEL: (03) 9586-6300 PIONEER ELECTRONICS OF CANADA, INC. 300 Allstate Parkway, Markham, Ontario L3R 0P2, Canada TEL: 1-877-283...


