Owner's Manual
Page 4
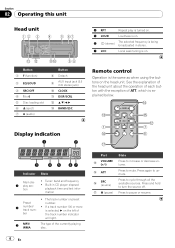
... Preset number. 2 number/ track num- ! Button 1 F (function) 2 EQ/LOUD 3 SRC/OFF 4 1 to 6 5 Disc loading slot 6 h (eject) 7 A (audio) Button 8 Detach 9 AUX input jack (3.5 mm stereo jack) a CLOCK b DISP/SCRL c a/b/c/d d BAND/ESC Display indication 1 2 3 4 5 67 Indicator State Main dis1 play is turned on. 5 LOUD Loudness is on the head unit. Press to unmute.
... Preset number. 2 number/ track num- ! Button 1 F (function) 2 EQ/LOUD 3 SRC/OFF 4 1 to 6 5 Disc loading slot 6 h (eject) 7 A (audio) Button 8 Detach 9 AUX input jack (3.5 mm stereo jack) a CLOCK b DISP/SCRL c a/b/c/d d BAND/ESC Display indication 1 2 3 4 5 67 Indicator State Main dis1 play is turned on. 5 LOUD Loudness is on the head unit. Press to unmute.
Owner's Manual
Page 8
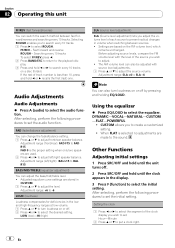
...SLA -4 Note You can also turn loudness on a disc (folder). Adjustment range: SLA +4 to adjust. ! Using the equalizer % Press EQ/LOUD to put a clock right. 8 En Hour-Minute 2 Press a or b to select the equalizer. FF/REV - Audio Adjustments Audio Adjustments % Press A (audio) to set the initial ...setting. Adjustment range (front/rear): FAD F15 to adjust the level. Setting the clock 1 Press c or d to select the segment of each source to prevent radical changes in CUSTOM. 1 Press a or b to FAD R15 FAD 0 is...
...SLA -4 Note You can also turn loudness on a disc (folder). Adjustment range: SLA +4 to adjust. ! Using the equalizer % Press EQ/LOUD to put a clock right. 8 En Hour-Minute 2 Press a or b to select the equalizer. FF/REV - Audio Adjustments Audio Adjustments % Press A (audio) to set the initial ...setting. Adjustment range (front/rear): FAD F15 to adjust the level. Setting the clock 1 Press c or d to select the segment of each source to prevent radical changes in CUSTOM. 1 Press a or b to FAD R15 FAD 0 is...
Owner's Manual
Page 9
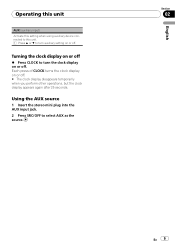
... input) Activate this setting when using auxiliary device connected to this unit. 1 Press a or b to turn the clock display on or off. Turning the clock display on or off % Press CLOCK to select AUX as the source. Using the AUX source 1 Insert the stereo mini plug into the AUX input jack.... 2 Press SRC/OFF to turn auxiliary setting on or off . Each press of CLOCK turns the clock display on or off . # The clock display disappears temporarily when you perform other operations, but the clock display appears again after 25 seconds.
... input) Activate this setting when using auxiliary device connected to this unit. 1 Press a or b to turn the clock display on or off. Turning the clock display on or off % Press CLOCK to select AUX as the source. Using the AUX source 1 Insert the stereo mini plug into the AUX input jack.... 2 Press SRC/OFF to turn auxiliary setting on or off . Each press of CLOCK turns the clock display on or off . # The clock display disappears temporarily when you perform other operations, but the clock display appears again after 25 seconds.


