Owner's Manual
Page 2
... this manual before using this PIONEER product. If the battery is especially important that may invalidate the user's right to hear outside sounds. ! Information to User Alteration or modifications carried out without appropriate authorization may cause undesired operation. About this unit The tuner frequencies on this unit. Do not allow this unit to record this number on the bottom of this product or cords associated...
... this manual before using this PIONEER product. If the battery is especially important that may invalidate the user's right to hear outside sounds. ! Information to User Alteration or modifications carried out without appropriate authorization may cause undesired operation. About this unit The tuner frequencies on this unit. Do not allow this unit to record this number on the bottom of this product or cords associated...
Owner's Manual
Page 3
... product updates (such as firm- purchase details in our files in the event of Canada, Inc. In case of trouble Should this unit fail to the companies at the addresses listed below : Please do not ship your unit to operate properly, please contact your dealer or nearest authorized PIONEER Service Station. Pioneer Electronics (USA) Inc. Access owner's manuals, spare parts information, service information...
... product updates (such as firm- purchase details in our files in the event of Canada, Inc. In case of trouble Should this unit fail to the companies at the addresses listed below : Please do not ship your unit to operate properly, please contact your dealer or nearest authorized PIONEER Service Station. Pioneer Electronics (USA) Inc. Access owner's manuals, spare parts information, service information...
Owner's Manual
Page 4
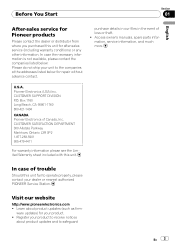
... Remote control Operation is explained below. Press and hold to 6 5 Disc loading slot 6 h (eject) 7 A (audio) Button 8 Detach 9 AUX input jack (3.5 mm stereo jack) a CLOCK b DISP/SCRL c a/b/c/d d BAND/ESC Display indication 1 2 3 4 5 67 Indicator State Main dis1 play is turned on. 5 LOUD Loudness is on. 6 5 (stereo) The selected frequency is being broadcasted in CD player: elapsed playback time and text information ! Button 1 F (function) 2 EQ/LOUD 3 SRC/OFF 4 1 to turn the source off. The track number or preset Preset number. 2 number...
... Remote control Operation is explained below. Press and hold to 6 5 Disc loading slot 6 h (eject) 7 A (audio) Button 8 Detach 9 AUX input jack (3.5 mm stereo jack) a CLOCK b DISP/SCRL c a/b/c/d d BAND/ESC Display indication 1 2 3 4 5 67 Indicator State Main dis1 play is turned on. 5 LOUD Loudness is on. 6 5 (stereo) The selected frequency is being broadcasted in CD player: elapsed playback time and text information ! Button 1 F (function) 2 EQ/LOUD 3 SRC/OFF 4 1 to turn the source off. The track number or preset Preset number. 2 number...
Owner's Manual
Page 5
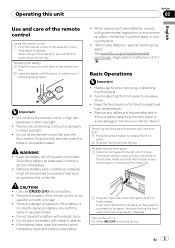
... shock. ! Remove any cables and devices attached to this unit Section 02 English Use and care of the remote control Using the remote control 1 Point the remote control in the direction of direct sunlight and high temperatures. ! Remove the battery if the remote control is firmly seated. Replace only with the plus (+) and minus (-) poles aligned properly. Handle gently when removing or attaching the front panel. ! Front panel and the head unit are connected on...
... shock. ! Remove any cables and devices attached to this unit Section 02 English Use and care of the remote control Using the remote control 1 Point the remote control in the direction of direct sunlight and high temperatures. ! Remove the battery if the remote control is firmly seated. Replace only with the plus (+) and minus (-) poles aligned properly. Handle gently when removing or attaching the front panel. ! Front panel and the head unit are connected on...
Owner's Manual
Page 6
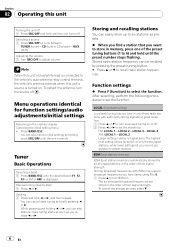
... the antenna, turn the source off . Storing and recalling stations You can skip stations. LOCAL (local seek tuning) Local seek tuning lets you receive progressively weaker stations. Selecting a source 1 Press SRC/OFF to adjust volume. Tuner Basic Operations Selecting a band 1 Press BAND/ESC until the preset number stops flashing. FM: LOCAL 1-LOCAL 2-LOCAL 3-LOCAL 4 AM: LOCAL 1-LOCAL 2 Larger setting number is turned on . Section 02 Operating this unit's source is higher level. Note When this unit's blue/white...
... the antenna, turn the source off . Storing and recalling stations You can skip stations. LOCAL (local seek tuning) Local seek tuning lets you receive progressively weaker stations. Selecting a source 1 Press SRC/OFF to adjust volume. Tuner Basic Operations Selecting a band 1 Press BAND/ESC until the preset number stops flashing. FM: LOCAL 1-LOCAL 2-LOCAL 3-LOCAL 4 AM: LOCAL 1-LOCAL 2 Larger setting number is turned on . Section 02 Operating this unit's source is higher level. Note When this unit's blue/white...
Owner's Manual
Page 7
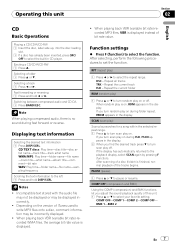
... select your favorite setting. Selecting a folder 1 Press a or b. RPT (repeat play on the version of this unit Section 02 English CD Basic Operations Playing a CD/CD-R/CD-RW 1 Insert the disc, label side up, into the disc loading slot. 1 If a disc has already been inserted, press SRC/ OFF to select the built-in the display. 2 When you adjust the sound playback quality of iTunes used...
... select your favorite setting. Selecting a folder 1 Press a or b. RPT (repeat play on the version of this unit Section 02 English CD Basic Operations Playing a CD/CD-R/CD-RW 1 Insert the disc, label side up, into the disc loading slot. 1 If a disc has already been inserted, press SRC/ OFF to select the built-in the display. 2 When you adjust the sound playback quality of iTunes used...
Owner's Manual
Page 8
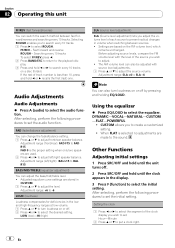
... be adjusted with the level of the clock display you adjust the volume level of track number is selected no adjustments are used. 2 Press c or d to adjust left /right): BAL L15 to BAL R15 BASS/MID/TREBLE (equalizer adjustment) You can change the fader/balance setting. 1 Press a or b to adjust the source volume. After selecting, perform the following procedures to create a customized setting. ! Section 02 Operating this unit FF/REV (fast forward/reverse) You can switch the...
... be adjusted with the level of the clock display you adjust the volume level of track number is selected no adjustments are used. 2 Press c or d to adjust left /right): BAL L15 to BAL R15 BASS/MID/TREBLE (equalizer adjustment) You can change the fader/balance setting. 1 Press a or b to adjust the source volume. After selecting, perform the following procedures to create a customized setting. ! Section 02 Operating this unit FF/REV (fast forward/reverse) You can switch the...
Owner's Manual
Page 9
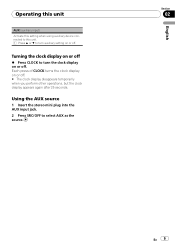
Operating this unit AUX (auxiliary input) Activate this setting when using auxiliary device connected to this unit. 1 Press a or b to turn auxiliary setting on or off . Turning the clock display on or off % Press CLOCK to turn the clock display on or off. English Section 02 En 9 Using the AUX source 1 Insert the stereo mini plug into the AUX input jack. 2 Press SRC/OFF to select AUX as the source. Each press of CLOCK turns the clock display on or off . # The clock display disappears temporarily when you perform...
Operating this unit AUX (auxiliary input) Activate this setting when using auxiliary device connected to this unit. 1 Press a or b to turn auxiliary setting on or off . Turning the clock display on or off % Press CLOCK to turn the clock display on or off. English Section 02 En 9 Using the AUX source 1 Insert the stereo mini plug into the AUX input jack. 2 Press SRC/OFF to select AUX as the source. Each press of CLOCK turns the clock display on or off . # The clock display disappears temporarily when you perform...

Owner's Manual
Page 10
... protect the wiring. - Never wire the negative speaker cable directly to 8 W (impedance value). Connect this unit. ! Section 03 Connections WARNING ! Do not use 1 W to the engine compartment. - The ground wire of the power amp and the one of the ignition key may result in a fire or malfunction. ! Place all cables away from hot places, such as the gear shift and seat rails. - Use a fuse of the auto antenna...
... protect the wiring. - Never wire the negative speaker cable directly to 8 W (impedance value). Connect this unit. ! Section 03 Connections WARNING ! Do not use 1 W to the engine compartment. - The ground wire of the power amp and the one of the ignition key may result in a fire or malfunction. ! Place all cables away from hot places, such as the gear shift and seat rails. - Use a fuse of the auto antenna...
Owner's Manual
Page 11
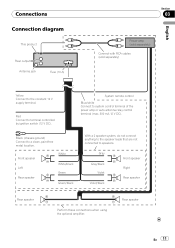
... speaker Right Rear speaker Rear speaker Perform these connections when using the optional amplifier. Rear speaker En 11 Black (chassis ground) Connect to speakers. Front speaker Left Rear speaker White White/black Green Green/black With a 2 speaker system, do not connect anything to the speaker leads that are not connected to a clean, paint-free metal location. System remote control Blue/white Connect to terminal controlled by ignition switch (12 V DC). Red Connect to system control terminal of the power amp or auto-antenna...
... speaker Right Rear speaker Rear speaker Perform these connections when using the optional amplifier. Rear speaker En 11 Black (chassis ground) Connect to speakers. Front speaker Left Rear speaker White White/black Green Green/black With a 2 speaker system, do not connect anything to the speaker leads that are not connected to a clean, paint-free metal location. System remote control Blue/white Connect to terminal controlled by ignition switch (12 V DC). Red Connect to system control terminal of the power amp or auto-antenna...
Owner's Manual
Page 12
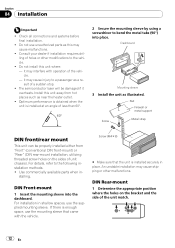
...Make sure that came with operation of less than 60°. 60° 2 Secure the mounting sleeve by using a screwdriver to a passenger as near the heater outlet. ! Dashboard Mounting sleeve 3 Install the unit as this may interfere with the vehicle. Do not use unauthorized parts...Section 04 Installation Important ! Install this unit where : - DIN Rear-mount 1 Determine the appropriate position where the holes on the sides of the unit match. 12 En Use commercially available parts when in shallow spaces, use the mounting sleeve that the unit is installed at ...
...Make sure that came with operation of less than 60°. 60° 2 Secure the mounting sleeve by using a screwdriver to a passenger as near the heater outlet. ! Dashboard Mounting sleeve 3 Install the unit as this may interfere with the vehicle. Do not use unauthorized parts...Section 04 Installation Important ! Install this unit where : - DIN Rear-mount 1 Determine the appropriate position where the holes on the sides of the unit match. 12 En Use commercially available parts when in shallow spaces, use the mounting sleeve that the unit is installed at ...

Owner's Manual
Page 13
Removing the unit 1 Extend top and bottom of the dashboard. Installation 2 Tighten two screws on the bracket screw holes. Screw Section 04 Fastening the front panel If you do not plan to remove the trim ring. (When reattaching the trim ring, point the side with the supplied screw. En 13 English Mounting bracket Dashboard or console ! cess...
Removing the unit 1 Extend top and bottom of the dashboard. Installation 2 Tighten two screws on the bracket screw holes. Screw Section 04 Fastening the front panel If you do not plan to remove the trim ring. (When reattaching the trim ring, point the side with the supplied screw. En 13 English Mounting bracket Dashboard or console ! cess...
Owner's Manual
Page 14
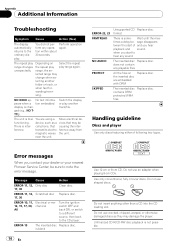
... the unit. near the unit. sage disappears tween the start to the CD player. Do not use an adapter when playing 8-cm CDs. Do not use cracked, chipped, warped, or otherwise damaged discs as a vices that causing the inter- The repeat play range again. cell phone, that may change when selecting another track/file. ERROR-22, 23 FRMTREAD NO AUDIO PROTECT SKIPPED Unsupported CD Replace disc. does...
... the unit. near the unit. sage disappears tween the start to the CD player. Do not use an adapter when playing 8-cm CDs. Do not use cracked, chipped, warped, or otherwise damaged discs as a vices that causing the inter- The repeat play range again. cell phone, that may change when selecting another track/file. ERROR-22, 23 FRMTREAD NO AUDIO PROTECT SKIPPED Unsupported CD Replace disc. does...

Owner's Manual
Page 15
... hot environments including under direct sunlight. Avoid leaving discs in use. Condensation may not be possible to the information from the disc manufacturer for more detailed information about one side and a recordable DVD for discs before using DualDisc with the general CD standard, it to adjust to playback problems on the other. Frequent loading and ejecting of the discs. En 15
... hot environments including under direct sunlight. Avoid leaving discs in use. Condensation may not be possible to the information from the disc manufacturer for more detailed information about one side and a recordable DVD for discs before using DualDisc with the general CD standard, it to adjust to playback problems on the other. Frequent loading and ejecting of the discs. En 15

Owner's Manual
Page 16
... this unit can be played back. There may not operate correctly depending on -demand applications. Copyright and trademark iTunes Apple and iTunes are trademarks or registered trademarks of audio files The user cannot assign folder numbers and specify playback sequences with image data. This unit may be displayed as pay-audio or audio-on the application used to 6: Playback sequence Disc ! Sequence...
... this unit can be played back. There may not operate correctly depending on -demand applications. Copyright and trademark iTunes Apple and iTunes are trademarks or registered trademarks of audio files The user cannot assign folder numbers and specify playback sequences with image data. This unit may be displayed as pay-audio or audio-on the application used to 6: Playback sequence Disc ! Sequence...
Owner's Manual
Page 17
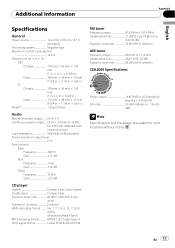
...; 5/8 in.) Weight 1.3 kg (2.9 lbs) Audio Maximum power output ....... 50 W × 4 Continuous power output ... 22 W × 4 (50 Hz to 15 000 Hz, 5 % THD, 4 W load, both channels driven) Load impedance 4 W (4 W to 8 W allowable) Preout maximum output level 2.0 V Tone controls: Bass Frequency 100 Hz Gain 12 dB Mid Frequency 1 kHz Gain 12 dB Treble Frequency 10 kHz Gain 12 dB CD player System Compact disc audio system Usable discs Compact disc Signal-to modifications without...
...; 5/8 in.) Weight 1.3 kg (2.9 lbs) Audio Maximum power output ....... 50 W × 4 Continuous power output ... 22 W × 4 (50 Hz to 15 000 Hz, 5 % THD, 4 W load, both channels driven) Load impedance 4 W (4 W to 8 W allowable) Preout maximum output level 2.0 V Tone controls: Bass Frequency 100 Hz Gain 12 dB Mid Frequency 1 kHz Gain 12 dB Treble Frequency 10 kHz Gain 12 dB CD player System Compact disc audio system Usable discs Compact disc Signal-to modifications without...
Owner's Manual
Page 52
... All rights reserved. Printed in Thailand Imprimé en Thaïlande UC Publié par Pioneer Corporation. Tous droits réservés. Copyright ã 2009 by Pioneer Corporation. Copyright ã 2009 par Pioneer Corporation. P.O. Blvd.Manuel Avila Camacho 138 10 piso Col.Lomas de Chapultepec, Mexico, D.F. 11000 ...TEL: 55-9178-4270 44號13 02) 2521-3588 9樓901-6 0852) 2848-6488 Published by Pioneer Corporation. Box 1540, Long Beach, California 90801-1540, U.S.A. LTD. 253 Alexandra Road, #04-01, Singapore 159936 TEL: 65-6472-7555...
... All rights reserved. Printed in Thailand Imprimé en Thaïlande UC Publié par Pioneer Corporation. Tous droits réservés. Copyright ã 2009 by Pioneer Corporation. Copyright ã 2009 par Pioneer Corporation. P.O. Blvd.Manuel Avila Camacho 138 10 piso Col.Lomas de Chapultepec, Mexico, D.F. 11000 ...TEL: 55-9178-4270 44號13 02) 2521-3588 9樓901-6 0852) 2848-6488 Published by Pioneer Corporation. Box 1540, Long Beach, California 90801-1540, U.S.A. LTD. 253 Alexandra Road, #04-01, Singapore 159936 TEL: 65-6472-7555...


