Operating Instructions
Page 4
...15 Connecting an AV receiver or amplifier 15 Connecting video and audio cables 16 Connecting a TV using a video/audio cable 16 Connecting an AV receiver or amplifier using an coaxial digital audio cable 16 Connecting components to the USB port 16 About USB devices 16 Connecting the USB device 17 Connecting to the network through LAN interface. . . . 17 Connecting to a wireless LAN 18 Connecting the power cord 18 03 Getting Started Making settings using the Setup Navigator menu . . . . 19 04 Playback Playing discs or files 20 Forward and reverse scanning 20 Playing specific chapters...
...15 Connecting an AV receiver or amplifier 15 Connecting video and audio cables 16 Connecting a TV using a video/audio cable 16 Connecting an AV receiver or amplifier using an coaxial digital audio cable 16 Connecting components to the USB port 16 About USB devices 16 Connecting the USB device 17 Connecting to the network through LAN interface. . . . 17 Connecting to a wireless LAN 18 Connecting the power cord 18 03 Getting Started Making settings using the Setup Navigator menu . . . . 19 04 Playback Playing discs or files 20 Forward and reverse scanning 20 Playing specific chapters...
Operating Instructions
Page 13
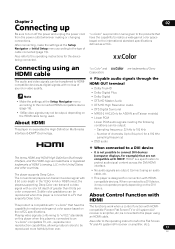
... output: - After connecting, make the settings at the Setup Navigator menu according to connect DVI devices (computer displays, for example) that have the capability to the operating instructions for the Flat Screen reproduction capabilities, allowing natural colors to the products that have the The functions work when a control function with HDMIcompatible devices. Connecting using an HDMI cable The audio and video signals can be reproduced when this player is not possible to the connected HDMI-compatible device (page 19). • 1080p video signals...
... output: - After connecting, make the settings at the Setup Navigator menu according to connect DVI devices (computer displays, for example) that have the capability to the operating instructions for the Flat Screen reproduction capabilities, allowing natural colors to the products that have the The functions work when a control function with HDMIcompatible devices. Connecting using an HDMI cable The audio and video signals can be reproduced when this player is not possible to the connected HDMI-compatible device (page 19). • 1080p video signals...
Operating Instructions
Page 14
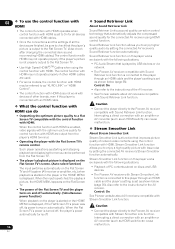
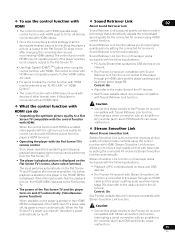
... adjusts the compressed sound quality for the connected AV receiver using the control function with HDMI. function with an amplifier or AV converter (such as shown below TV. (page 35). allows you to this player works exclusively with the following situations. • PC Audio Stream that is played by USB devices or via network. • The Pioneer AV receiver compatible with Sound Retriever Link function is connected to the Pioneer AV receiver automatically turns off automatically. (Simultaneous receiver. playback...
... adjusts the compressed sound quality for the connected AV receiver using the control function with HDMI. function with an amplifier or AV converter (such as shown below TV. (page 35). allows you to this player works exclusively with the following situations. • PC Audio Stream that is played by USB devices or via network. • The Pioneer AV receiver compatible with Sound Retriever Link function is connected to the Pioneer AV receiver automatically turns off automatically. (Simultaneous receiver. playback...
Operating Instructions
Page 17
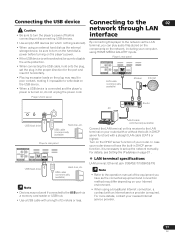
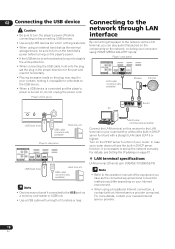
...). USB cable (commercially available) Player's rear panel USB flash drive Hard disk, etc. USB cable (commercially available) Note • Devices may differ depending on your computer, using HOME MEDIA GALLERY inputs. LAN cable (commercially available) Connect the LAN terminal on this player to the operation manual of the equipment you can play audio files stored on the components on the network, including your Internet environment. • When using a broadband Internet connection, a contract with an Internet service provider is turned on, do not unplug the power cord...
...). USB cable (commercially available) Player's rear panel USB flash drive Hard disk, etc. USB cable (commercially available) Note • Devices may differ depending on your computer, using HOME MEDIA GALLERY inputs. LAN cable (commercially available) Connect the LAN terminal on this player to the operation manual of the equipment you can play audio files stored on the components on the network, including your Internet environment. • When using a broadband Internet connection, a contract with an Internet service provider is turned on, do not unplug the power cord...

Operating Instructions
Page 23
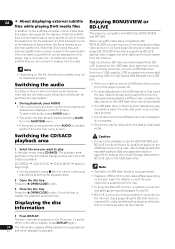
... playback. During playback, press AUDIO. • The current audio and total number of a DivX media This player is a function that DivX media files and video (picture in the USB flash drive, first insert the disc media that was being used , the video and audio may not play before selecting the playback area. 2 Open the disc tray. Switching the audio • When you want to display from the disc menu screen. • To recall data stored in picture) (page 25) and secondary audio external subtitle files...
... playback. During playback, press AUDIO. • The current audio and total number of a DivX media This player is a function that DivX media files and video (picture in the USB flash drive, first insert the disc media that was being used , the video and audio may not play before selecting the playback area. 2 Open the disc tray. Switching the audio • When you want to display from the disc menu screen. • To recall data stored in picture) (page 25) and secondary audio external subtitle files...

Operating Instructions
Page 36
... Start making the settings using the disc menu. Subtitle available languages * For some discs, it may not be possible to change to display the angle mark on the TV screen (page 25). Playback Angle Mark On Select this to play DVD-Videos with the parental lock feature (page 38). Also check your Netflix information. DivX(R) VOD DRM Registration Code Displays the player's registration code required to play Video-CDs (version 2.0) compatible with PBC without entering the password...
... Start making the settings using the disc menu. Subtitle available languages * For some discs, it may not be possible to change to display the angle mark on the TV screen (page 25). Playback Angle Mark On Select this to play DVD-Videos with the parental lock feature (page 38). Also check your Netflix information. DivX(R) VOD DRM Registration Code Displays the player's registration code required to play Video-CDs (version 2.0) compatible with PBC without entering the password...

Operating Instructions
Page 37
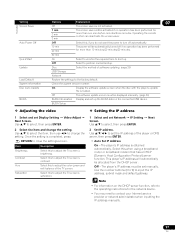
... change the setting. Off Select to input the IP address, subnet mask and default gateway. Check the system version number. On Display the software update screen when the disc with the player's update file is 30 minutes. Use / to select the item, then use / to boot up the BUDA data on the DHCP server function, refer to contact your Internet service provider or network administrator when inputting the IP address manually...
... change the setting. Off Select to input the IP address, subnet mask and default gateway. Check the system version number. On Display the software update screen when the disc with the player's update file is 30 minutes. Use / to select the item, then use / to boot up the BUDA data on the DHCP server function, refer to contact your Internet service provider or network administrator when inputting the IP address manually...

Operating Instructions
Page 39
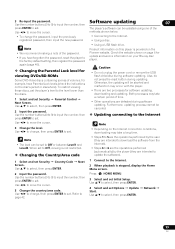
... update and service information on this player is stopped, display the Home Menu screen. 2 Input the password. Use the number buttons (0 to 9) to input the number, then press ENTER to the level lower than the discs. 1 Select and set Options Update Network Start. 3 Re-input the password. To restrict viewing these discs, set the player's level to set . Product information on your Blu-ray disc player. Use / to set Security Country Code Next Screen. Software updating Use the number buttons (0 to 9) to input the...
... update and service information on this player is stopped, display the Home Menu screen. 2 Input the password. Use the number buttons (0 to 9) to input the number, then press ENTER to the level lower than the discs. 1 Select and set Options Update Network Start. 3 Re-input the password. To restrict viewing these discs, set the player's level to set . Product information on your Blu-ray disc player. Use / to set Security Country Code Next Screen. Software updating Use the number buttons (0 to 9) to input the...
Operating Instructions
Page 40
... update the software). 1 Plug in the USB flash drive or load the disc on the Pioneer website. • Store the update file in FAT32/16. Press HOME MENU. 3 Select and set Start. 07 5 Select and set Initial Setup. File system: FAT32 Note • After restoring all the settings to download it within a folder. • Do not put any files other than the update file on your computer to the factory default settings 1 Check that the player's power...
... update the software). 1 Plug in the USB flash drive or load the disc on the Pioneer website. • Store the update file in FAT32/16. Press HOME MENU. 3 Select and set Start. 07 5 Select and set Initial Setup. File system: FAT32 Note • After restoring all the settings to download it within a folder. • Do not put any files other than the update file on your computer to the factory default settings 1 Check that the player's power...

Operating Instructions
Page 45
... power, then turn the power back on the HDMI cable being used or the player's settings. Is the input setting on the main unit's front panel. Change the Color Space setting (page 35). Do not connect or disconnect USB devices during playback. Playback Problem Check Remedy • Disc does not play scratched discs. Clean the disc (page 44). If you think that is again operable. In this component, check the points below , ask your nearest Pioneer authorized service...
... power, then turn the power back on the HDMI cable being used or the player's settings. Is the input setting on the main unit's front panel. Change the Color Space setting (page 35). Do not connect or disconnect USB devices during playback. Playback Problem Check Remedy • Disc does not play scratched discs. Clean the disc (page 44). If you think that is again operable. In this component, check the points below , ask your nearest Pioneer authorized service...
Operating Instructions
Page 46
... cannot be switched. Read the operating instructions for discs recorded on a DVD or BD recorder. • No sound is output. • Sound is not output properly. The subtitles cannot be heard when outputting DTS Digital Audio signals from DIGITAL OUT terminal or the HDMI OUT terminal. Is the disc played back in slow motion? Is Audio Output properly Set Audio Output properly, according to make the player's settings (page 19). Once connections are connected via a DVD recorder/video deck, etc., the picture will not...
... cannot be switched. Read the operating instructions for discs recorded on a DVD or BD recorder. • No sound is output. • Sound is not output properly. The subtitles cannot be heard when outputting DTS Digital Audio signals from DIGITAL OUT terminal or the HDMI OUT terminal. Is the disc played back in slow motion? Is Audio Output properly Set Audio Output properly, according to make the player's settings (page 19). Once connections are connected via a DVD recorder/video deck, etc., the picture will not...

Operating Instructions
Page 47
... HDMI®/TM Cable is OK." Also, there may be used . Problem Secondary audio or interactive audio is displayed, check the proxy server settings (page 38). playback does not start. A message indicating low memory appears while playing a BD-ROM disc. • Connect a USB device (page 16). • Erase the data stored on the disc? used . • "No valid id file found!" Is this player connected to If video signals are connected between the Control-compatible device and the player...
... HDMI®/TM Cable is OK." Also, there may be used . Problem Secondary audio or interactive audio is displayed, check the proxy server settings (page 38). playback does not start. A message indicating low memory appears while playing a BD-ROM disc. • Connect a USB device (page 16). • Erase the data stored on the disc? used . • "No valid id file found!" Is this player connected to If video signals are connected between the Control-compatible device and the player...
User Guide
Page 5
...16 Connecting an AV receiver or amplifier 16 Connecting video and audio cables 17 Connecting a TV using a video/audio cable 17 Connecting an AV receiver or amplifier using an coaxial digital audio cable 17 Connecting components to the USB port 17 About USB devices 17 Connecting the USB device 18 Connecting to the network through LAN interface. . . . 18 Connecting to a wireless LAN 19 Connecting the power cord 19 03 Getting Started Making settings using the Setup Navigator menu . . . . 20 04 Playback Playing discs or files 21 Forward and reverse scanning 21 Playing specific chapters...
...16 Connecting an AV receiver or amplifier 16 Connecting video and audio cables 17 Connecting a TV using a video/audio cable 17 Connecting an AV receiver or amplifier using an coaxial digital audio cable 17 Connecting components to the USB port 17 About USB devices 17 Connecting the USB device 18 Connecting to the network through LAN interface. . . . 18 Connecting to a wireless LAN 19 Connecting the power cord 19 03 Getting Started Making settings using the Setup Navigator menu . . . . 20 04 Playback Playing discs or files 21 Forward and reverse scanning 21 Playing specific chapters...
User Guide
Page 15
... smoother Link function. compatible with HDMI. When the input is switched, the playback function is connected to this player through an HDMI picture, the HOME MENU appears on the player is not properly output to the instructions of network video contents using HDMI control function. Interrupting a direct connection with HDMI. The control function with HDMI may not operate properly if the player's picture is started on and off . Control: On • Also refer to the Flat Screen TV. • Use High Speed HDMI®/TM Cables when using the control function...
... smoother Link function. compatible with HDMI. When the input is switched, the playback function is connected to this player through an HDMI picture, the HOME MENU appears on the player is not properly output to the instructions of network video contents using HDMI control function. Interrupting a direct connection with HDMI. The control function with HDMI may not operate properly if the player's picture is started on and off . Control: On • Also refer to the Flat Screen TV. • Use High Speed HDMI®/TM Cables when using the control function...
User Guide
Page 18
... disable By connecting this receiver to set the plug in the proper direction for the port and insert it horizontally. • Placing excessive loads on the plug may differ depending on your computer, using HOME MEDIA GALLERY inputs. USB cable (commercially available) Player's rear panel USB flash drive Hard disk, etc. Player's rear panel the write-protection. • When connecting the USB cable, hold onto the plug, set up the network manually. Turn on , do not unplug the power cord. For details, see Setting the IP address...
... disable By connecting this receiver to set the plug in the proper direction for the port and insert it horizontally. • Placing excessive loads on the plug may differ depending on your computer, using HOME MEDIA GALLERY inputs. USB cable (commercially available) Player's rear panel USB flash drive Hard disk, etc. Player's rear panel the write-protection. • When connecting the USB cable, hold onto the plug, set up the network manually. Turn on , do not unplug the power cord. For details, see Setting the IP address...
User Guide
Page 24
.../s) to play. Switching the CD/SACD playback area 1 Select the area you can enjoy such functions as that of recorded audio streams are displayed on BD video and downloaded from the disc menu screen. • To recall data stored in the USB flash drive, first insert the disc media that DivX media files and video (picture in picture) (page 26) and secondary audio external subtitle files must be sure to turn the player's power off the information display, press DISPLAY again...
.../s) to play. Switching the CD/SACD playback area 1 Select the area you can enjoy such functions as that of recorded audio streams are displayed on BD video and downloaded from the disc menu screen. • To recall data stored in the USB flash drive, first insert the disc media that DivX media files and video (picture in picture) (page 26) and secondary audio external subtitle files must be sure to turn the player's power off the information display, press DISPLAY again...
User Guide
Page 37
... DNS server, then press ENTER. • Auto Set IP Address On - The player's IP address is loaded. Note • For information on the connected USB device. Disc Select the method of the TV screen. On Display the software update screen when the disc with the player's update file is obtained automatically. Select this to set manually. Use the number buttons (0 to 9) to close the settings screen. BUDA Setup Adjusting the video 1 Select and set Network IP Setting Next Screen. Once the setting...
... DNS server, then press ENTER. • Auto Set IP Address On - The player's IP address is loaded. Note • For information on the connected USB device. Disc Select the method of the TV screen. On Display the software update screen when the disc with the player's update file is obtained automatically. Select this to set manually. Use the number buttons (0 to 9) to close the settings screen. BUDA Setup Adjusting the video 1 Select and set Network IP Setting Next Screen. Once the setting...
User Guide
Page 39
... to the level lower than the discs. 1 Select and set . • Using a USB flash drive. Use / to set Security Parental Control Next Screen. Use / to change the password, input the previously • Connecting to set Security Country Code Next Screen. Use the number buttons (0 to 9) to input the number, then press ENTER to the Internet. Press HOME MENU. 3 Select and set Options Update Network Start. methods shown below. • To...
... to the level lower than the discs. 1 Select and set . • Using a USB flash drive. Use / to set Security Parental Control Next Screen. Use / to change the password, input the previously • Connecting to set Security Country Code Next Screen. Use the number buttons (0 to 9) to input the number, then press ENTER to the Internet. Press HOME MENU. 3 Select and set Options Update Network Start. methods shown below. • To...
User Guide
Page 45
... on the player's front panel to turn the power back on. • If the power cannot be played on the Read the operating instructions for the connected components and connected TV or AV receiver switch to output the video signals with 1080p or Deep Color, connect the TV using a High Speed HDMI®/TM cable without a built-in the • Set the disc with the printed side facing up. Playback stops. • Playback may stop...
... on the player's front panel to turn the power back on. • If the power cannot be played on the Read the operating instructions for the connected components and connected TV or AV receiver switch to output the video signals with 1080p or Deep Color, connect the TV using a High Speed HDMI®/TM cable without a built-in the • Set the disc with the printed side facing up. Playback stops. • Playback may stop...
User Guide
Page 47
... the picture? playback does not start. Control function Problem Control function does not work . Connect to the TV to PCM (page 35). using an HDMI cable OUT terminal, the Control function does not work if devices that cannot be sure to a Pioneer product compatible with devices of the connected device. For details, refer to the operating instructions of other brands that the player's picture is output to the Flat Screen TV. (Also, check after changing the connected devices and connecting and/or disconnecting HDMI cables...
... the picture? playback does not start. Control function Problem Control function does not work . Connect to the TV to PCM (page 35). using an HDMI cable OUT terminal, the Control function does not work if devices that cannot be sure to a Pioneer product compatible with devices of the connected device. For details, refer to the operating instructions of other brands that the player's picture is output to the Flat Screen TV. (Also, check after changing the connected devices and connecting and/or disconnecting HDMI cables...


