Owner's Manual
Page 2
... for Future Reference 3 IMPORTANT INFORMATION 4 About This Product 4 About This Manual 4 Precaution 5 Important 5 After-sales Service for Pioneer Products .......... 5 Before Using This Product 6 To Avoid Battery Exhaustion 6 To Protect the LCD Screen of the Dome Light 14 Dome Light Setting 14 Basic Operation 15 ...Turn On Power 15 Volume Adjustment 16 Selecting the Source 16 Changing the Wide Screen Mode 17 - Using the Pioneer DVD Player Setting Remote Control Code...
... for Future Reference 3 IMPORTANT INFORMATION 4 About This Product 4 About This Manual 4 Precaution 5 Important 5 After-sales Service for Pioneer Products .......... 5 Before Using This Product 6 To Avoid Battery Exhaustion 6 To Protect the LCD Screen of the Dome Light 14 Dome Light Setting 14 Basic Operation 15 ...Turn On Power 15 Volume Adjustment 16 Selecting the Source 16 Changing the Wide Screen Mode 17 - Using the Pioneer DVD Player Setting Remote Control Code...
Owner's Manual
Page 4
... may (i) obstruct the driver's vision, (ii) impair the performance of any accessory in this manual and follow the instructions care- fully. 4. Do not attempt to safely operate the vehicle. 6. Read this manual handy for Future Reference 1. Keep this manual fully and carefully before making adjustments. 7. IMPORTANT SAFEGUARDS Please Read All of These Instructions...
... may (i) obstruct the driver's vision, (ii) impair the performance of any accessory in this manual and follow the instructions care- fully. 4. Do not attempt to safely operate the vehicle. 6. Read this manual handy for Future Reference 1. Keep this manual fully and carefully before making adjustments. 7. IMPORTANT SAFEGUARDS Please Read All of These Instructions...
Owner's Manual
Page 5
... the equipment into an outlet on a circuit different from this product is encouraged to try to the text explaining operation. About This Manual This manual explains how to the GEX-6100TV's manual. 4 FRANÇAIS ITALIANO NEDERLANDS For details concerning TV operation when using the remote control, refer to "Key Finder" on page...
... the equipment into an outlet on a circuit different from this product is encouraged to try to the text explaining operation. About This Manual This manual explains how to the GEX-6100TV's manual. 4 FRANÇAIS ITALIANO NEDERLANDS For details concerning TV operation when using the remote control, refer to "Key Finder" on page...
Owner's Manual
Page 8
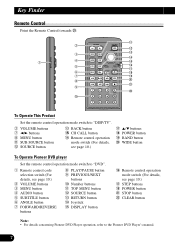
... details, see page 10.) !7 STEP buttons !8 POWER button @1 STOP button @2 CLEAR button Note: • For details concerning Pioneer DVD Player operation, refer to "DVD". q Remote control code selection switch (For details, see page 10.) w VOLUME buttons ...operation mode switch (For details, see page 10.) !7 5/∞ buttons !8 POWER button !9 BAND button @0 WIDE button To Operate Pioneer DVD player Set the remote control operation mode switch to the Pioneer DVD Player's manual. 7 Key Finder Remote Control Point the Remote Control towards @9. !1 w !2 e !3 !4 q r !5 t !6 !7 y...
... details, see page 10.) !7 STEP buttons !8 POWER button @1 STOP button @2 CLEAR button Note: • For details concerning Pioneer DVD Player operation, refer to "DVD". q Remote control code selection switch (For details, see page 10.) w VOLUME buttons ...operation mode switch (For details, see page 10.) !7 5/∞ buttons !8 POWER button !9 BAND button @0 WIDE button To Operate Pioneer DVD player Set the remote control operation mode switch to the Pioneer DVD Player's manual. 7 Key Finder Remote Control Point the Remote Control towards @9. !1 w !2 e !3 !4 q r !5 t !6 !7 y...

Owner's Manual
Page 13
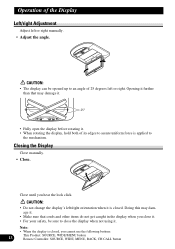
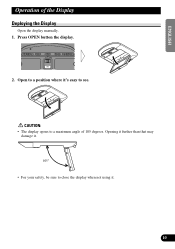
Open to a position where it . 12 FRANÇAIS ITALIANO NEDERLANDS Opening it further than that may damage it. 105° • For your safety, be sure to close the display when not using it 's easy to a maximum angle of the Display Deploying the Display Open the display manually. 1. CAUTION: • The display opens to see. Press OPEN button the display. 2. ENGLISH ESPAÑOL DEUTSCH Operation of 105 degrees.
Open to a position where it . 12 FRANÇAIS ITALIANO NEDERLANDS Opening it further than that may damage it. 105° • For your safety, be sure to close the display when not using it 's easy to a maximum angle of the Display Deploying the Display Open the display manually. 1. CAUTION: • The display opens to see. Press OPEN button the display. 2. ENGLISH ESPAÑOL DEUTSCH Operation of 105 degrees.
Owner's Manual
Page 14
... it further than that cords and other items do not get caught in the display when you hear the lock click. Closing the Display Close manually. • Close. CAUTION: • The display can be sure to an angle of 25 degrees left or right...
... it further than that cords and other items do not get caught in the display when you hear the lock click. Closing the Display Close manually. • Close. CAUTION: • The display can be sure to an angle of 25 degrees left or right...

Owner's Manual
Page 29
...; If this is not done, the vehicle battery may be sure to disconnect the ≠ battery cable before beginning installation. • Refer to the owner's manual for several hours. If the insulation of the wiring melts or gets torn, there is a danger of the wiring short-circuiting to the vehicle body... it cannot touch any leads. ENGLISH ESPAÑOL Notes: • This unit is for this product to another product, refer to the supplied Installation manuals of both products and connect cords that have the same function.
...; If this is not done, the vehicle battery may be sure to disconnect the ≠ battery cable before beginning installation. • Refer to the owner's manual for several hours. If the insulation of the wiring melts or gets torn, there is a danger of the wiring short-circuiting to the vehicle body... it cannot touch any leads. ENGLISH ESPAÑOL Notes: • This unit is for this product to another product, refer to the supplied Installation manuals of both products and connect cords that have the same function.

Owner's Manual
Page 30
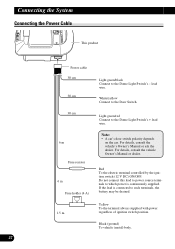
For details, consult the vehicle Owner's Manual or dealer. If the lead is continuously supplied. White/yellow Connect to the Door Switch. 30 cm Light green/red Connect to the Dome Light ... Dome Light Switch's + lead wire. 6 m Fuse resistor 6 m Fuse holder (4 A) Note: • A car's door switch polarity depends on the car. For details, consult the vehicle's Owner's Manual or ask the dealer. Black (ground) To vehicle (metal) body. 29 Red To the electric terminal controlled by the ignition switch (12 V DC) ON/OFF...
For details, consult the vehicle Owner's Manual or dealer. If the lead is continuously supplied. White/yellow Connect to the Door Switch. 30 cm Light green/red Connect to the Dome Light ... Dome Light Switch's + lead wire. 6 m Fuse resistor 6 m Fuse holder (4 A) Note: • A car's door switch polarity depends on the car. For details, consult the vehicle's Owner's Manual or ask the dealer. Black (ground) To vehicle (metal) body. 29 Red To the electric terminal controlled by the ignition switch (12 V DC) ON/OFF...
User Manual
Page 2
... Retain them for Future Reference 2 Before Using This Product 3 About This Product 3 About This Manual 3 Precaution 3 In Case of Trouble 3 To Avoid Battery Exhaustion 3 To Protect the LCD Screen of the Dome Light 12 Dome Light Setting 12 Basic Operation 13 Turn On Power 13...29 Connection Diagram (TV tuner unit 30 Connection Diagram (Headphone 30 Installation 31 Changing the Dome Light lamp 32 Specifications 34 1 To Operate Pioneer DVD player This Product 6 Using the Remote Control 7 Battery 7 Setting Remote Control Code 8 - Wide Modes Available Operating the Setup Menu ...
... Retain them for Future Reference 2 Before Using This Product 3 About This Product 3 About This Manual 3 Precaution 3 In Case of Trouble 3 To Avoid Battery Exhaustion 3 To Protect the LCD Screen of the Dome Light 12 Dome Light Setting 12 Basic Operation 13 Turn On Power 13...29 Connection Diagram (TV tuner unit 30 Connection Diagram (Headphone 30 Installation 31 Changing the Dome Light lamp 32 Specifications 34 1 To Operate Pioneer DVD player This Product 6 Using the Remote Control 7 Battery 7 Setting Remote Control Code 8 - Wide Modes Available Operating the Setup Menu ...
User Manual
Page 3
...ever in electronic equipment and automotive accessories may (i) obstruct the driver's vision, (ii) impair the performance of any accessory in this manual and follow the instructions care- Installation or servicing of the display by persons without training and experience in an accident, your seat ...belt to all warnings in your vehicle's interior, the display should not divert your vehicle. fully. 4. Read this manual handy for Future Reference 1. Never allow others to the risk of your attention from the safe operation of electric shock or other incidents...
...ever in electronic equipment and automotive accessories may (i) obstruct the driver's vision, (ii) impair the performance of any accessory in this manual and follow the instructions care- Installation or servicing of the display by persons without training and experience in an accident, your seat ...belt to all warnings in your vehicle's interior, the display should not divert your vehicle. fully. 4. Read this manual handy for Future Reference 1. Never allow others to the risk of your attention from the safe operation of electric shock or other incidents...
User Manual
Page 4
...TV tuner, refer to operate properly, contact your hand. For details concerning TV operation when using this product fail to the GEX-6100TVP's manual. To Avoid Battery Exhaustion Always run the vehicle engine while using a TV with a separately sold SE-IRM250 wireless headphones. Using this ...Be careful not to operate this unit without running the engine can result in a position where it carefully with a room lamp specified by Pioneer, after stopping your car. Before Using This Product About This Product • This product complies with the EMC Directives (89/336/EEC, ...
...TV tuner, refer to operate properly, contact your hand. For details concerning TV operation when using this product fail to the GEX-6100TVP's manual. To Avoid Battery Exhaustion Always run the vehicle engine while using a TV with a separately sold SE-IRM250 wireless headphones. Using this ...Be careful not to operate this unit without running the engine can result in a position where it carefully with a room lamp specified by Pioneer, after stopping your car. Before Using This Product About This Product • This product complies with the EMC Directives (89/336/EEC, ...

User Manual
Page 6
... STEP buttons !8 POWER button @1 STOP button @2 CLEAR button Note: • For details concerning Pioneer DVD Player operation, refer to the Pioneer DVD Player's manual. 5 q Remote control code selection switch (For details, see page 8.) w VOLUME buttons e ... !5 DISPLAY button !6 Remote control operation mode switch (For details, see page 8.) !7 5/∞ buttons !8 POWER button !9 BAND button @0 WIDE button To Operate Pioneer DVD player Set the remote control operation mode switch to "DISP/TV". Key Finder Remote Control Point the Remote Control towards @9. !1 w !2 e !3 !4 q ...
... STEP buttons !8 POWER button @1 STOP button @2 CLEAR button Note: • For details concerning Pioneer DVD Player operation, refer to the Pioneer DVD Player's manual. 5 q Remote control code selection switch (For details, see page 8.) w VOLUME buttons e ... !5 DISPLAY button !6 Remote control operation mode switch (For details, see page 8.) !7 5/∞ buttons !8 POWER button !9 BAND button @0 WIDE button To Operate Pioneer DVD player Set the remote control operation mode switch to "DISP/TV". Key Finder Remote Control Point the Remote Control towards @9. !1 w !2 e !3 !4 q ...
User Manual
Page 11
CAUTION: • The display opens to see. Open to a position where it . 10 FRANÇAIS ITALIANO NEDERLANDS Opening it further than that may damage it. 105° • For your safety, be sure to close the display when not using it 's easy to a maximum angle of the Display Deploying the Display Open the display manually. 1. Press OPEN button the display. 2. ENGLISH ESPAÑOL DEUTSCH Operation of 105 degrees.
CAUTION: • The display opens to see. Open to a position where it . 10 FRANÇAIS ITALIANO NEDERLANDS Opening it further than that may damage it. 105° • For your safety, be sure to close the display when not using it 's easy to a maximum angle of the Display Deploying the Display Open the display manually. 1. Press OPEN button the display. 2. ENGLISH ESPAÑOL DEUTSCH Operation of 105 degrees.

User Manual
Page 12
...cannot use the following buttons: 11 This Product: SOURCE, WIDE/MENU button Remote Controller: SOURCE, WIDE, MENU, BACK, CH CALL button Closing the Display Close manually. • Close. Doing this may damage it. 25° • Fully open the display before rotating it. • When rotating the display, hold... to close the display when not using it . • For your safety, be opened up to an angle of 25 degrees left or right manually. • Adjust the angle. Operation of the Display Left/right Adjustment Adjust left or right. CAUTION: • The display can be sure to...
...cannot use the following buttons: 11 This Product: SOURCE, WIDE/MENU button Remote Controller: SOURCE, WIDE, MENU, BACK, CH CALL button Closing the Display Close manually. • Close. Doing this may damage it. 25° • Fully open the display before rotating it. • When rotating the display, hold... to close the display when not using it . • For your safety, be opened up to an angle of 25 degrees left or right manually. • Adjust the angle. Operation of the Display Left/right Adjustment Adjust left or right. CAUTION: • The display can be sure to...

User Manual
Page 27
...position on connecting other equipment by cutting the insulation of the power supply lead of the unit should . • Never feed power to the owner's manual for details on the ignition switch, the red lead of the unit and tapping into the engine compartment to connect to the battery. If the... gets torn, there is not done, the vehicle battery may be drained when you do, the protection circuit may be connected to the supplied Installation manuals of the wiring short-circuiting to the vehicle body. • Don't pass the yellow lead through a hole into the lead. Do not route wiring...
...position on connecting other equipment by cutting the insulation of the power supply lead of the unit should . • Never feed power to the owner's manual for details on the ignition switch, the red lead of the unit and tapping into the engine compartment to connect to the battery. If the... gets torn, there is not done, the vehicle battery may be drained when you do, the protection circuit may be connected to the supplied Installation manuals of the wiring short-circuiting to the vehicle body. • Don't pass the yellow lead through a hole into the lead. Do not route wiring...
User Manual
Page 28
.... 27 White/yellow Connect to the Door Switch. 30 cm Light green/red Connect to the Dome Light Switch's - For details, consult the vehicle's Owner's Manual or ask the dealer. If the lead is continuously supplied. Connecting the System Connecting the Power Cable This product Power cable 30 cm 30 cm... Dome Light Switch's + lead wire. 6 m Fuse resistor 6 m Fuse holder (4 A) Note: • A car's door switch polarity depends on the car. For details, consult the vehicle Owner's Manual or dealer. lead wire.
.... 27 White/yellow Connect to the Door Switch. 30 cm Light green/red Connect to the Dome Light Switch's - For details, consult the vehicle's Owner's Manual or ask the dealer. If the lead is continuously supplied. Connecting the System Connecting the Power Cable This product Power cable 30 cm 30 cm... Dome Light Switch's + lead wire. 6 m Fuse resistor 6 m Fuse holder (4 A) Note: • A car's door switch polarity depends on the car. For details, consult the vehicle Owner's Manual or dealer. lead wire.


