Installation Manual
Page 2
...Installing the HDMI® cable holder 7 Connecting the system 8 When connecting the Android™ device (for AVIC-Z150BH and AVIC-X950BH) 9 Connecting the power cord (1) 10 Connecting the power cord (2) 12 When connecting to rear video output 18 Installation Precautions before connecting the system 5 Before installing this manual 3 Important safeguards 3 Connecting the ... 20 - Installation on the side of the navigation unit 21 - Using an AV input (AV2) 18 When connecting the rear display 18 - For AVIC-Z150BH users 20 Installing the navigation system 20 - Parts supplied 21 -
...Installing the HDMI® cable holder 7 Connecting the system 8 When connecting the Android™ device (for AVIC-Z150BH and AVIC-X950BH) 9 Connecting the power cord (1) 10 Connecting the power cord (2) 12 When connecting to rear video output 18 Installation Precautions before connecting the system 5 Before installing this manual 3 Important safeguards 3 Connecting the ... 20 - Installation on the side of the navigation unit 21 - Using an AV input (AV2) 18 When connecting the rear display 18 - For AVIC-Z150BH users 20 Installing the navigation system 20 - Parts supplied 21 -

Installation Manual
Page 8
... displays should not be used while the vehicle is a visible distraction to the driver. · In some countries, the viewing of applicable laws, this product's video source should not be illegal. Where such regulations apply they must be obeyed and this product should never be used . 8 En USB interface cable for...
... displays should not be used while the vehicle is a visible distraction to the driver. · In some countries, the viewing of applicable laws, this product's video source should not be illegal. Where such regulations apply they must be obeyed and this product should never be used . 8 En USB interface cable for...

Installation Manual
Page 16
WARNING USE INPUT ONLY FOR REVERSE OR MIRROR IMAGE REAR VIEW CAMERA. OTHER USE MAY RESULT IN INJURY OR DAMAGE. ND-BC6) (sold separately) To video output RCA cable Brown (REAR VIEW CAMERA IN) RCA 20 cm (7-7/8 in reality. ! Connect the navigation system to check what is moved to REVERSE ... When this function for entertainment purposes. ! The rear view camera is used with a rear view camera, it is possible to automatically switch from the video to rear view image when the shift lever is behind you while driving. Rear view camera (e.g. Notes ! CAUTION ! Do not use this product is...
WARNING USE INPUT ONLY FOR REVERSE OR MIRROR IMAGE REAR VIEW CAMERA. OTHER USE MAY RESULT IN INJURY OR DAMAGE. ND-BC6) (sold separately) To video output RCA cable Brown (REAR VIEW CAMERA IN) RCA 20 cm (7-7/8 in reality. ! Connect the navigation system to check what is moved to REVERSE ... When this function for entertainment purposes. ! The rear view camera is used with a rear view camera, it is possible to automatically switch from the video to rear view image when the shift lever is behind you while driving. Rear view camera (e.g. Notes ! CAUTION ! Do not use this product is...
Installation Manual
Page 17
...cables, the wiring position might differ resulting in disturbed images and sounds. Connecting the system Section 02 English When connecting the external video component Using an AV input (AV1) The navigation unit 15 cm (5-7/8 in.) AUX input CAUTION Be sure to Operation Manual.)... L : Left audio (White) R : Right audio (Red) V : Video (Yellow) G : Ground RCA connector Yellow Mini-jack AV cable (CD-RM10) (sold separately) Red, white To video output RCA cables (sold separately) To audio outputs External video component (sold separately) for wiring. If you use a mini-jack AV cable ...
...cables, the wiring position might differ resulting in disturbed images and sounds. Connecting the system Section 02 English When connecting the external video component Using an AV input (AV1) The navigation unit 15 cm (5-7/8 in.) AUX input CAUTION Be sure to Operation Manual.)... L : Left audio (White) R : Right audio (Red) V : Video (Yellow) G : Ground RCA connector Yellow Mini-jack AV cable (CD-RM10) (sold separately) Red, white To video output RCA cables (sold separately) To audio outputs External video component (sold separately) for wiring. If you use a mini-jack AV cable ...
Installation Manual
Page 18
...RCA cables (sold separately) ! This mode is available when the setting of video input 2 (AV2) is for connection of a display to enable passengers in a location that enables the driver to watch the video source while driving. Section 02 Connecting the system Using an AV input (AV2... cm (7-7/8 in.) RCA connector Yellow (VIDEO INPUT) Red, white (AUDIO INPUT) 15 cm (5-7/8 in.) Red, white, yellow (REAR MONITOR OUTPUT) RCA connector To video output RCA cables (sold separately) To audio outputs External video component (sold separately) To video input To audio inputs Rear display with...
...RCA cables (sold separately) ! This mode is available when the setting of video input 2 (AV2) is for connection of a display to enable passengers in a location that enables the driver to watch the video source while driving. Section 02 Connecting the system Using an AV input (AV2... cm (7-7/8 in.) RCA connector Yellow (VIDEO INPUT) Red, white (AUDIO INPUT) 15 cm (5-7/8 in.) Red, white, yellow (REAR MONITOR OUTPUT) RCA connector To video output RCA cables (sold separately) To audio outputs External video component (sold separately) To video input To audio inputs Rear display with...

Operation Manual
Page 2
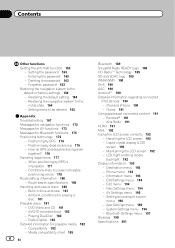
...subject to use the navigation menu screens 22 Shortcut Menu 23 - Inserting a disc (for AVIC-Z150BH) 16 - Ejecting a disc (for AVIC-Z150BH) 15 - X850BT and AVIC-X8510BT) 16 Inserting and ejecting an SD memory card 16 2 En - Unplugging a USB ...Thank you for performance and function improvements. Important The screens shown in this manual 9 Notice regarding video viewing 10 Notice regarding DVD-Video viewing 10 Notice regarding MP3 file usage 10 iPod compatibility 10 Map coverage 11 Protecting the LCD... through these instructions so you will know how to use this Pioneer product.
...subject to use the navigation menu screens 22 Shortcut Menu 23 - Inserting a disc (for AVIC-Z150BH) 16 - Ejecting a disc (for AVIC-Z150BH) 15 - X850BT and AVIC-X8510BT) 16 Inserting and ejecting an SD memory card 16 2 En - Unplugging a USB ...Thank you for performance and function improvements. Important The screens shown in this manual 9 Notice regarding video viewing 10 Notice regarding DVD-Video viewing 10 Notice regarding MP3 file usage 10 iPod compatibility 10 Map coverage 11 Protecting the LCD... through these instructions so you will know how to use this Pioneer product.

Operation Manual
Page 5
... Streaming Pandora® 109 - Reading the screen 111 - Using the touch panel keys 112 - Frame-by hardware buttons 84 Playing a DVD-Video Starting procedure 85 Reading the screen 85 Using the touch panel keys 86 - Searching for a specific scene and starting playback from a specified time...Operating the DVD menu 88 - Starting playback from USB or SD) Starting procedure 100 Reading the screen 100 Using the touch panel keys (Video) 101 - Slow motion playback 92 - Searching for compatibility of connected devices 107 Starting procedure 107 - Setting the code number and level ...
... Streaming Pandora® 109 - Reading the screen 111 - Using the touch panel keys 112 - Frame-by hardware buttons 84 Playing a DVD-Video Starting procedure 85 Reading the screen 85 Using the touch panel keys 86 - Searching for a specific scene and starting playback from a specified time...Operating the DVD menu 88 - Starting playback from USB or SD) Starting procedure 100 Reading the screen 100 Using the touch panel keys (Video) 101 - Slow motion playback 92 - Searching for compatibility of connected devices 107 Starting procedure 107 - Setting the code number and level ...

Operation Manual
Page 7
...to select your DivX VOD registration code 149 - Setting the App operation screen interruption 143 - Changing the preinstalled splash screen 145 - Setting video input 2 (AV2) 149 - Using the subwoofer output 154 - Setting the keyboard language with application for iPhone 157 Setting the rear ...output 158 Adjusting the picture 158 Selecting the video for app settings 157 - Displaying the traffic notification icon 144 Changing the view mode 144 Displaying the screen for time restrictions ...
...to select your DivX VOD registration code 149 - Setting the App operation screen interruption 143 - Changing the preinstalled splash screen 145 - Setting video input 2 (AV2) 149 - Using the subwoofer output 154 - Setting the keyboard language with application for iPhone 157 Setting the rear ...output 158 Adjusting the picture 158 Selecting the video for app settings 157 - Displaying the traffic notification icon 144 Changing the view mode 144 Displaying the screen for time restrictions ...
Operation Manual
Page 8
... menu 196 - System Settings menu 196 - Positioning by dead reckoning 176 - When positioning by GPS is impossible 177 - Built-in drive and care 181 - DVD-Video and CD 181 - Destination menu 193 - Edit/Settings menu 194 - Navi Settings menu 194 - Media compatibility chart 185 8 En Bluetooth 189 SiriusXM Radio READY Logo...
... menu 196 - System Settings menu 196 - Positioning by dead reckoning 176 - When positioning by GPS is impossible 177 - Built-in drive and care 181 - DVD-Video and CD 181 - Destination menu 193 - Edit/Settings menu 194 - Navi Settings menu 194 - Media compatibility chart 185 8 En Bluetooth 189 SiriusXM Radio READY Logo...

Operation Manual
Page 9
... the Display information at the beginning of the operations, refer to How to use this manual Finding the operation procedure for AVIC-Z150BH. Extra information, alternatives and other keys on screen, you touch [OK], the entry is commercially available and can find ...manual are described in brackets [ ]: e.g.) [Destination], [AV Source]. ! Terms used in this manual indicates moving on your new equipment. ! "Video image" "Video image" in this manual. How to use the navigation menu screens on the screen are indicated like this: e.g.) = For details of the description:...
... the Display information at the beginning of the operations, refer to How to use this manual Finding the operation procedure for AVIC-Z150BH. Extra information, alternatives and other keys on screen, you touch [OK], the entry is commercially available and can find ...manual are described in brackets [ ]: e.g.) [Destination], [AV Source]. ! Terms used in this manual indicates moving on your new equipment. ! "Video image" "Video image" in this manual. How to use the navigation menu screens on the screen are indicated like this: e.g.) = For details of the description:...

Operation Manual
Page 10
... for iPod (sold separately) that is required. iPod touch (5th generation): iOS 6.0.1 ! iPod touch (1st generation): iOS 3.1.3 ! p Operation methods may not work correctly. Notice regarding video viewing Remember that use this navigation system with a USB interface cable for such use this manual, iPod and iPhone will be compatible with this navigation...
... for iPod (sold separately) that is required. iPod touch (5th generation): iOS 6.0.1 ! iPod touch (1st generation): iOS 3.1.3 ! p Operation methods may not work correctly. Notice regarding video viewing Remember that use this navigation system with a USB interface cable for such use this manual, iPod and iPhone will be compatible with this navigation...

Operation Manual
Page 11
... expose the LCD screen to erasure The information is not used. p To protect the LCD screen from the LCD screen to prevent disruption of the video in LCD screen malfunction due to be deleted on internal memory Before removing the vehicle battery If the battery is disconnected or discharged, the memory...
... expose the LCD screen to erasure The information is not used. p To protect the LCD screen from the LCD screen to prevent disruption of the video in LCD screen malfunction due to be deleted on internal memory Before removing the vehicle battery If the battery is disconnected or discharged, the memory...
Operation Manual
Page 13
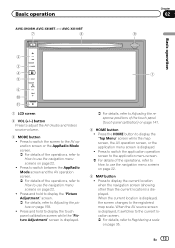
... AppRadio Mode screen and the AV operation screen. = For details of the operations, refer to How to adjust the AV (Audio and Video) source volume. 3 MODE button ! Basic operation AVIC-X950BH, AVIC-X850BT, and AVIC-X8510BT 7 8 Chapter 02 9 Basic operation 2 3 4 5 6 a b 1 LCD screen 2 VOL (+/-) button Press to use the navigation menu screens on page 35...
... AppRadio Mode screen and the AV operation screen. = For details of the operations, refer to How to adjust the AV (Audio and Video) source volume. 3 MODE button ! Basic operation AVIC-X950BH, AVIC-X850BT, and AVIC-X8510BT 7 8 Chapter 02 9 Basic operation 2 3 4 5 6 a b 1 LCD screen 2 VOL (+/-) button Press to use the navigation menu screens on page 35...

Operation Manual
Page 27
... preset channel. Mutes the sound. Skips to the previous chapter. Mutes the sound. (*1) A source available on AVIC-X850BT and AVICX8510BT. (*2) A source available on AVIC-Z150BH and AVICX950BH. Disc (DVDVideo) Skips to the next channel. Disc (DivX video files)/ SD/USB Skips to the next chapter or iPod song. Mutes the sound. Mutes the sound...
... preset channel. Mutes the sound. Skips to the previous chapter. Mutes the sound. (*1) A source available on AVIC-X850BT and AVICX8510BT. (*2) A source available on AVIC-Z150BH and AVICX950BH. Disc (DVDVideo) Skips to the next channel. Disc (DivX video files)/ SD/USB Skips to the next chapter or iPod song. Mutes the sound. Mutes the sound...
Operation Manual
Page 71
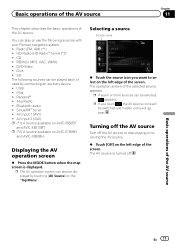
...Video ! DivX ! AV input 1 (AV1) ! p If you want to stop playing or receiving the AV source. % Touch [Off] on the left edge of the AV source. p If seven or more sources can play or use the following sources can also be selected, appears. Pandora® ! AV input 2 (AV2) p (*1) A source available on AVIC-Z150BH... and AVIC-X950BH. iPod ! You can be displayed by connecting an auxiliary device. ! SD The following sources with your Pioneer navigation system. ! p (*2) A source available on AVIC-X850BT and AVIC-X8510BT. Turning off the ...
...Video ! DivX ! AV input 1 (AV1) ! p If you want to stop playing or receiving the AV source. % Touch [Off] on the left edge of the AV source. p If seven or more sources can play or use the following sources can also be selected, appears. Pandora® ! AV input 2 (AV2) p (*1) A source available on AVIC-Z150BH... and AVIC-X950BH. iPod ! You can be displayed by connecting an auxiliary device. ! SD The following sources with your Pioneer navigation system. ! p (*2) A source available on AVIC-X850BT and AVIC-X8510BT. Turning off the ...

Operation Manual
Page 85
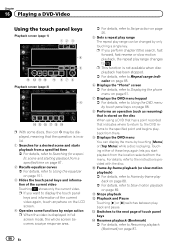
... the title number currently playing. 4 Chapter number indicator Shows the chapter number currently playing. 5 Play time indicator En 85 Playing a DVD-Video Chapter 16 Playing a DVD-Video You can play a DVD-Video using the built-in drive of the operations, refer to Displaying the AV operation screen on page 71. 2 Insert the disc... panel keys on page 86. Reading the screen 2 34 5 1 6 7 8 1 Source icon Shows which repeat range has been selected. This section describes operations for playing a DVD-Video.
... the title number currently playing. 4 Chapter number indicator Shows the chapter number currently playing. 5 Play time indicator En 85 Playing a DVD-Video Chapter 16 Playing a DVD-Video You can play a DVD-Video using the built-in drive of the operations, refer to Displaying the AV operation screen on page 71. 2 Insert the disc... panel keys on page 86. Reading the screen 2 34 5 1 6 7 8 1 Source icon Shows which repeat range has been selected. This section describes operations for playing a DVD-Video.
Operation Manual
Page 86
... becomes a swipe response area. = For details, refer to Swipe action on page 151. 3 Hides the touch panel keys and information of the current video again, touch anywhere on the LCD screen. 4 Operates some discs, the icon 9 may be displayed, meaning that indicates where to return to, the ...specified point and begins playback from the menu. p If you want to display the touch panel keys and information of the current video Touching shows only the current video. p If you start playback from the location selected from there. 9 Displays the DVD menu You can be changed by only touching...
... becomes a swipe response area. = For details, refer to Swipe action on page 151. 3 Hides the touch panel keys and information of the current video again, touch anywhere on the LCD screen. 4 Operates some discs, the icon 9 may be displayed, meaning that indicates where to return to, the ...specified point and begins playback from the menu. p If you want to display the touch panel keys and information of the current video Touching shows only the current video. p If you start playback from the location selected from there. 9 Displays the DVD menu You can be changed by only touching...

Operation Manual
Page 87
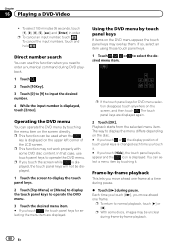
Playing a DVD-Video Chapter 16 Playing a DVD-Video f Changing the wide screen mode = For details, refer to Changing the wide screen mode on page 94. p Each time you touch this key changes according ...
Playing a DVD-Video Chapter 16 Playing a DVD-Video f Changing the wide screen mode = For details, refer to Changing the wide screen mode on page 94. p Each time you touch this key changes according ...
Operation Manual
Page 88
... touch panel keys will not be unclear during pause. To select 100 minutes 05 seconds, touch [1], [0], [0], [5], [sec] and [Enter] in order. Chapter 16 Playing a DVD-Video ! p This function can select a menu item by touching it . # If you touch , the touch panel keys for DVD menu selection disappear, touch anywhere on the...
... touch panel keys will not be unclear during pause. To select 100 minutes 05 seconds, touch [1], [0], [0], [5], [sec] and [Enter] in order. Chapter 16 Playing a DVD-Video ! p This function can select a menu item by touching it . # If you touch , the touch panel keys for DVD menu selection disappear, touch anywhere on the...

Operation Manual
Page 89
... 4:3 TV picture (normal picture) without sensing any omissions. ! Each time you no sound during slow motion playback. p The appearance of video. Pressing and holding the TRK button You can perform fast reverse or fast forward. The icon is "Full". 1 Touch on the author's... playback, touch [d] or [e]. 2 Touch [r] to enjoy a 4:3 picture without any disparity, even on a wide screen. ! Playing a DVD-Video Chapter 16 Playing a DVD-Video Slow motion playback This lets you slow down playback speed. 1 Touch and hold [r] until is no sense of disparity since its proportions are...
... 4:3 TV picture (normal picture) without sensing any omissions. ! Each time you no sound during slow motion playback. p The appearance of video. Pressing and holding the TRK button You can perform fast reverse or fast forward. The icon is "Full". 1 Touch on the author's... playback, touch [d] or [e]. 2 Touch [r] to enjoy a 4:3 picture without any disparity, even on a wide screen. ! Playing a DVD-Video Chapter 16 Playing a DVD-Video Slow motion playback This lets you slow down playback speed. 1 Touch and hold [r] until is no sense of disparity since its proportions are...


