
Owner's Manual
Page 2
...first-time startup 23 Regular startup 23 - Before removing the vehicle battery 12 - Ejecting a disc (for AVIC-X940BT) 18 - Inserting a disc (for AVIC-Z140BH) 18 - Ejecting an SD memory card (for AVICX940BT) 20 Plugging and unplugging a USB storage device 21 - Scrolling the map to the position ...faceplate 16 - Ejecting an SD memory card (for AVICZ140BH) 19 - POI list) 28 Operating the on-screen keyboard 28 How to use this manual 10 - Enlarged map of the road stored in this Pioneer product. Please read the map screen 29 - Inserting a disc (for AVIC- Z140BH) 19 2 En -...
...first-time startup 23 Regular startup 23 - Before removing the vehicle battery 12 - Ejecting a disc (for AVIC-X940BT) 18 - Inserting a disc (for AVIC-Z140BH) 18 - Ejecting an SD memory card (for AVICX940BT) 20 Plugging and unplugging a USB storage device 21 - Scrolling the map to the position ...faceplate 16 - Ejecting an SD memory card (for AVICZ140BH) 19 - POI list) 28 Operating the on-screen keyboard 28 How to use this manual 10 - Enlarged map of the road stored in this Pioneer product. Please read the map screen 29 - Inserting a disc (for AVIC- Z140BH) 19 2 En -...

Owner's Manual
Page 3
... destination 42 - Adding a waypoint 48 - Importing favorite locations 52 Deleting the destination history from "Favorites" 43 Searching for POIs by using the data on the SD memory card 43 Selecting a location you searched for recently 44 Searching for and selecting a location The basic flow of the facilities 41 - Contents - Viewing information about...
... destination 42 - Adding a waypoint 48 - Importing favorite locations 52 Deleting the destination history from "Favorites" 43 Searching for POIs by using the data on the SD memory card 43 Selecting a location you searched for recently 44 Searching for and selecting a location The basic flow of the facilities 41 - Contents - Viewing information about...
Owner's Manual
Page 8
... center control 186 - Using subwoofer output 187 - How to the default or factory settings 196 - Voice commands related to the splash screen stored in the SD memory card 173 - Entering the password 195 - Setting the illumination color 175 - Switching the muting/attenuation level 179 - Using the equalizer 182 - Adjusting source levels 187...
... center control 186 - Using subwoofer output 187 - How to the default or factory settings 196 - Voice commands related to the splash screen stored in the SD memory card 173 - Entering the password 195 - Setting the illumination color 175 - Switching the muting/attenuation level 179 - Using the equalizer 182 - Adjusting source levels 187...

Owner's Manual
Page 10
...operations, refer to use a different model, the screens that is deleted. ! "External storage device (USB, SD)" The SD memory card, SDHC memory card, microSD card, microSDHC card and USB memory device are indicated with these conventions will find the necessary page from the examples in the ...to Screen switching overview on , take a few minutes to as the "external storage device (USB, SD)". Touch panel keys that is referred to read Important Information for AVIC-Z140BH. Buttons on the screen are the ones for the User (a separate manual) which contains warnings, ...
...operations, refer to use a different model, the screens that is deleted. ! "External storage device (USB, SD)" The SD memory card, SDHC memory card, microSD card, microSDHC card and USB memory device are indicated with these conventions will find the necessary page from the examples in the ...to Screen switching overview on , take a few minutes to as the "external storage device (USB, SD)". Touch panel keys that is referred to read Important Information for AVIC-Z140BH. Buttons on the screen are the ones for the User (a separate manual) which contains warnings, ...

Owner's Manual
Page 11
...Pioneer USB interface cable for commercial or public viewing purposes may vary depending on our website. iPod touch (2nd generation): iOS 4.2.1 ! iPod classic 80GB: Ver. 1.1.2 ! iPhone 4: iOS 5.0 ! Introduction Chapter 01 Introduction "SD memory card" The SD memory card, SDHC memory card, microSD card and microSDHC card...with this navigation system with this navigation system, refer to the information on the author's rights as the "SD memory card". ferred to as protected by U.S. iPod compatibility This product supports only the following iPod models and iPod software...
...Pioneer USB interface cable for commercial or public viewing purposes may vary depending on our website. iPod touch (2nd generation): iOS 4.2.1 ! iPod classic 80GB: Ver. 1.1.2 ! iPhone 4: iOS 5.0 ! Introduction Chapter 01 Introduction "SD memory card" The SD memory card, SDHC memory card, microSD card and microSDHC card...with this navigation system with this navigation system, refer to the information on the author's rights as the "SD memory card". ferred to as protected by U.S. iPod compatibility This product supports only the following iPod models and iPod software...
Owner's Manual
Page 15
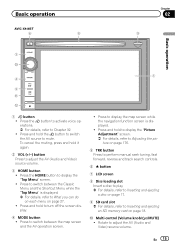
Press the button to activate voice operations. = For details, refer to Inserting and ejecting an SD memory card on page 18. Press and hold it again. 2 VOL (+/-) button Press to mute. Rotate to switch between the Classic Menu and the Shortcut Menu while ...the "Top Menu" is displayed. = For details, refer to display the map screen while the navigation function screen is displayed. ! Basic operation AVIC-X940BT 6 8 Chapter 02...
Press the button to activate voice operations. = For details, refer to Inserting and ejecting an SD memory card on page 18. Press and hold it again. 2 VOL (+/-) button Press to mute. Rotate to switch between the Classic Menu and the Shortcut Menu while ...the "Top Menu" is displayed. = For details, refer to display the map screen while the navigation function screen is displayed. ! Basic operation AVIC-X940BT 6 8 Chapter 02...

Owner's Manual
Page 18
...the h button. The disc is loaded, and the LCD panel closes. Inserting and ejecting an SD memory card CAUTION ! If data loss or corruption occurs on the storage device for AVIC-X940BT) 1 Press the h button. Do not insert anything other than a disc into the ...Disc Eject]. Pioneer accepts no liability for AVIC-Z140BH) 1 Press the h button. The touch panel keys for AVIC-X940BT) CAUTION Do not insert anything other than SD memory cards. 18 En Be sure to recover the data. Ejecting an SD memory card during data transfer can damage the SD memory card. The disc ...
...the h button. The disc is loaded, and the LCD panel closes. Inserting and ejecting an SD memory card CAUTION ! If data loss or corruption occurs on the storage device for AVIC-X940BT) 1 Press the h button. Do not insert anything other than a disc into the ...Disc Eject]. Pioneer accepts no liability for AVIC-Z140BH) 1 Press the h button. The touch panel keys for AVIC-X940BT) CAUTION Do not insert anything other than SD memory cards. 18 En Be sure to recover the data. Ejecting an SD memory card during data transfer can damage the SD memory card. The disc ...

Owner's Manual
Page 19
... completely locks. The "Monitor Setup" screen appears. 2 Touch [Eject SD]. The LCD panel opens, and the SD card slot appears. 3 Insert an SD memory card into the SD card slot. Inserting an SD memory card (for AVIC-Z140BH) 1 Press the h button. Doing so may damage the card. 1 Press the h button. Ejecting an SD memory card (for AVIC-Z140BH) CAUTION ! Do not press the h button before an...
... completely locks. The "Monitor Setup" screen appears. 2 Touch [Eject SD]. The LCD panel opens, and the SD card slot appears. 3 Insert an SD memory card into the SD card slot. Inserting an SD memory card (for AVIC-Z140BH) 1 Press the h button. Doing so may damage the card. 1 Press the h button. Ejecting an SD memory card (for AVIC-Z140BH) CAUTION ! Do not press the h button before an...

Owner's Manual
Page 20
... an SD memory card into the SD memory card. Insert the SD memory card with the terminal contacts facing down, and press the card until it clicks and locks completely. Chapter 02 Basic operation 4 Pull the SD memory card out straight. 5 Press the h button. If data related to remove the SD memory card appears. 20 En Inserting an SD memory card (for AVIC-Z140BH. p If...
... an SD memory card into the SD memory card. Insert the SD memory card with the terminal contacts facing down, and press the card until it clicks and locks completely. Chapter 02 Basic operation 4 Pull the SD memory card out straight. 5 Press the h button. If data related to remove the SD memory card appears. 20 En Inserting an SD memory card (for AVIC-Z140BH. p If...

Owner's Manual
Page 43
...our website.) Storing the customized POI properly and inserting the SD memory card enables the system to use the data for searches. 1 Store the item into the SD memory card by using the AVIC FEEDS. 2 Insert an SD memory card into the SD card slot. = For details of the operation, refer to Inserting... and ejecting an SD memory card on page 18. 3 Display the "Destination Menu" screen. = For ...
...our website.) Storing the customized POI properly and inserting the SD memory card enables the system to use the data for searches. 1 Store the item into the SD memory card by using the AVIC FEEDS. 2 Insert an SD memory card into the SD card slot. = For details of the operation, refer to Inserting... and ejecting an SD memory card on page 18. 3 Display the "Destination Menu" screen. = For ...

Owner's Manual
Page 52
...You can export the "Favorites" data to an SD memory card for editing by using the utility program AVIC FEEDS which is overwritten. 1 Store the item into the SD card slot. = For details of the operation, refer to Inserting and ejecting an SD memory card on page 18. 2 Display the "Destination .... 52 En 5 Touch [OK]. Data export starts. The data you selected is overwritten with new data. 1 Insert an SD memory card into the SD memory card by using the AVIC FEEDS. Importing favorite locations You can select all entries, touch [None]. 5 Touch [Delete]. A message will appear asking you...
...You can export the "Favorites" data to an SD memory card for editing by using the utility program AVIC FEEDS which is overwritten. 1 Store the item into the SD card slot. = For details of the operation, refer to Inserting and ejecting an SD memory card on page 18. 2 Display the "Destination .... 52 En 5 Touch [OK]. Data export starts. The data you selected is overwritten with new data. 1 Insert an SD memory card into the SD memory card by using the AVIC FEEDS. Importing favorite locations You can select all entries, touch [None]. 5 Touch [Delete]. A message will appear asking you...

Owner's Manual
Page 53
... [No], the deletion is finished, the "Favorites" screen appears. Registering and editing locations Chapter 09 2 Insert an SD memory card into the SD card slot. = For details of the operation, refer to Inserting and ejecting an SD memory card on page 18. 3 Display the "Destination Menu" screen. = For details of the operations, refer to Screen switching...
... [No], the deletion is finished, the "Favorites" screen appears. Registering and editing locations Chapter 09 2 Insert an SD memory card into the SD card slot. = For details of the operation, refer to Inserting and ejecting an SD memory card on page 18. 3 Display the "Destination Menu" screen. = For details of the operations, refer to Screen switching...
Owner's Manual
Page 72
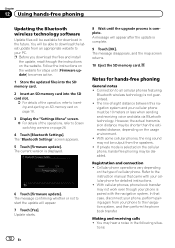
... page 26. 4 Touch [Bluetooth Settings]. Update starts. 8 Wait until [Firmware update] becomes active. 1 Store the updated files into the SD memory card. 2 Insert an SD memory card into the SD card slot. = For details of the operations, refer to the navigation system, and then perform the phone book transfer. A message will appear after the ...latest update from the speakers. ! The "Bluetooth Settings" screen appears. 5 Touch [Firmware update]. The message disappears, and the map screen returns. 10 Eject the SD memory card. Connection to your phone is complete. 9 Touch [OK].
... page 26. 4 Touch [Bluetooth Settings]. Update starts. 8 Wait until [Firmware update] becomes active. 1 Store the updated files into the SD memory card. 2 Insert an SD memory card into the SD card slot. = For details of the operations, refer to the navigation system, and then perform the phone book transfer. A message will appear after the ...latest update from the speakers. ! The "Bluetooth Settings" screen appears. 5 Touch [Firmware update]. The message disappears, and the map screen returns. 10 Eject the SD memory card. Connection to your phone is complete. 9 Touch [OK].
Owner's Manual
Page 113
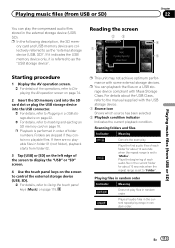
...page 115. Plays the first audio files of the operations, refer to Displaying the AV operation screen on page 74. 2 Insert the SD memory card into the SD card slot or plug the USB storage device into the USB connector. = For details, refer to Plugging in a USB storage device on ... has been selected. 2 Playback condition indicator Indicates the current playback condition. Reading the screen 23 p In the following description, the SD mem- 4 ory card and USB memory device are no playable files. p Playback is performed in order of each folder for about 10 seconds when the ...
...page 115. Plays the first audio files of the operations, refer to Displaying the AV operation screen on page 74. 2 Insert the SD memory card into the SD card slot or plug the USB storage device into the USB connector. = For details, refer to Plugging in a USB storage device on ... has been selected. 2 Playback condition indicator Indicates the current playback condition. Reading the screen 23 p In the following description, the SD mem- 4 ory card and USB memory device are no playable files. p Playback is performed in order of each folder for about 10 seconds when the ...
Owner's Manual
Page 117
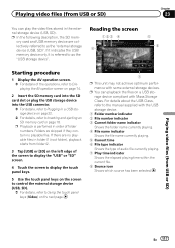
... supplied with Mass Storage Class. p You can play the video files stored in a USB storage device on page 74. 2 Insert the SD memory card into the SD card slot or plug the USB storage device into the USB connector. = For details, refer to Plugging in the external storage device (USB..., SD). p Playback is referred to Inserting and ejecting an SD memory card on the screen to control the external storage device (USB, SD). = For details, refer to as the "USB storage device". Folders are no playable ...
... supplied with Mass Storage Class. p You can play the video files stored in a USB storage device on page 74. 2 Insert the SD memory card into the SD card slot or plug the USB storage device into the USB connector. = For details, refer to Plugging in the external storage device (USB..., SD). p Playback is referred to Inserting and ejecting an SD memory card on the screen to control the external storage device (USB, SD). = For details, refer to as the "USB storage device". Folders are no playable ...

Owner's Manual
Page 160
... since the previous fueling. Enter the following items: ! Exporting the data of fuel cost information Exporting the fuel cost data to the SD memory card. Chapter 31 Customizing preferences If the entries reach the maximum number, a new entry will be obtained. 1 Display the "Navi Settings"... on page 157. 3 Touch [Gas Mileage]. These calculations are entered, the fuel consumption is overwritten with new data. 1 Insert an SD memory card into the SD card slot. = For details of fuel pumped. ! The "Gas Price Calculation" screen appears. 4 Enter the fuel consumption information. p The...
... since the previous fueling. Enter the following items: ! Exporting the data of fuel cost information Exporting the fuel cost data to the SD memory card. Chapter 31 Customizing preferences If the entries reach the maximum number, a new entry will be obtained. 1 Display the "Navi Settings"... on page 157. 3 Touch [Gas Mileage]. These calculations are entered, the fuel consumption is overwritten with new data. 1 Insert an SD memory card into the SD card slot. = For details of fuel pumped. ! The "Gas Price Calculation" screen appears. 4 Enter the fuel consumption information. p The...
Owner's Manual
Page 161
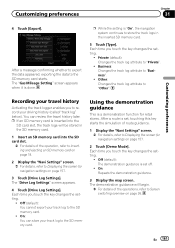
...26. Private (default): Changes the track log attribute to the SD memory card. ! Off (default): The demonstration guidance is inserted into the SD card slot. = For details of the operation, refer to Inserting and ejecting an SD memory card on page 157. 3 Touch [Drive Log Settings]. The ... The "Drive Log Settings" screen appears. 4 Touch [Drive Log Settings]. Each time you to store the track logs in the SD memory card. 1 Insert an SD memory card into the SD card slot, the track logs will begin. = For details of route guidance. 1 Display the "Navi Settings" screen. = For details...
...26. Private (default): Changes the track log attribute to the SD memory card. ! Off (default): The demonstration guidance is inserted into the SD card slot. = For details of the operation, refer to Inserting and ejecting an SD memory card on page 157. 3 Touch [Drive Log Settings]. The ... The "Drive Log Settings" screen appears. 4 Touch [Drive Log Settings]. Each time you to store the track logs in the SD memory card. 1 Insert an SD memory card into the SD card slot, the track logs will begin. = For details of route guidance. 1 Display the "Navi Settings" screen. = For details...

Owner's Manual
Page 168
...AVIC FEEDS will appear next to "On". Changing the view mode Various types of screen displays can set the timing for map settings on the map, touch [Display] to Switch- p When only a few detailed categories are displayed. categories or detailed categories. 1 Insert an SD memory card into the SD card...on our website.) Storing the customized POI properly and inserting the SD memory card enables the system to display. Displaying the customized POIs Creating a customized POI is possible by using the utility program AVIC FEEDS which is active. Setting the map color change between ...
...AVIC FEEDS will appear next to "On". Changing the view mode Various types of screen displays can set the timing for map settings on the map, touch [Display] to Switch- p When only a few detailed categories are displayed. categories or detailed categories. 1 Insert an SD memory card into the SD card...on our website.) Storing the customized POI properly and inserting the SD memory card enables the system to display. Displaying the customized POIs Creating a customized POI is possible by using the utility program AVIC FEEDS which is active. Setting the map color change between ...
Owner's Manual
Page 173
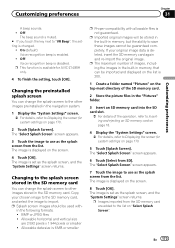
... list on page 18. 4 Display the "System Settings" screen. = For details, refer to Inserting and ejecting an SD memory card on "Select Splash Screen". p The maximum number of the operation, refer to Displaying the screen for AVIC-Z140BH only. 4 To finish the setting, touch [OK]. The image is enabled. ! On (default): Voice recognition beep...
... list on page 18. 4 Display the "System Settings" screen. = For details, refer to Inserting and ejecting an SD memory card on "Select Splash Screen". p The maximum number of the operation, refer to Displaying the screen for AVIC-Z140BH only. 4 To finish the setting, touch [OK]. The image is enabled. ! On (default): Voice recognition beep...
Owner's Manual
Page 188
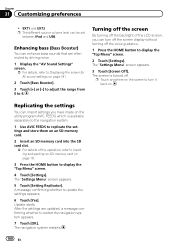
... to replicate the settings and store them on an SD memory card. 2 Insert an SD memory card into the SD card slot. = For details of the LCD screen, you can import settings you have made on . Replicating the settings You can turn it back on the utility program AVIC FEEDS which is turned off the backlight of...
... to replicate the settings and store them on an SD memory card. 2 Insert an SD memory card into the SD card slot. = For details of the LCD screen, you can import settings you have made on . Replicating the settings You can turn it back on the utility program AVIC FEEDS which is turned off the backlight of...


