
Owner's Manual
Page 2
...Selecting the shortcut 27 - Inserting an SD memory card (for AVIC-Z140BH) 17 - A message about the map database 24 Demonstration images 24 How to use this manual 10 Notice regarding video viewing 11 Notice regarding DVD-Video viewing 11 Notice regarding MP3 file usage 11 iPod compatibility 11 ...to use the navigation menu screens Screen switching overview 26 What you have finished reading the instructions, keep this Pioneer product. Important The screens shown in a safe place for AVIC-X940BT) 18 Inserting and ejecting an SD memory card 18 - Terms used in a USB storage device ...
...Selecting the shortcut 27 - Inserting an SD memory card (for AVIC-Z140BH) 17 - A message about the map database 24 Demonstration images 24 How to use this manual 10 Notice regarding video viewing 11 Notice regarding DVD-Video viewing 11 Notice regarding MP3 file usage 11 iPod compatibility 11 ...to use the navigation menu screens Screen switching overview 26 What you have finished reading the instructions, keep this Pioneer product. Important The screens shown in a safe place for AVIC-X940BT) 18 Inserting and ejecting an SD memory card 18 - Terms used in a USB storage device ...

Owner's Manual
Page 5
... 94 Reading the screen 94 Using the touch panel keys 96 Operating by hardware buttons 103 Using advanced functions 103 Playing a DivX video Starting procedure 105 Reading the screen 105 Using the touch panel keys 106 - Scrolling the detailed information 88 Storing song information to an...by hardware buttons 87 Switching the display 87 - Slow motion playback 103 Operating by hardware buttons 97 Using advanced functions 97 Playing a DVD-Video Starting procedure 99 Reading the screen 99 Using the touch panel keys 100 - Switching the seek mode 89 - Storing and recalling broadcast ...
... 94 Reading the screen 94 Using the touch panel keys 96 Operating by hardware buttons 103 Using advanced functions 103 Playing a DivX video Starting procedure 105 Reading the screen 105 Using the touch panel keys 106 - Scrolling the detailed information 88 Storing song information to an...by hardware buttons 87 Switching the display 87 - Slow motion playback 103 Operating by hardware buttons 97 Using advanced functions 97 Playing a DVD-Video Starting procedure 99 Reading the screen 99 Using the touch panel keys 100 - Switching the seek mode 89 - Storing and recalling broadcast ...
Owner's Manual
Page 6
... audio player Starting procedure 138 Reading the screen 138 Using the touch panel keys 140 Operating by hardware buttons 116 Using advanced functions 116 Playing video files (from the navigation system 126 - Reading the screen 129 - Using the touch panel keys 134 - Using the touch panel keys 136 - ... file for DivX 111 Language code chart for iPhone from USB or SD) Starting procedure 117 Reading the screen 117 Using the touch panel keys (Video) 118 - Using the touch panel keys 126 - For iPhone users 132 Using Pandora® internet radio 133 - Functions coupled with Advanced App ...
... audio player Starting procedure 138 Reading the screen 138 Using the touch panel keys 140 Operating by hardware buttons 116 Using advanced functions 116 Playing video files (from the navigation system 126 - Reading the screen 129 - Using the touch panel keys 134 - Using the touch panel keys 136 - ... file for DivX 111 Language code chart for iPhone from USB or SD) Starting procedure 117 Reading the screen 117 Using the touch panel keys (Video) 118 - Using the touch panel keys 126 - For iPhone users 132 Using Pandora® internet radio 133 - Functions coupled with Advanced App ...
Owner's Manual
Page 8
... 173 - Changing to the default or factory settings 196 - Setting for AV sound settings 181 - Setting the illumination color 175 - Setting video input 2 (AV2) 178 - Switching the muting/attenuation level 179 - Acquiring/Cataloging iPod music information 180 - Adjusting the equalizer curve automatically ...(Auto EQ) 184 - Adjusting source levels 187 - Setting the password 195 - Setting the Volume for AV system settings 177 - Setting video input 1 (AV1) 177 - Enhancing bass (Bass Booster) 188 Replicating the settings 188 Turning off the screen 188 Operating your navigation system...
... 173 - Changing to the default or factory settings 196 - Setting for AV sound settings 181 - Setting the illumination color 175 - Setting video input 2 (AV2) 178 - Switching the muting/attenuation level 179 - Acquiring/Cataloging iPod music information 180 - Adjusting the equalizer curve automatically ...(Auto EQ) 184 - Adjusting source levels 187 - Setting the password 195 - Setting the Volume for AV system settings 177 - Setting video input 1 (AV1) 177 - Enhancing bass (Bass Booster) 188 Replicating the settings 188 Turning off the screen 188 Operating your navigation system...

Owner's Manual
Page 9
... Settings menu 228 - Positioning by dead reckoning 208 - Route search specifications 212 Handling and care of discs 212 - Ambient conditions for playable media 214 - DVD-Video and CD 213 - Media compatibility chart 217 Bluetooth 221 About the SAT RADIO READY Logo 221 HD Radio™ Technology 221 SD and SDHC logo...
... Settings menu 228 - Positioning by dead reckoning 208 - Route search specifications 212 Handling and care of discs 212 - Ambient conditions for playable media 214 - DVD-Video and CD 213 - Media compatibility chart 217 Bluetooth 221 About the SAT RADIO READY Logo 221 HD Radio™ Technology 221 SD and SDHC logo...

Owner's Manual
Page 10
...meanings of the manual. Menu items, screen titles, and functional components are described in bold with double quotation marks " ": e.g.) "Video image" "Video image" in this manual indicates moving on your new equipment. ! Chapter 01 Introduction Manual overview Before using this product, be sure to...the location first. ! Buttons on , take a few minutes to do When you have decided what you want to read Important Information for AVIC-Z140BH. How to use a different model, the screens that appear may differ from the Display information at the beginning of the description: e.g.) ...
...meanings of the manual. Menu items, screen titles, and functional components are described in bold with double quotation marks " ": e.g.) "Video image" "Video image" in this manual indicates moving on your new equipment. ! Chapter 01 Introduction Manual overview Before using this product, be sure to...the location first. ! Buttons on , take a few minutes to do When you have decided what you want to read Important Information for AVIC-Z140BH. How to use a different model, the screens that appear may differ from the Display information at the beginning of the description: e.g.) ...

Owner's Manual
Page 11
Notice regarding video viewing Remember that is required. An independent license for commercial or public viewing purposes may vary depending on the iPod models and the software version ... be re- iPod touch (4th generation): iOS 5.0 ! iPod nano (3rd generation): Ver. 1.1.3 ! iPhone 4: iOS 5.0 ! iPhone 3G: iOS 4.2.1 ! Map coverage For details about iPod compatibility with a Pioneer USB interface cable for private, non-commercial use this navigation system. En 11 patents and other intellectual property rights of this navigation system conveys only...
Notice regarding video viewing Remember that is required. An independent license for commercial or public viewing purposes may vary depending on the iPod models and the software version ... be re- iPod touch (4th generation): iOS 5.0 ! iPod nano (3rd generation): Ver. 1.1.3 ! iPhone 4: iOS 5.0 ! iPhone 3G: iOS 4.2.1 ! Map coverage For details about iPod compatibility with a Pioneer USB interface cable for private, non-commercial use this navigation system. En 11 patents and other intellectual property rights of this navigation system conveys only...

Owner's Manual
Page 12
.... p To protect the LCD screen from the battery (or removing the battery itself). Extended exposure to direct sunlight can result in the form of the video in LCD screen malfunction due to the resulting high temperatures. Chapter 01 Introduction Protecting the LCD panel and screen p Do not allow direct sunlight to...
.... p To protect the LCD screen from the battery (or removing the battery itself). Extended exposure to direct sunlight can result in the form of the video in LCD screen malfunction due to the resulting high temperatures. Chapter 01 Introduction Protecting the LCD panel and screen p Do not allow direct sunlight to...
Owner's Manual
Page 15
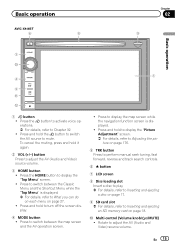
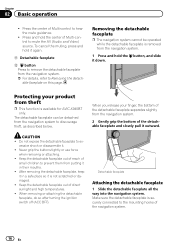
En 15 To cancel the muting, press and hold to adjust the AV (Audio and Video) source volume. 3 HOME button ! Press and hold it again. 2 VOL (+/-) button Press to turn off the screen display. 4 MODE button ! Press and hold the button... page 17. 9 SD card slot = For details, refer to Chapter 32. ! Press to switch between the map screen and the AV operation screen. ! Basic operation AVIC-X940BT 6 8 Chapter 02 9 Basic operation 3 a 7 4 5 b c 1 button ! Press the HOME button to mute. Press and hold to display the "Picture Adjustment" screen. = For details, refer ...
En 15 To cancel the muting, press and hold to adjust the AV (Audio and Video) source volume. 3 HOME button ! Press and hold it again. 2 VOL (+/-) button Press to turn off the screen display. 4 MODE button ! Press and hold the button... page 17. 9 SD card slot = For details, refer to Chapter 32. ! Press to switch between the map screen and the AV operation screen. ! Basic operation AVIC-X940BT 6 8 Chapter 02 9 Basic operation 3 a 7 4 5 b c 1 button ! Press the HOME button to mute. Press and hold to display the "Picture Adjustment" screen. = For details, refer ...
Owner's Manual
Page 16
... it again. The detachable faceplate can be operated while the detachable faceplate is available for AVIC-X940BT only. When you release your product from the navigation system. = For details, refer to mute the AV (Audio and Video) source. Never grip the buttons tightly or use force when removing or attaching. ! Keep the...
... it again. The detachable faceplate can be operated while the detachable faceplate is available for AVIC-X940BT only. When you release your product from the navigation system. = For details, refer to mute the AV (Audio and Video) source. Never grip the buttons tightly or use force when removing or attaching. ! Keep the...
Owner's Manual
Page 74
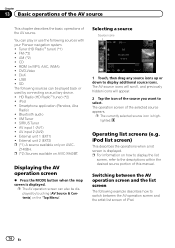
...FM (*2) ! iPod ! AV input 1 (AV1) ! Z140BH. p The AV operation screen can also be played back or used by touching [AV Source & Contents] on AVIC- XM Tuner ! ROM (in MP3, AAC, WMA) ! SIRIUS Tuner ! External unit 1 (EXT1) ! DVD-Video ! External unit 2 (EXT2) p (*1) A source available... only on the "Top Menu". Selecting a source Source icons 1 Touch, then drag any source icons up or down to select. Switching between the AV operation screen and the list screen The following sources with your Pioneer navigation system...
...FM (*2) ! iPod ! AV input 1 (AV1) ! Z140BH. p The AV operation screen can also be played back or used by touching [AV Source & Contents] on AVIC- XM Tuner ! ROM (in MP3, AAC, WMA) ! SIRIUS Tuner ! External unit 1 (EXT1) ! DVD-Video ! External unit 2 (EXT2) p (*1) A source available... only on the "Top Menu". Selecting a source Source icons 1 Touch, then drag any source icons up or down to select. Switching between the AV operation screen and the list screen The following sources with your Pioneer navigation system...
Owner's Manual
Page 97
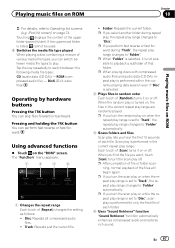
... Retriever" function automatically enhances compressed audio and restores rich sound. Playing music files on ROM Chapter 18 Playing music files on or off. DivX (DivX video files) Operating by hardware buttons Pressing the TRK button You can perform fast reverse or fast forward. p If you turn the scan play lets you...
... Retriever" function automatically enhances compressed audio and restores rich sound. Playing music files on ROM Chapter 18 Playing music files on or off. DivX (DivX video files) Operating by hardware buttons Pressing the TRK button You can perform fast reverse or fast forward. p If you turn the scan play lets you...
Owner's Manual
Page 99
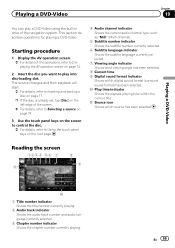
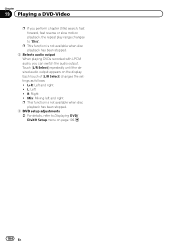
...screen. = For details of the navigation system. b Source icon Shows which digital sound format (surround sound format) has been selected. Playing a DVD-Video Reading the screen 1234 56 7 b 8 9 a 1 Title number indicator Shows the title number currently playing. 2 Audio track indicator Shows the audio... and audio language currently selected. 3 Chapter number indicator Shows the chapter number currently playing. This section describes operations for playing a DVD-Video. a Play time indicator Shows the elapsed playing time within the current title. p If the disc is already set, tap [Disc]...
...screen. = For details of the navigation system. b Source icon Shows which digital sound format (surround sound format) has been selected. Playing a DVD-Video Reading the screen 1234 56 7 b 8 9 a 1 Title number indicator Shows the title number currently playing. 2 Audio track indicator Shows the audio... and audio language currently selected. 3 Chapter number indicator Shows the chapter number currently playing. This section describes operations for playing a DVD-Video. a Play time indicator Shows the elapsed playing time within the current title. p If the disc is already set, tap [Disc]...

Owner's Manual
Page 100
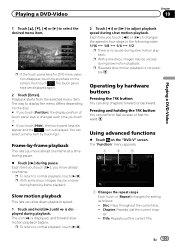
p If you want to display the touch panel keys and information of the current video again, touch anywhere on page 102. 6 Playback and Pause Touching [f] switches between playback and pause. 7 Hides the touch panel keys and ... plate as follows: Disc information display - Repeat range and L/R select display hij 4 Switches to the next page of the current video Touching [Hide] shows only the current video. Chapter 19 Playing a DVD-Video Using the touch panel keys Playback screen (page 1) b a 9 8 1 2 3 45 6 7 Playback screen (page 2) Playback screen (page 3) g f e c d p With some...
p If you want to display the touch panel keys and information of the current video again, touch anywhere on page 102. 6 Playback and Pause Touching [f] switches between playback and pause. 7 Hides the touch panel keys and ... plate as follows: Disc information display - Repeat range and L/R select display hij 4 Switches to the next page of the current video Touching [Hide] shows only the current video. Chapter 19 Playing a DVD-Video Using the touch panel keys Playback screen (page 1) b a 9 8 1 2 3 45 6 7 Playback screen (page 2) Playback screen (page 3) g f e c d p With some...

Owner's Manual
Page 101
... to Frame-by touching [Menu] or [Top Menu] while a disc is displayed. Touching [c] skips to the start of the next chapter. Playing a DVD-Video Chapter 19 Playing a DVD-Video 8 Skips forward or backward Touching [p] skips to the start of the previous title. p During playback of the current chapter. Resuming playback (Bookmark) The...
... to Frame-by touching [Menu] or [Top Menu] while a disc is displayed. Touching [c] skips to the start of the next chapter. Playing a DVD-Video Chapter 19 Playing a DVD-Video 8 Skips forward or backward Touching [p] skips to the start of the previous title. p During playback of the current chapter. Resuming playback (Bookmark) The...

Owner's Manual
Page 102
... touch , the touch panel keys for the same disc, the older bookmark will not be used when the key is dis- Chapter 19 Playing a DVD-Video You can bookmark one . Searching for a specific scene and starting playback from a specified time You can search for each of the LCD screen. For titles...
... touch , the touch panel keys for the same disc, the older bookmark will not be used when the key is dis- Chapter 19 Playing a DVD-Video You can bookmark one . Searching for a specific scene and starting playback from a specified time You can search for each of the LCD screen. For titles...
Owner's Manual
Page 103
... is not possible. Pressing and holding the TRK button You can perform fast reverse or fast forward. Chapter: Repeats just the current chapter. ! Playing a DVD-Video Chapter 19 Playing a DVD-Video 1 Touch [a], [b], [c] or [d] to normal playback, touch [f]. p With some discs, images may be unclear during slow motion playback.
... is not possible. Pressing and holding the TRK button You can perform fast reverse or fast forward. Chapter: Repeats just the current chapter. ! Playing a DVD-Video Chapter 19 Playing a DVD-Video 1 Touch [a], [b], [c] or [d] to normal playback, touch [f]. p With some discs, images may be unclear during slow motion playback.
Owner's Manual
Page 104
... DVD/ DivX® Setup menu on the display. L+R: Left and right ! Each touch of [L/R Select] changes the settings as follows: ! L: Left ! Chapter 19 Playing a DVD-Video p If you can switch the audio output.
... DVD/ DivX® Setup menu on the display. L+R: Left and right ! Each touch of [L/R Select] changes the settings as follows: ! L: Left ! Chapter 19 Playing a DVD-Video p If you can switch the audio output.

Owner's Manual
Page 105
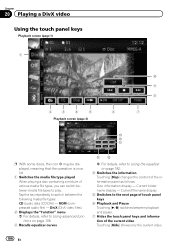
...Shows the digital sound format (surround sound format) currently selected. 9 Play time indicator Shows the elapsed playing time within the current file. Playing a DivX video Reading the screen 123 4 5 6 a 7 8 9 1 Folder number indicator Shows the folder number currently playing. 2 Audio track indicator Shows the... source has been selected. Starting procedure 1 Display the AV operation screen. = For details of the navigation system. Playing a DivX video Chapter 20 You can play a DivX disc using the built-in drive of the operations, refer to Displaying the AV operation screen ...
...Shows the digital sound format (surround sound format) currently selected. 9 Play time indicator Shows the elapsed playing time within the current file. Playing a DivX video Reading the screen 123 4 5 6 a 7 8 9 1 Folder number indicator Shows the folder number currently playing. 2 Audio track indicator Shows the... source has been selected. Starting procedure 1 Display the AV operation screen. = For details of the navigation system. Playing a DivX video Chapter 20 You can play a DivX disc using the built-in drive of the operations, refer to Displaying the AV operation screen ...
Owner's Manual
Page 106
Current folder name display - ROM (compressed audio file) - DivX (DivX video files) 2 Displays the "Function" menu = For details, refer to Using advanced functions on page 182. 4 Switches the information Touching [Disp] changes ... to switch between playback and pause. 7 Hides the touch panel keys and information of the current video Touching [Hide] shows only the current video. 106 En Current file name display 5 Switches to play. Chapter 20 Playing a DivX video Using the touch panel keys Playback screen (page 1) 1 a 9 8 2 3 4 5 6 7 Playback screen (page 2) f e d p With...
Current folder name display - ROM (compressed audio file) - DivX (DivX video files) 2 Displays the "Function" menu = For details, refer to Using advanced functions on page 182. 4 Switches the information Touching [Disp] changes ... to switch between playback and pause. 7 Hides the touch panel keys and information of the current video Touching [Hide] shows only the current video. 106 En Current file name display 5 Switches to play. Chapter 20 Playing a DivX video Using the touch panel keys Playback screen (page 1) 1 a 9 8 2 3 4 5 6 7 Playback screen (page 2) f e d p With...


