Owner's Manual
Page 1
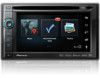
English Be sure to your vehicle's parking brake and depending on your Authorized Pioneer Electronics retailer or call us at (800) 421-1404. For more information, please contact your vehicle, additional installation may be required. Operation Manual MULTIMEDIA NAVIGATION RECEIVER AVIC-Z140BH AVIC-X940BT Notice to all users: This software requires that the navigation system is properly connected to read Important Information for the User includes the important information that you must understand before using this navigation system. Important Information for the User first!
English Be sure to your vehicle's parking brake and depending on your Authorized Pioneer Electronics retailer or call us at (800) 421-1404. For more information, please contact your vehicle, additional installation may be required. Operation Manual MULTIMEDIA NAVIGATION RECEIVER AVIC-Z140BH AVIC-X940BT Notice to all users: This software requires that the navigation system is properly connected to read Important Information for the User includes the important information that you must understand before using this navigation system. Important Information for the User first!
Owner's Manual
Page 2
... Pioneer product. Actual screens may differ from theft 16 - Conventions used in this document in a USB storage device 22 - Data subject to operate your iPod 22 Startup and termination 23 On first-time startup 23 Regular startup 23 - Ejecting a disc (for AVIC-X940BT) 18 - Inserting a disc (for AVIC-Z140BH...operation Checking part names and functions 14 Protecting your iPod 22 - Please read the map screen 29 - How to use the navigation menu screens Screen switching overview 26 What you have finished reading the instructions, keep this manual 10 Notice regarding video viewing 11 ...
... Pioneer product. Actual screens may differ from theft 16 - Conventions used in this document in a USB storage device 22 - Data subject to operate your iPod 22 Startup and termination 23 On first-time startup 23 Regular startup 23 - Ejecting a disc (for AVIC-X940BT) 18 - Inserting a disc (for AVIC-Z140BH...operation Checking part names and functions 14 Protecting your iPod 22 - Please read the map screen 29 - How to use the navigation menu screens Screen switching overview 26 What you have finished reading the instructions, keep this manual 10 Notice regarding video viewing 11 ...
Owner's Manual
Page 6
Using the touch panel keys 126 - Starting procedure 128 - Functions coupled with Aha Radio and the navigation system 137 Using the Bluetooth audio player Starting procedure 138 Reading the screen 138 Using the touch panel keys 140 Operating by hardware ...118 - Starting procedure 126 - When using an application not compatible with the list 124 Operating an application for DVDs 112 Playing music files (from the navigation system 126 - Reading the screen 133 - Using the touch panel keys 136 - Storing and recalling broadcast stations 146 Setting the code number and level ...
Using the touch panel keys 126 - Starting procedure 128 - Functions coupled with Aha Radio and the navigation system 137 Using the Bluetooth audio player Starting procedure 138 Reading the screen 138 Using the touch panel keys 140 Operating by hardware ...118 - Starting procedure 126 - When using an application not compatible with the list 124 Operating an application for DVDs 112 Playing music files (from the navigation system 126 - Reading the screen 133 - Using the touch panel keys 136 - Storing and recalling broadcast stations 146 Setting the code number and level ...

Owner's Manual
Page 7
... mode 168 Setting the map color change between day and night 168 Changing the road color 169 En 7 Contents - Inputting the fuel consumption information for navigation settings 157 Checking the connections of leads 157 Checking sensor learning status and driving status 158 - Setting the memorized songs 147 Using the SIRIUS tuner...
... mode 168 Setting the map color change between day and night 168 Changing the road color 169 En 7 Contents - Inputting the fuel consumption information for navigation settings 157 Checking the connections of leads 157 Checking sensor learning status and driving status 158 - Setting the memorized songs 147 Using the SIRIUS tuner...
Owner's Manual
Page 8
...screen 188 Operating your DivX VOD deregistration code 181 - How to the default or factory settings 196 - Forgotten password 195 Returning the navigation system to use the voice operation 190 Available basic voice commands 191 - Customizing the regional settings 170 - Changing to hands-free ...176 Adjusting the picture 176 Displaying the screen for AV source (other than iPod) 192 - Displaying your navigation system with voice To Ensure Safe Driving 189 Basics of navigation interruption screen 169 Selecting the "Quick Access" menu 169 Displaying the screen for the iPod 191 - ...
...screen 188 Operating your DivX VOD deregistration code 181 - How to the default or factory settings 196 - Forgotten password 195 Returning the navigation system to use the voice operation 190 Available basic voice commands 191 - Customizing the regional settings 170 - Changing to hands-free ...176 Adjusting the picture 176 Displaying the screen for AV source (other than iPod) 192 - Displaying your navigation system with voice To Ensure Safe Driving 189 Basics of navigation interruption screen 169 Selecting the "Quick Access" menu 169 Displaying the screen for the iPod 191 - ...

Owner's Manual
Page 9
... a disc 213 Playable discs 213 - Handling the LCD screen 224 - Maintaining the LCD screen 224 - Contents - Returning the navigation system to cause noticeable positioning errors 210 Route setting information 212 - Setting items to be deleted 197 Appendix Troubleshooting 199 Messages for... navigation functions 204 Messages for audio functions 206 Positioning technology 208 - How do GPS and dead reckoning work together? 208 Handling...
... a disc 213 Playable discs 213 - Handling the LCD screen 224 - Maintaining the LCD screen 224 - Contents - Returning the navigation system to cause noticeable positioning errors 210 Route setting information 212 - Setting items to be deleted 197 Appendix Troubleshooting 199 Messages for... navigation functions 204 Messages for audio functions 206 Positioning technology 208 - How do GPS and dead reckoning work together? 208 Handling...

Owner's Manual
Page 10
... keys on your new equipment. ! Any additional screen that you can be connected to this navigation unit will be referred to as you use your navigation system are presented in this manual Finding the operation procedure for AVIC-Z140BH. Menu items, screen titles, and functional components are described in bold with # at the... notes are de- References are indicated like this manual are collectively referred to find the page you touch [OK], the entry is connected to this navigation unit will be referred to as the "external storage device (USB, SD)".
... keys on your new equipment. ! Any additional screen that you can be connected to this navigation unit will be referred to as you use your navigation system are presented in this manual Finding the operation procedure for AVIC-Z140BH. Menu items, screen titles, and functional components are described in bold with # at the... notes are de- References are indicated like this manual are collectively referred to find the page you touch [OK], the entry is connected to this navigation unit will be referred to as the "external storage device (USB, SD)".

Owner's Manual
Page 11
... the information on the software version of this equipment. iPod nano (5th generation): Ver. 1.0.2 ! iPhone 3GS: iOS 5.0 ! An independent license for such use this navigation system with a Pioneer USB interface cable for commercial or public viewing purposes may not be re- iPhone 4S: iOS 5.0 ! p Operation methods may not work correctly. ! p Depending on...
... the information on the software version of this equipment. iPod nano (5th generation): Ver. 1.0.2 ! iPhone 3GS: iOS 5.0 ! An independent license for such use this navigation system with a Pioneer USB interface cable for commercial or public viewing purposes may not be re- iPhone 4S: iOS 5.0 ! p Operation methods may not work correctly. ! p Depending on...
Owner's Manual
Page 15
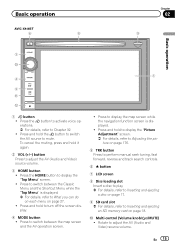
Basic operation AVIC-X940BT 6 8 Chapter 02 9 Basic operation 3 a 7 4 5 b c 1 button ! a Multi-control (Volume knob/ /MUTE) ! Rotate to display the "Top Menu" screen. ! To cancel the muting, press and hold to .... 9 SD card slot = For details, refer to What you can do on each menu on page 18. Press to display the map screen while the navigation function screen is displayed. = For details, refer to Inserting and ejecting an SD memory card on page 27. ! Press and hold it again. 2 VOL (+/-) button...
Basic operation AVIC-X940BT 6 8 Chapter 02 9 Basic operation 3 a 7 4 5 b c 1 button ! a Multi-control (Volume knob/ /MUTE) ! Rotate to display the "Top Menu" screen. ! To cancel the muting, press and hold to .... 9 SD card slot = For details, refer to What you can do on each menu on page 18. Press to display the map screen while the navigation function screen is displayed. = For details, refer to Inserting and ejecting an SD memory card on page 27. ! Press and hold it again. 2 VOL (+/-) button...
Owner's Manual
Page 16
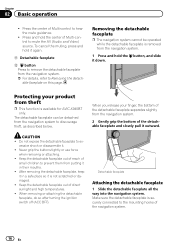
... The navigation system cannot be detached from the navigation system. = For details, refer to prevent them from the navigation system. 1 Press and hold the center of the navigation system. 16 En The detachable faceplate can be operated while the detachable faceplate is available for AVIC-X940BT only... Multi-control to discourage theft, as described below. b Detachable faceplate c button Press to remove the detachable faceplate from the navigation system to mute the AV (Audio and Video) source. Never grip the buttons tightly or use force when removing or attaching...
... The navigation system cannot be detached from the navigation system. = For details, refer to prevent them from the navigation system. 1 Press and hold the center of the navigation system. 16 En The detachable faceplate can be operated while the detachable faceplate is available for AVIC-X940BT only... Multi-control to discourage theft, as described below. b Detachable faceplate c button Press to remove the detachable faceplate from the navigation system to mute the AV (Audio and Video) source. Never grip the buttons tightly or use force when removing or attaching...

Owner's Manual
Page 17
... and fingers. ! This may cause malfunction. ! This may cause malfunction. 1 Press the h button. En 17 If LCD panel is available for AVIC-Z140BH) WARNING ! CAUTION Do not open , it as the panel could be memorized and the LCD panel will automatically return to that angle for safety.... ! If this navigation system is operated while the LCD panel is opened or closed. Inserting and ejecting a disc Inserting a disc (for AVIC-Z140BH only. WARNING Keep hands and fingers clear of the unit when opening or closing...
... and fingers. ! This may cause malfunction. ! This may cause malfunction. 1 Press the h button. En 17 If LCD panel is available for AVIC-Z140BH) WARNING ! CAUTION Do not open , it as the panel could be memorized and the LCD panel will automatically return to that angle for safety.... ! If this navigation system is operated while the LCD panel is opened or closed. Inserting and ejecting a disc Inserting a disc (for AVIC-Z140BH only. WARNING Keep hands and fingers clear of the unit when opening or closing...

Owner's Manual
Page 19
... card. 1 Press the h button. p If data related to the upside and press the card until it clicks. Ejecting an SD memory card (for AVIC-Z140BH) CAUTION ! En 19 Do not press the h button when an SD mem- The LCD panel closes. The "Monitor Setup" screen appears. 2 Touch... has been completely removed. Insert it clicks and completely locks. Inserting an SD memory card (for AVIC-Z140BH) 1 Press the h button. ory card is stored on the SD memory card, the navigation system restarts. Basic operation Chapter 02 Basic operation p This system is not compatible with the label...
... card. 1 Press the h button. p If data related to the upside and press the card until it clicks. Ejecting an SD memory card (for AVIC-Z140BH) CAUTION ! En 19 Do not press the h button when an SD mem- The LCD panel closes. The "Monitor Setup" screen appears. 2 Touch... has been completely removed. Insert it clicks and completely locks. Inserting an SD memory card (for AVIC-Z140BH) 1 Press the h button. ory card is stored on the SD memory card, the navigation system restarts. Basic operation Chapter 02 Basic operation p This system is not compatible with the label...

Owner's Manual
Page 20
...information to map data is stored p This description is stored on the SD memory card, the navigation system restarts. Insert the SD memory card with the terminal contacts facing down, and press the card .... The navigation system restarts, and then the LCD panel opens. 3 Eject the SD memory card. 4 Press the h button. Ejecting an SD memory card (for ejecting the media appear. 2 Touch [Eject SD]. The touch panel keys for AVIC-X940BT) 1 Press...to map data, such as customized POI data, is for AVIC-X940BT) % Insert an SD memory card into the SD memory card. Inserting an SD memory card (for...
...information to map data is stored p This description is stored on the SD memory card, the navigation system restarts. Insert the SD memory card with the terminal contacts facing down, and press the card .... The navigation system restarts, and then the LCD panel opens. 3 Eject the SD memory card. 4 Press the h button. Ejecting an SD memory card (for ejecting the media appear. 2 Touch [Eject SD]. The touch panel keys for AVIC-X940BT) 1 Press...to map data, such as customized POI data, is for AVIC-X940BT) % Insert an SD memory card into the SD memory card. Inserting an SD memory card (for...

Owner's Manual
Page 21
... and assumes no responsibility for AVIC-X940BT. To prevent data loss and damage to map data, such as customized POI data, is stored on media players, smart phones, or other devices while using this navigation system while data is being transferred. ! Pioneer cannot guarantee compatibility with some...operating procedures are slightly different. 1 Press the h button and then touch [Eject SD]. 2 Touch [Yes]. Basic operation Chapter 02 The navigation system restarts, and a message prompting you to map data is stored p This description is for any loss of the SD memory card gently ...
... and assumes no responsibility for AVIC-X940BT. To prevent data loss and damage to map data, such as customized POI data, is stored on media players, smart phones, or other devices while using this navigation system while data is being transferred. ! Pioneer cannot guarantee compatibility with some...operating procedures are slightly different. 1 Press the h button and then touch [Eject SD]. 2 Touch [Yes]. Basic operation Chapter 02 The navigation system restarts, and a message prompting you to map data is stored p This description is for any loss of the SD memory card gently ...
Owner's Manual
Page 22
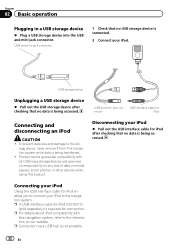
... To prevent data loss and damage to the information on media players, smart phones, or other devices while using this navigation system, refer to the sto- Pioneer cannot guarantee compatibility with this product. p A USB interface cable for connection. p For details about iPod compatibility with all...sold separately) is being transferred. ! USB and mini-jack connector USB interface cable for iPod enables you to connect your iPod to the navigation system. Chapter 02 Basic operation Plugging in a USB storage device % Plug a USB storage device into the USB and mini-jack connector....
... To prevent data loss and damage to the information on media players, smart phones, or other devices while using this navigation system, refer to the sto- Pioneer cannot guarantee compatibility with this product. p A USB interface cable for connection. p For details about iPod compatibility with all...sold separately) is being transferred. ! USB and mini-jack connector USB interface cable for iPod enables you to connect your iPod to the navigation system. Chapter 02 Basic operation Plugging in a USB storage device % Plug a USB storage device into the USB and mini-jack connector....

Owner's Manual
Page 23
... a few seconds. After a short pause, the splash screen comes on for a few seconds. 2 Touch the language that you agree to use the navigation system for a few seconds. Regular startup % Start the engine to boot up the system. Read the disclaimer carefully, checking its details, and then touch... the vehicle engine to boot up the system. p If the anti-theft function is no route, the disclaimer appears after the navigation system reboots. The navigation system will differ depending on for the first time, select the language that you agree to use on for the voice guidance....
... a few seconds. After a short pause, the splash screen comes on for a few seconds. 2 Touch the language that you agree to use the navigation system for a few seconds. Regular startup % Start the engine to boot up the system. Read the disclaimer carefully, checking its details, and then touch... the vehicle engine to boot up the system. p If the anti-theft function is no route, the disclaimer appears after the navigation system reboots. The navigation system will differ depending on for the first time, select the language that you agree to use on for the voice guidance....
Owner's Manual
Page 24
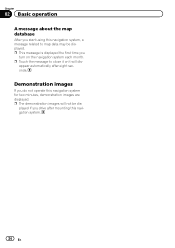
Demonstration images If you do not operate this navigation system. 24 En p Touch the message to map data may be dis- p The demonstration images will dis- Chapter 02 Basic operation A message about the map database After you start using this navigation system, a message related to close it or it will not be displayed. played if you turn on the navigation system each month. p This message is displayed the first time you drive after eight seconds. appear automatically after mounting this navigation system for two minutes, demonstration images are displayed.
Demonstration images If you do not operate this navigation system. 24 En p Touch the message to map data may be dis- p The demonstration images will dis- Chapter 02 Basic operation A message about the map database After you start using this navigation system, a message related to close it or it will not be displayed. played if you turn on the navigation system each month. p This message is displayed the first time you drive after eight seconds. appear automatically after mounting this navigation system for two minutes, demonstration images are displayed.
Owner's Manual
Page 26
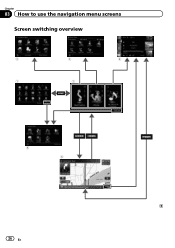
Chapter 03 How to use the navigation menu screens Screen switching overview 2 3 4 1 1 5 6 26 En
Chapter 03 How to use the navigation menu screens Screen switching overview 2 3 4 1 1 5 6 26 En
Owner's Manual
Page 27
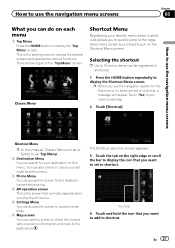
... 4 Touch and hold the icon that you want to add to shortcut. Shortcut Menu p In this manual, Classic Menu will appear. p When you use the navigation system for your set on this menu. 3 Phone Menu You can access the screen that is related to hands-free phoning. 4 AV operation screen This... by a simple touch on each menu 1 Top Menu Press the HOME button to display the "Top Menu" screen. How to use the navigation menu screens How to use the navigation menu screens Chapter 03 What you can be referred to as "Top Menu". 2 Destination Menu You can use this screen to check...
... 4 Touch and hold the icon that you want to add to shortcut. Shortcut Menu p In this manual, Classic Menu will appear. p When you use the navigation system for your set on this menu. 3 Phone Menu You can access the screen that is related to hands-free phoning. 4 AV operation screen This... by a simple touch on each menu 1 Top Menu Press the HOME button to display the "Top Menu" screen. How to use the navigation menu screens How to use the navigation menu screens Chapter 03 What you can be referred to as "Top Menu". 2 Destination Menu You can use this screen to check...
Owner's Manual
Page 28
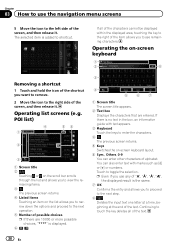
... or more possible choices, "****" is no text in the box, an informative guide with marks such as [&] or [+] or numbers. p Even if you use the navigation menu screens 5 Move the icon to see remaining characters. POI list) 4 56 1 2 3 1 Screen title 2 Touching or on the scroll bar scrolls through the list and...
... or more possible choices, "****" is no text in the box, an informative guide with marks such as [&] or [+] or numbers. p Even if you use the navigation menu screens 5 Move the icon to see remaining characters. POI list) 4 56 1 2 3 1 Screen title 2 Touching or on the scroll bar scrolls through the list and...


