Owner's Manual
Page 8
... the setting of the voice operation 189 - Adjusting the response positions of the voice operation 189 - Using balance adjustment 182 - Adjusting the equalizer curve automatically (Auto EQ) 184 - Adjusting source levels 187 - Setting the Volume for the iPod 191 - Switching the muting/attenuation level 179 - Changing to hands-free phoning 193 Tips...
... the setting of the voice operation 189 - Adjusting the response positions of the voice operation 189 - Using balance adjustment 182 - Adjusting the equalizer curve automatically (Auto EQ) 184 - Adjusting source levels 187 - Setting the Volume for the iPod 191 - Switching the muting/attenuation level 179 - Changing to hands-free phoning 193 Tips...
Owner's Manual
Page 183
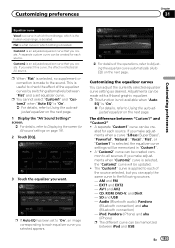
...custom curve can be created for each equalizer curve you create. Custom2 is selected, the "Custom2" curve will be cre- p If Auto EQ has been set equalizer curve. A separate "Custom1" curve can adjust the currently selected equalizer curve setting as desired. ated for each ... a curve "S.Bass (Super Bass)", "Powerful", "Natural", "Vocal", "Flat", or "Custom1" is useful to Adjusting the equalizer curve automatically (Auto EQ) on the next page. If you make adjustments when "Custom2" curve is an adjusted equalizer curve that you can be made to the following sources...
...custom curve can be created for each equalizer curve you create. Custom2 is selected, the "Custom2" curve will be cre- p If Auto EQ has been set equalizer curve. A separate "Custom1" curve can adjust the currently selected equalizer curve setting as desired. ated for each ... a curve "S.Bass (Super Bass)", "Powerful", "Natural", "Vocal", "Flat", or "Custom1" is useful to Adjusting the equalizer curve automatically (Auto EQ) on the next page. If you make adjustments when "Custom2" curve is an adjusted equalizer curve that you can be made to the following sources...
Owner's Manual
Page 184
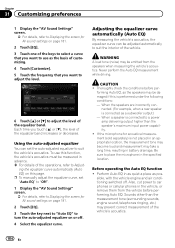
... decreases. sible, with the vehicle engine and air conditioning switched off . 4 Select the equalizer curve. Thoroughly check the conditions before performing Auto EQ. Sounds other than the speaker's maximum input power capability. ! Chapter 31 Customizing preferences 1 Display the "AV Sound Settings" screen. ...: - To use as a subwoofer output.) - p To manually adjust the equalizer curve, set the auto-adjusted equalizer to Adjust- forming Auto EQ, as pos- Before operating the Auto EQ function ! Also, cut power to car phones or cellular phones in as quiet a place as the...
... decreases. sible, with the vehicle engine and air conditioning switched off . 4 Select the equalizer curve. Thoroughly check the conditions before performing Auto EQ. Sounds other than the speaker's maximum input power capability. ! Chapter 31 Customizing preferences 1 Display the "AV Sound Settings" screen. ...: - To use as a subwoofer output.) - p To manually adjust the equalizer curve, set the auto-adjusted equalizer to Adjust- forming Auto EQ, as pos- Before operating the Auto EQ function ! Also, cut power to car phones or cellular phones in as quiet a place as the...

Owner's Manual
Page 185
... or heater may prevent correct Auto EQ. Front speakers (left /right) - The front and rear speakers will be connected. ! p For AVIC-Z140BH users Do not press the h button to the highest frequency. ! The Auto EQ may differ depending on the previous page. ! "Auto EQ" on , turn the LPF... off . If the vehicle's air conditioner or heater is turned on the "EQ Menu" screen is connected...
... or heater may prevent correct Auto EQ. Front speakers (left /right) - The front and rear speakers will be connected. ! p For AVIC-Z140BH users Do not press the h button to the highest frequency. ! The Auto EQ may differ depending on the previous page. ! "Auto EQ" on , turn the LPF... off . If the vehicle's air conditioner or heater is turned on the "EQ Menu" screen is connected...
Owner's Manual
Page 186
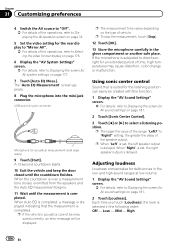
..., the greater the delay of vehicle. Each time you touch [Loudness], the level is suited for AV system settings on page 177. 7 Touch [Auto EQ Meas.]. Low - p To stop the measurement, touch [Stop]. 12 Touch [OK]. 13 Store the microphone carefully in the low- When "Right"... output is completed. When the countdown is over, a measurement tone (noise) is emitted from the speakers and the Auto EQ measurement begins. 11 Wait until the countdown finishes. When Auto EQ is completed, a message is displayed indicating that is selected in the following order: Off - High 186 En p...
..., the greater the delay of vehicle. Each time you touch [Loudness], the level is suited for AV system settings on page 177. 7 Touch [Auto EQ Meas.]. Low - p To stop the measurement, touch [Stop]. 12 Touch [OK]. 13 Store the microphone carefully in the low- When "Right"... output is completed. When the countdown is over, a measurement tone (noise) is emitted from the speakers and the Auto EQ measurement begins. 11 Wait until the countdown finishes. When Auto EQ is completed, a message is displayed indicating that is selected in the following order: Off - High 186 En p...
Owner's Manual
Page 229
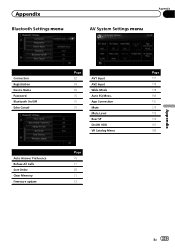
Appendix Bluetooth Settings menu Appendix AV System Settings menu Appendix Connection Registration Device Name Password Bluetooth On/Off Echo Cancel Auto Answer Preference Refuse All Calls Sort Order Clear Memory Firmware update Page 62 59 69 70 70 70 AV1 Input AV2 Input Wide Mode Auto EQ Meas. App Connection Mute Mute Level Rear SP DivX® VOD VR Catalog Menu Page 70 71 69 71 72 Page 177 178 178 184 131 179 179 179 181 180 En 229
Appendix Bluetooth Settings menu Appendix AV System Settings menu Appendix Connection Registration Device Name Password Bluetooth On/Off Echo Cancel Auto Answer Preference Refuse All Calls Sort Order Clear Memory Firmware update Page 62 59 69 70 70 70 AV1 Input AV2 Input Wide Mode Auto EQ Meas. App Connection Mute Mute Level Rear SP DivX® VOD VR Catalog Menu Page 70 71 69 71 72 Page 177 178 178 184 131 179 179 179 181 180 En 229


