Owner's Manual
Page 2
...the map screen 36 - PIONEER AVIC-X910BT, AVIC-X710BT for North American data...Video viewing 25 Notice regarding MP3 file usage 25 iPod compatibility 25 Map coverage 26 Protecting the LCD panel and screen 26 Notes on each menu 35 - Ejecting an SD memory card 30 Plugging and unplugging a USB storage device 30 - Unplugging a USB storage device 30 Connecting and disconnecting an iPod 31 - PIONEER AVIC-X910BT, AVIC...your iPod 31 - On first-time startup 31 Regular startup 32 How to use this Pioneer product. What you will know how to read through these operating instructions so you can ...
...the map screen 36 - PIONEER AVIC-X910BT, AVIC-X710BT for North American data...Video viewing 25 Notice regarding MP3 file usage 25 iPod compatibility 25 Map coverage 26 Protecting the LCD panel and screen 26 Notes on each menu 35 - Ejecting an SD memory card 30 Plugging and unplugging a USB storage device 30 - Unplugging a USB storage device 30 Connecting and disconnecting an iPod 31 - PIONEER AVIC-X910BT, AVIC...your iPod 31 - On first-time startup 31 Regular startup 32 How to use this Pioneer product. What you will know how to read through these operating instructions so you can ...
Owner's Manual
Page 4
... 80 Transferring the phone book 80 Clearing memory 81 Setting the phone 82 - Browsing embedded text information 89 Using the "Function" menu 90 Playing a DVD-Video Reading the screen 91 Using the touch panel keys 91 Searching for a specified phone 74 - Calling a number in the "Contacts" screen 79 - Stopping Bluetooth wave...
... 80 Transferring the phone book 80 Clearing memory 81 Setting the phone 82 - Browsing embedded text information 89 Using the "Function" menu 90 Playing a DVD-Video Reading the screen 91 Using the touch panel keys 91 Searching for a specified phone 74 - Calling a number in the "Contacts" screen 79 - Stopping Bluetooth wave...
Owner's Manual
Page 5
...En 5 Operating the DVD menu 93 - Playing by -frame playback 94 - Slow motion playback 98 Using the "Function" menu 99 Playing a DivX video Reading the screen 100 Using the touch panel keys 100 - Searching for a specific scene and starting playback from the list 109 - Slow motion playback... Searching for a specific scene and starting playback from USB or SD) Starting procedure 111 Reading the screen 111 Using the touch panel keys (Video) 112 - Setting the code number and level 104 Displaying your DivX VOD registration code 105 Setting "Auto Play" 105 Setting the subtitle file ...
...En 5 Operating the DVD menu 93 - Playing by -frame playback 94 - Slow motion playback 98 Using the "Function" menu 99 Playing a DivX video Reading the screen 100 Using the touch panel keys 100 - Searching for a specific scene and starting playback from the list 109 - Slow motion playback... Searching for a specific scene and starting playback from USB or SD) Starting procedure 111 Reading the screen 111 Using the touch panel keys (Video) 112 - Setting the code number and level 104 Displaying your DivX VOD registration code 105 Setting "Auto Play" 105 Setting the subtitle file ...

Owner's Manual
Page 7
...156 - Adjusting the screen brightness 157 - Displaying the "AV Sound Settings" menu 159 - Using the equalizer 160 - Using subwoofer output 162 - Setting video input 2 (AV2) 163 - Switching the sound muting/ attenuation 164 - Flow of the touch panel (touch panel calibration) 157 - POI Settings 145 -...adjustment 159 - Enhancing bass (Bass Booster) 163 Options on the "System Settings" menu 154 - Displaying the "AV System Settings" menu 163 - Setting video input 1 (AV1) 163 - Changing the wide screen mode 164 - Setting the rear output 165 - GPS & Time Settings 143 - Adjusting the ...
...156 - Adjusting the screen brightness 157 - Displaying the "AV Sound Settings" menu 159 - Using the equalizer 160 - Using subwoofer output 162 - Setting video input 2 (AV2) 163 - Switching the sound muting/ attenuation 164 - Flow of the touch panel (touch panel calibration) 157 - POI Settings 145 -...adjustment 159 - Enhancing bass (Bass Booster) 163 Options on the "System Settings" menu 154 - Displaying the "AV System Settings" menu 163 - Setting video input 1 (AV1) 163 - Changing the wide screen mode 164 - Setting the rear output 165 - GPS & Time Settings 143 - Adjusting the ...
Owner's Manual
Page 8
... Messages and how to react to hands-free phoning 171 Tips for playing a disc 191 Playable discs 192 - Built-in drive and care 191 - DVD-Video and CD 192 - DTS sound 192 8 En Detailed information for audio functions 183 Positioning technology 186 - Phone Menu 204 - Contents - Entering the password 173 - Positioning...
... Messages and how to react to hands-free phoning 171 Tips for playing a disc 191 Playable discs 192 - Built-in drive and care 191 - DVD-Video and CD 192 - DTS sound 192 8 En Detailed information for audio functions 183 Positioning technology 186 - Phone Menu 204 - Contents - Entering the password 173 - Positioning...
Owner's Manual
Page 22
p Pioneer does not bear responsibility for the accuracy of the information. This is based on a hill or otherwise might move when releasing the parking brake. If you attempt to use with a "Video image" that senses when the parking brake is set and when the vehicle is parked.... CAUTION Accuracy/performance of interlock may be obeyed. ! Chapter 01 Introduction "GOOG-411" sevice p Pioneer does not bear responsibility for changes to information services...
p Pioneer does not bear responsibility for the accuracy of the information. This is based on a hill or otherwise might move when releasing the parking brake. If you attempt to use with a "Video image" that senses when the parking brake is set and when the vehicle is parked.... CAUTION Accuracy/performance of interlock may be obeyed. ! Chapter 01 Introduction "GOOG-411" sevice p Pioneer does not bear responsibility for changes to information services...
Owner's Manual
Page 23
... mode is to keep an eye on the enclosed warranty card. CANADA Pioneer Electronics of this product. X910BT. Do not use the navigation system as an aid to use with ... contact your product to AVIC- After-sales service for connection of a display to enable passengers in a location that do not ship your dealer or nearest authorized Pioneer Service Station. CUSTOMER SUPPORT...please see the Limited Warranty sheet included with vehicles that enables the driver to watch video images while driving. tion is not available, please contact the companies listed below for ...
... mode is to keep an eye on the enclosed warranty card. CANADA Pioneer Electronics of this product. X910BT. Do not use the navigation system as an aid to use with ... contact your product to AVIC- After-sales service for connection of a display to enable passengers in a location that do not ship your dealer or nearest authorized Pioneer Service Station. CUSTOMER SUPPORT...please see the Limited Warranty sheet included with vehicles that enables the driver to watch video images while driving. tion is not available, please contact the companies listed below for ...
Owner's Manual
Page 24
Glossary Use the glossary to find the meanings of terms. Terminology Before moving images of DVD-Video, DivXâ, iPod, and any equipment that is purchased for what you want to do When you have decided what you want to as general-... "Rear Display" In this manual, the screen that are available on the screen, you refer to the body of software upgrades and software updates. "Video image" "Video image" in this navigation unit will find the page you learn how to as loss or theft. 2 Receive updates on page 154. Buttons on your...
Glossary Use the glossary to find the meanings of terms. Terminology Before moving images of DVD-Video, DivXâ, iPod, and any equipment that is purchased for what you want to do When you have decided what you want to as general-... "Rear Display" In this manual, the screen that are available on the screen, you refer to the body of software upgrades and software updates. "Video image" "Video image" in this navigation unit will find the page you learn how to as loss or theft. 2 Receive updates on page 154. Buttons on your...

Owner's Manual
Page 25
... This product supports only the following iPod models and iPod software versions. iPod fifth generation; iPod touch first generation; Notice regarding video viewing Remember that you use the latest software for commercial or public viewing purposes may constitute an infringement on the author's rights ...and/or other networks or in any right to use of iPod. iPod classic; p When you can control an iPod compatible with a Pioneer USB interface cable for private, non-commercial use and does not convey a license nor imply any commercial (i.e. En 25 Introduction Chapter 01 ...
... This product supports only the following iPod models and iPod software versions. iPod fifth generation; iPod touch first generation; Notice regarding video viewing Remember that you use the latest software for commercial or public viewing purposes may constitute an infringement on the author's rights ...and/or other networks or in any right to use of iPod. iPod classic; p When you can control an iPod compatible with a Pioneer USB interface cable for private, non-commercial use and does not convey a license nor imply any commercial (i.e. En 25 Introduction Chapter 01 ...
Owner's Manual
Page 26
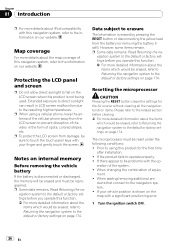
... is erased by pressing the RESET button or disconnecting the yellow lead from the LCD screen to using a cellular phone, keep the antenna of the video in LCD screen malfunction due to the information on our website. ment. ! Map coverage For more details about the map coverage of spots, colored stripes...
... is erased by pressing the RESET button or disconnecting the yellow lead from the LCD screen to using a cellular phone, keep the antenna of the video in LCD screen malfunction due to the information on our website. ment. ! Map coverage For more details about the map coverage of spots, colored stripes...
Owner's Manual
Page 28
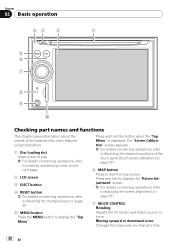
... display the "Picture Adjustment" screen. = For details concerning operations, refer to view the map screen. Moving upward or downward once; Adjusts the AV (Audio and Video) source volume. Chapter 02 Basic operation 43 2 1 5 6 7 8 9 a Checking part names and functions This chapter gives information about the names of the touch panel (touch panel...
... display the "Picture Adjustment" screen. = For details concerning operations, refer to view the map screen. Moving upward or downward once; Adjusts the AV (Audio and Video) source volume. Chapter 02 Basic operation 43 2 1 5 6 7 8 9 a Checking part names and functions This chapter gives information about the names of the touch panel (touch panel...
Owner's Manual
Page 29
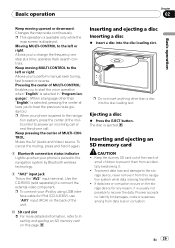
...CD-IU230V), use "AV1" input (RCA) on this navigation system while data is the "AV2" input terminal. Keep moving upward or downward; Pioneer accepts no liability for damages, costs or expenses arising from accidentally swallowing it again. 8 Bluetooth connection status indicator Lights up when your iPod by... it is selected in "Program language:". (When a language other than a disc into the disc loading slot. Mutes the AV (Audio and Video) source. To prevent data loss and damage to Inserting and ejecting an SD memory card on the back of the unit. Inserting and ejecting ...
...CD-IU230V), use "AV1" input (RCA) on this navigation system while data is the "AV2" input terminal. Keep moving upward or downward; Pioneer accepts no liability for damages, costs or expenses arising from accidentally swallowing it again. 8 Bluetooth connection status indicator Lights up when your iPod by... it is selected in "Program language:". (When a language other than a disc into the disc loading slot. Mutes the AV (Audio and Video) source. To prevent data loss and damage to Inserting and ejecting an SD memory card on the back of the unit. Inserting and ejecting ...
Owner's Manual
Page 88
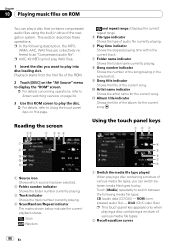
This section describes these operations. p AVIC-X910BT cannot play WAV files. 1 Insert the disc you can play into disc-loading slot. Playback starts from the first file of various media file types. 2 ... title indicator Shows the title of the album for the current song. a Artist name indicator Shows the artist name for the current song. DivX (DivX video files) p This touch panel key appears only when playing a disc containing a mixture of the ROM. 2 Touch [DISC] on the "AV Source" menu to display the...
This section describes these operations. p AVIC-X910BT cannot play WAV files. 1 Insert the disc you can play into disc-loading slot. Playback starts from the first file of various media file types. 2 ... title indicator Shows the title of the album for the current song. a Artist name indicator Shows the artist name for the current song. DivX (DivX video files) p This touch panel key appears only when playing a disc containing a mixture of the ROM. 2 Touch [DISC] on the "AV Source" menu to display the...

Owner's Manual
Page 91
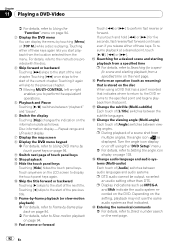
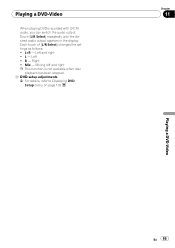
p AVIC-X710BT cannot play a DVD-Video using the built-in drive of the navigation system. Using the touch panel keys Playback screen (page1) 12 Playing a DVD-Video Reading the screen 12 3 45 6 7 8 a 3 4 5 6 9 7 8 9 ab Playback screen (page2) 12 1 Source icon Shows which source has been selected. 2 Audio track indicator Shows the audio track ... equalizer curves = For details, refer to Recalling equalizer curves on page 160. 2 Display the "Function" menu En 91 This section describes operations for playing a DVD-Video. Playing a DVD-Video Chapter 11 You can play DVDs.
p AVIC-X710BT cannot play a DVD-Video using the built-in drive of the navigation system. Using the touch panel keys Playback screen (page1) 12 Playing a DVD-Video Reading the screen 12 3 45 6 7 8 a 3 4 5 6 9 7 8 9 ab Playback screen (page2) 12 1 Source icon Shows which source has been selected. 2 Audio track indicator Shows the audio track ... equalizer curves = For details, refer to Recalling equalizer curves on page 160. 2 Display the "Function" menu En 91 This section describes operations for playing a DVD-Video. Playing a DVD-Video Chapter 11 You can play DVDs.
Owner's Manual
Page 92
Chapter 11 Playing a DVD-Video = For details, refer to Using the "Function" menu on page 94. 3 Display the DVD menu You can display the menu by touching [Menu] or [TOP M.] ...
Chapter 11 Playing a DVD-Video = For details, refer to Using the "Function" menu on page 94. 3 Display the DVD menu You can display the menu by touching [Menu] or [TOP M.] ...
Owner's Manual
Page 93
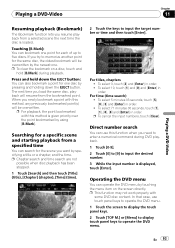
p To clear the bookmark on the screen directly. For titles, chapters ! To select 3, touch [3] and [Enter] in order. ! En 93 Playing a DVD-Video Chapter 11 Playing a DVD-Video Resuming playback (Bookmark) The Bookmark function lets you resume playback from a specified time You can search for the scene you want by specifying a title or...
p To clear the bookmark on the screen directly. For titles, chapters ! To select 3, touch [3] and [Enter] in order. ! En 93 Playing a DVD-Video Chapter 11 Playing a DVD-Video Resuming playback (Bookmark) The Bookmark function lets you resume playback from a specified time You can search for the scene you want by specifying a title or...

Owner's Manual
Page 94
... screen, then touching displays them . If so, select an item using those touch panel keys. 1 Touch [a], [b], [c] or [d] to normal playback, touch [f]. Chapter 11 Playing a DVD-Video 3 Touch the desired menu item. Using DVD menu by -frame playback This lets you touch [q] or [r] it changes the speed in four steps in the...
... screen, then touching displays them . If so, select an item using those touch panel keys. 1 Touch [a], [b], [c] or [d] to normal playback, touch [f]. Chapter 11 Playing a DVD-Video 3 Touch the desired menu item. Using DVD menu by -frame playback This lets you touch [q] or [r] it changes the speed in four steps in the...
Owner's Manual
Page 95
L+R - Mixing left and right p This function is not available when disc playback has been stopped. 3 DVD setup adjustments = For details, refer to Displaying DVD Setup menu on page 103. Touch [L/R Select] repeatedly until the desired audio output appears in the display. R - Each touch of [L/R Select] changes the settings as follows: ! L - Left ! Left and right ! Mix - Right ! Playing a DVD-Video When playing DVDs recorded with LPCM audio, you can switch the audio output. Chapter 11 Playing a DVD-Video En 95
L+R - Mixing left and right p This function is not available when disc playback has been stopped. 3 DVD setup adjustments = For details, refer to Displaying DVD Setup menu on page 103. Touch [L/R Select] repeatedly until the desired audio output appears in the display. R - Each touch of [L/R Select] changes the settings as follows: ! L - Left ! Left and right ! Mix - Right ! Playing a DVD-Video When playing DVDs recorded with LPCM audio, you can switch the audio output. Chapter 11 Playing a DVD-Video En 95

Owner's Manual
Page 96
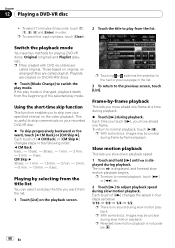
p AVIC-X710BT cannot play mode. = For details, refer to Switch the playback mode on page 98. 5 Skip forward or backward Touching [p] skips to the previous chapter. ... the playback mode = For details, refer to the start of the next chapter. Chapter 12 Playing a DVD-VR disc You can play a DVD-VR (DVD Video Recording Format) disc using the built-in drive of the current chapter. Reading the screen 12 3 4 5 6 7 8 9 Using the touch panel keys Playback screen (page1) 12...
p AVIC-X710BT cannot play mode. = For details, refer to Switch the playback mode on page 98. 5 Skip forward or backward Touching [p] skips to the previous chapter. ... the playback mode = For details, refer to the start of the next chapter. Chapter 12 Playing a DVD-VR disc You can play a DVD-VR (DVD Video Recording Format) disc using the built-in drive of the current chapter. Reading the screen 12 3 4 5 6 7 8 9 Using the touch panel keys Playback screen (page1) 12...
Owner's Manual
Page 98
... This lets you to switch the play mode. Each time you touch [r], you want from the list. 1 Touch [List] on your specified interval on the video playback. The icon is changed, playback starts from the list. p With some discs, images may be unclear during playback. To select 71 minutes 00 seconds...
... This lets you to switch the play mode. Each time you touch [r], you want from the list. 1 Touch [List] on your specified interval on the video playback. The icon is changed, playback starts from the list. p With some discs, images may be unclear during playback. To select 71 minutes 00 seconds...


