
Owner's Manual
Page 122
..." and set points to some extent. •Drive your nearest Pioneer service facility. turn off the system and check the installation. Wait for a response from the currently set the direction of the Hide-away unit correctly. No XM signal. Abnormal output of Gyrosensor is impossible. Because... ready to operate it with Vehicle Dynamics Display. a mountain) and the route calculation is detected. Confirm the installation angle. (The Navigation System must be established by bypassing toll roads (including toll areas) and Areas to -30 degrees of the horizontal, or within +30 ...
..." and set points to some extent. •Drive your nearest Pioneer service facility. turn off the system and check the installation. Wait for a response from the currently set the direction of the Hide-away unit correctly. No XM signal. Abnormal output of Gyrosensor is impossible. Because... ready to operate it with Vehicle Dynamics Display. a mountain) and the route calculation is detected. Confirm the installation angle. (The Navigation System must be established by bypassing toll roads (including toll areas) and Areas to -30 degrees of the horizontal, or within +30 ...
Installation Manual
Page 11
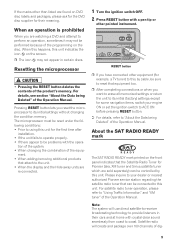
...system. • When changing the combination of the product's memory. ment. • When adding/removing additional products that attach to the unit. • When the display and the Hide-away units are found on the front panel indicates that the Satellite Radio Tuner for Pioneer (aka, XM tuner and Sirius satellite tuner which are watching a DVD... must be reset under the following conditions: • Prior to using this unit for some navigation items, switch your dealer or nearest authorized Pioneer service station regarding the satellite radio tuner that equipment too. ❒ After ...
...system. • When changing the combination of the product's memory. ment. • When adding/removing additional products that attach to the unit. • When the display and the Hide-away units are found on the front panel indicates that the Satellite Radio Tuner for Pioneer (aka, XM tuner and Sirius satellite tuner which are watching a DVD... must be reset under the following conditions: • Prior to using this unit for some navigation items, switch your dealer or nearest authorized Pioneer service station regarding the satellite radio tuner that equipment too. ❒ After ...

Other Manual
Page 2
... contrary advice. • Certain government laws may not be possible to install this Navigation System in your vehicle. It is not a substitute for Navigation System. • Do not install the display unit or Hide-away unit where it may restrict the placement and use this Navigation System to route to you in the operation of your vehicle. IMPORTANT INFORMATION ABOUT...
... contrary advice. • Certain government laws may not be possible to install this Navigation System in your vehicle. It is not a substitute for Navigation System. • Do not install the display unit or Hide-away unit where it may restrict the placement and use this Navigation System to route to you in the operation of your vehicle. IMPORTANT INFORMATION ABOUT...

Other Manual
Page 3
... video component and the display 16 - Parts supplied - Installing the Hide-away unit - DIN Front-mount - English Contents IMPORTANT INFORMATION 1 ABOUT YOUR NEW NAVIGATION SYSTEM AND THIS MANUAL 1 IMPORTANT SAFEGUARDS 3 PLEASE READ ALL OF THESE INSTRUCTIONS REGARDING YOUR NAVIGATION SYSTEM AND RETAIN THEM FOR FUTURE REFERENCE 3 Connecting the System 4 - To prevent damage - When installing the antenna inside the...
... video component and the display 16 - Parts supplied - Installing the Hide-away unit - DIN Front-mount - English Contents IMPORTANT INFORMATION 1 ABOUT YOUR NEW NAVIGATION SYSTEM AND THIS MANUAL 1 IMPORTANT SAFEGUARDS 3 PLEASE READ ALL OF THESE INSTRUCTIONS REGARDING YOUR NAVIGATION SYSTEM AND RETAIN THEM FOR FUTURE REFERENCE 3 Connecting the System 4 - To prevent damage - When installing the antenna inside the...
Other Manual
Page 5
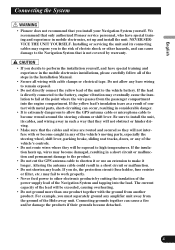
... the ground from the ground of the Hide-away unit. Connecting grounds together can occur, resulting in considerable danger. • It is not covered by cutting the insulation of the power supply lead of the Navigation System and tapping into the engine compartment. We...their grounds became detached. 4 Français Italiano Nederlands English Español Deutsch Connecting the System • Pioneer does not recommend that only authorized Pioneer service personnel, who have special training and experience in the mobile electronics installations, please carefully follow ...
... the ground from the ground of the Hide-away unit. Connecting grounds together can occur, resulting in considerable danger. • It is not covered by cutting the insulation of the power supply lead of the Navigation System and tapping into the engine compartment. We...their grounds became detached. 4 Français Italiano Nederlands English Español Deutsch Connecting the System • Pioneer does not recommend that only authorized Pioneer service personnel, who have special training and experience in the mobile electronics installations, please carefully follow ...

Other Manual
Page 6
...Hide-away unit. Do not ground more than one product together with a 12-volt battery and negative grounding. Connecting grounds together can cause a fire and/or damage the products if their grounds became detached. • Refer to the owner's manual for vehicles with the ground from another product. Connecting the System Before installing the unit... • This unit is for details on the fuse holder. • Since a unique BPTL circuit is employed,...
...Hide-away unit. Do not ground more than one product together with a 12-volt battery and negative grounding. Connecting grounds together can cause a fire and/or damage the products if their grounds became detached. • Refer to the owner's manual for vehicles with the ground from another product. Connecting the System Before installing the unit... • This unit is for details on the fuse holder. • Since a unique BPTL circuit is employed,...
Other Manual
Page 7
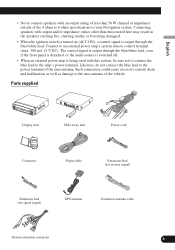
... of the auto antenna. Parts supplied Español Deutsch Français Italiano Display unit Hide-away unit Power cord Connector 30-pin cable Extension lead (for reverse signal) Extension lead (for speed signal) GPS antenna Extension antenna cable System extension connector 6 Nederlands English • Never connect speakers with an output rating of less... external power amp is output through the blue/white lead. Such connection could cause excessive current drain and malfunction as well as damage to your Navigation system.
... of the auto antenna. Parts supplied Español Deutsch Français Italiano Display unit Hide-away unit Power cord Connector 30-pin cable Extension lead (for reverse signal) Extension lead (for speed signal) GPS antenna Extension antenna cable System extension connector 6 Nederlands English • Never connect speakers with an output rating of less... external power amp is output through the blue/white lead. Such connection could cause excessive current drain and malfunction as well as damage to your Navigation system.
Other Manual
Page 8
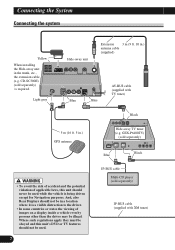
...unit's DVD or TV features should not be used . 7 IP-BUS cable Multi-CD player (sold separately) is a visible distraction to the driver. • In some countries or states the viewing of images on a display inside a vehicle even by persons other than the driver may be illegal. Light gray Hide-away unit... and this unit should not be in the trunk, etc., the extension cable (e.g. And, also Rear Displays should never be used while the vehicle is being driven except for Navigation purposes. Connecting the System Connecting the system Yellow When installing the Hide-away unit in a ...
...unit's DVD or TV features should not be used . 7 IP-BUS cable Multi-CD player (sold separately) is a visible distraction to the driver. • In some countries or states the viewing of images on a display inside a vehicle even by persons other than the driver may be illegal. Light gray Hide-away unit... and this unit should not be in the trunk, etc., the extension cable (e.g. And, also Rear Displays should never be used while the vehicle is being driven except for Navigation purposes. Connecting the System Connecting the system Yellow When installing the Hide-away unit in a ...
Other Manual
Page 9
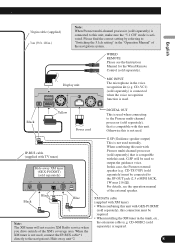
...-P10XMT (sold separately), this unit. When combining this unit with Pioneer multi-channel processor (sold separately) that is compatible with this connection must be connected to "Switching the 5.1ch setting" in the "Operation Manual" of the navigation system. XM DATA cable (supplied with... 3 m (9 ft. 10 in.) Note: When Pioneer multi-channel processor (sold separately) is connected to the navigation's Hide-away unit*2. Otherwise this is not used , connect the IP-BUS cable*1 directly to this case, the Pioneer external speaker (e.g. Please find the correct setting by referring...
...-P10XMT (sold separately), this unit. When combining this unit with Pioneer multi-channel processor (sold separately) that is compatible with this connection must be connected to "Switching the 5.1ch setting" in the "Operation Manual" of the navigation system. XM DATA cable (supplied with... 3 m (9 ft. 10 in.) Note: When Pioneer multi-channel processor (sold separately) is connected to the navigation's Hide-away unit*2. Otherwise this is not used , connect the IP-BUS cable*1 directly to this case, the Pioneer external speaker (e.g. Please find the correct setting by referring...
Other Manual
Page 12
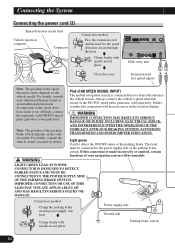
... Note: The position of the speed detection circuit depends on the vehicle model. Pink (CAR SPEED SIGNAL INPUT) The mobile navigation system is too difficult, connect the separately sold separately. IMPROPER CONNECTION OR USE OF THIS LEAD MAY VIOLATE APPLICABLE LAW AND MAY ... owner's manual or dealer. Clamp firmly with needle-nosed pliers. Hide-away unit Extension lead (for the speed detection circuit through this connection is made incorrectly or omitted, certain functions of your authorized Pioneer dealer or an installation professional. If connection to the speed detection circuit...
... Note: The position of the speed detection circuit depends on the vehicle model. Pink (CAR SPEED SIGNAL INPUT) The mobile navigation system is too difficult, connect the separately sold separately. IMPROPER CONNECTION OR USE OF THIS LEAD MAY VIOLATE APPLICABLE LAW AND MAY ... owner's manual or dealer. Clamp firmly with needle-nosed pliers. Hide-away unit Extension lead (for the speed detection circuit through this connection is made incorrectly or omitted, certain functions of your authorized Pioneer dealer or an installation professional. If connection to the speed detection circuit...
Other Manual
Page 16
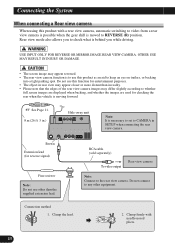
...not use other equipment. RCA cable (sold separately) To video output Rear view camera Note: Connect to check what is moving forward. Connecting the System When connecting a Rear view camera When using this product with needle-nosed pliers. 15 Do not connect to any other than in reality. &#... may differ slightly according to keep an eye on trailers, or backing into a tight parking spot. See Page 11. 8 m (26 ft. 3 in.) Hide-away unit Note: It is moved to CAMERA in rear view may appear closer or more distant than the supplied extension lead. Clamp firmly with a rear view...
...not use other equipment. RCA cable (sold separately) To video output Rear view camera Note: Connect to check what is moving forward. Connecting the System When connecting a Rear view camera When using this product with needle-nosed pliers. 15 Do not connect to any other than in reality. &#... may differ slightly according to keep an eye on trailers, or backing into a tight parking spot. See Page 11. 8 m (26 ft. 3 in.) Hide-away unit Note: It is moved to CAMERA in rear view may appear closer or more distant than the supplied extension lead. Clamp firmly with a rear view...

Other Manual
Page 17
...DVD, etc. • NEVER install the rear display in a location that appear on the front display. Español Deutsch Français Italiano RCA cables (sold separately) To audio outputs To video output External video component (sold separately) To audio inputs Display with RCA input jacks To video input Hide-away unit... Note: The map screen navigation images output to the rear display differ from standard NTSC format images. English When connecting the external...
...DVD, etc. • NEVER install the rear display in a location that appear on the front display. Español Deutsch Français Italiano RCA cables (sold separately) To audio outputs To video output External video component (sold separately) To audio inputs Display with RCA input jacks To video input Hide-away unit... Note: The map screen navigation images output to the rear display differ from standard NTSC format images. English When connecting the external...
Other Manual
Page 18
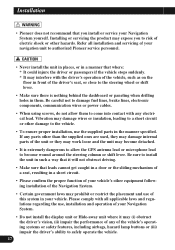
...or microphone lead to a short circuit or other hazards. Please comply with all installation and servicing of your Navigation System. • Do not install the display unit or Hide-away unit where it will not obstruct driving. • Make sure that you to risk of electric shock or ... in the manner specified. Refer all applicable laws and regulations regarding the use, installation and operation of your navigation unit to authorized Pioneer service personnel. • Never install the unit in places, or in a manner that where: * It could injure the driver or passengers if the vehicle...
...or microphone lead to a short circuit or other hazards. Please comply with all installation and servicing of your Navigation System. • Do not install the display unit or Hide-away unit where it will not obstruct driving. • Make sure that you to risk of electric shock or ... in the manner specified. Refer all applicable laws and regulations regarding the use, installation and operation of your navigation unit to authorized Pioneer service personnel. • Never install the unit in places, or in a manner that where: * It could injure the driver or passengers if the vehicle...

Other Manual
Page 19
... prevent interference, set the following items as far as possible from the display unit and Hide-away unit of the vehicle's operating systems, including airbags and headrests. GPS antenna and its lead - Such electromagnetic noise will impair the performance of any of this Navigation System, other antenna leads. Do not bind them together, lay or route them...
... prevent interference, set the following items as far as possible from the display unit and Hide-away unit of the vehicle's operating systems, including airbags and headrests. GPS antenna and its lead - Such electromagnetic noise will impair the performance of any of this Navigation System, other antenna leads. Do not bind them together, lay or route them...

Other Manual
Page 20
... 30° 30° • If installation angle exceeds 30º from horizontal, the display unit might not give its optimum performance. 30° 19 Unless the display unit or Hide-away unit are securely attached, the current location of the vehicle cannot be displayed correctly. • Do not ... +30 degrees to -30 degrees tolerance (within five degrees to bear the weight of travel). Mis-installing the unit with the display unit installed. • Install the Hide-away unit horizontally on top of the dashboard or the rear shelf. * Places that may be ejected with the surface tilted...
... 30° 30° • If installation angle exceeds 30º from horizontal, the display unit might not give its optimum performance. 30° 19 Unless the display unit or Hide-away unit are securely attached, the current location of the vehicle cannot be displayed correctly. • Do not ... +30 degrees to -30 degrees tolerance (within five degrees to bear the weight of travel). Mis-installing the unit with the display unit installed. • Install the Hide-away unit horizontally on top of the dashboard or the rear shelf. * Places that may be ejected with the surface tilted...

Other Manual
Page 21
... area shown in the trunk, use the extension cable (e.g. Display unit Hide-away unit Do not cover this area. • The semiconductor laser will be damaged if it overheats, so don't install the unit anywhere hot - Do not cover this area. Español ...unit in a position where the opening of the display unit. This may cause interference with the shift lever, or a malfunction of the mechanism of the LCD panel is necessary to allow the amplifiers and navigation mechanism to heat dissipate freely. for instance, near a heater outlet. • When installing the Hide-away unit...
... area shown in the trunk, use the extension cable (e.g. Display unit Hide-away unit Do not cover this area. • The semiconductor laser will be damaged if it overheats, so don't install the unit anywhere hot - Do not cover this area. Español ...unit in a position where the opening of the display unit. This may cause interference with the shift lever, or a malfunction of the mechanism of the LCD panel is necessary to allow the amplifiers and navigation mechanism to heat dissipate freely. for instance, near a heater outlet. • When installing the Hide-away unit...

Other Manual
Page 22
Installation Parts supplied Display unit Screw Holder Side bracket (2 pcs.) Rubber bushing Binding screw (5 × 6 mm) (4 pcs.) Flush surface screw (5 × 6 mm) (4 pcs.) Frame Screw (4 × 3 mm) (4 pcs.) Fixing screw (2 pcs.) Conceal tape Hide-away unit Side bracket (2 pcs.) Washer faced screw (4 × 8 mm) (4 pcs.) Self-tapping screw (6 × 16 mm) (4 pcs.) 21
Installation Parts supplied Display unit Screw Holder Side bracket (2 pcs.) Rubber bushing Binding screw (5 × 6 mm) (4 pcs.) Flush surface screw (5 × 6 mm) (4 pcs.) Frame Screw (4 × 3 mm) (4 pcs.) Fixing screw (2 pcs.) Conceal tape Hide-away unit Side bracket (2 pcs.) Washer faced screw (4 × 8 mm) (4 pcs.) Self-tapping screw (6 × 16 mm) (4 pcs.) 21

Other Manual
Page 23
... holes in this position. English • Install with the holes in the Hideaway unit. Forward/Backward direction of travel . When the Hide-away unit is facing up with the left and right sides of the Hide-away unit perpendicular or parallel to install the Hide-away unit on the floor with the silk printing side is installed on the floor...çais Italiano • Be sure to your vehicle's direction of travel or the current location will operate properly only in the side brackets. The navigation system will be attached to the Hide-away unit. Attach the side brackets to the...
... holes in this position. English • Install with the holes in the Hideaway unit. Forward/Backward direction of travel . When the Hide-away unit is facing up with the left and right sides of the Hide-away unit perpendicular or parallel to install the Hide-away unit on the floor with the silk printing side is installed on the floor...çais Italiano • Be sure to your vehicle's direction of travel or the current location will operate properly only in the side brackets. The navigation system will be attached to the Hide-away unit. Attach the side brackets to the...

Other Manual
Page 24
Installation When the Hide-away unit is installed under the passenger seat, etc., use the installation board. 2. Self-tapping screw (6 × 16 mm) 23 Installation board Mark up the positions for drilling the holes. Decide on the installation position, and drill the holes. Secure it firmly using the self-tapping screws. Drill holes of between 4 and 4.5 mm in diameter. 3.
Installation When the Hide-away unit is installed under the passenger seat, etc., use the installation board. 2. Self-tapping screw (6 × 16 mm) 23 Installation board Mark up the positions for drilling the holes. Decide on the installation position, and drill the holes. Secure it firmly using the self-tapping screws. Drill holes of between 4 and 4.5 mm in diameter. 3.
Other Manual
Page 30
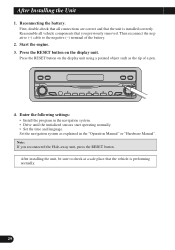
... sure to the negative (-) terminal of a pen. 4. Press the RESET button on the display unit using a pointed object such as explained in the navigation system. • Drive until the initialized sensors start operating normally. • Set the time and language. Enter ..."Operation Manual" or "Hardware Manual". After Installing the Unit 1. Reconnecting the battery. Start the engine. 3. Set the navigation system as the tip of the battery. 2. Reassemble all connections are correct and that you reconnected the Hide-away unit, press the RESET button. First, double-check that ...
... sure to the negative (-) terminal of a pen. 4. Press the RESET button on the display unit using a pointed object such as explained in the navigation system. • Drive until the initialized sensors start operating normally. • Set the time and language. Enter ..."Operation Manual" or "Hardware Manual". After Installing the Unit 1. Reconnecting the battery. Start the engine. 3. Set the navigation system as the tip of the battery. 2. Reassemble all connections are correct and that you reconnected the Hide-away unit, press the RESET button. First, double-check that ...


