Owner's Manual
Page 12
... tracks in the Audio Screen 129 AUDIO menu 129 INITIAL menu 129 SET UP menu 129 FUNCTION menu 130 FUNCTION 4 94 Switching the automatic and manual function 95 AUX 95 Selecting AUX as the source 95 AV Input (AV) 95 Selecting AV as the source 95 Changing the wide screen mode... controller 100 Switching the muting/attenuation 101 Changing the voice output of the navigation guidance 102 Switching the auto antenna setting 102 Other Functions 102 Setup adjustments 102 Setting the video input 102 Setting for rear view camera 102 Selecting the video of rear display 103 Switching the dimmer setting 103...
... tracks in the Audio Screen 129 AUDIO menu 129 INITIAL menu 129 SET UP menu 129 FUNCTION menu 130 FUNCTION 4 94 Switching the automatic and manual function 95 AUX 95 Selecting AUX as the source 95 AV Input (AV) 95 Selecting AV as the source 95 Changing the wide screen mode... controller 100 Switching the muting/attenuation 101 Changing the voice output of the navigation guidance 102 Switching the auto antenna setting 102 Other Functions 102 Setup adjustments 102 Setting the video input 102 Setting for rear view camera 102 Selecting the video of rear display 103 Switching the dimmer setting 103...
Owner's Manual
Page 94
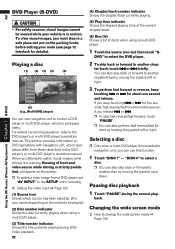
DVD" to select the DVD player. 2 To skip back or forward to watch a video image from those described in the SETUP menu correctly. ➲ Setting the video input ➞ Page 102 (1) Source icon Shows which is sold separately. This section provides information on DVD... from a DVD player, set "AV INPUT" in the DVD player's or multi-DVD player's operation manual. ter/track, touch or briefly. When you release or . ❒ To stop in motion. Using the AV Source (Pioneer AV Equipment) Chapter 7 S-DVD AV DVD Player (S-DVD) • For safety reasons, visual images ...
DVD" to select the DVD player. 2 To skip back or forward to watch a video image from those described in the SETUP menu correctly. ➲ Setting the video input ➞ Page 102 (1) Source icon Shows which is sold separately. This section provides information on DVD... from a DVD player, set "AV INPUT" in the DVD player's or multi-DVD player's operation manual. ter/track, touch or briefly. When you release or . ❒ To stop in motion. Using the AV Source (Pioneer AV Equipment) Chapter 7 S-DVD AV DVD Player (S-DVD) • For safety reasons, visual images ...
Owner's Manual
Page 107
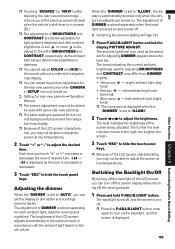
... When the "DIMMER" is set to "AUTO", you can adjust the picture adjustment for the rear view camera only when CAMERA in SETUP menu is displayed to the left of DIMMER is automatically dimmed only when the vehicle's headlights are turned on the set the display to... and navigation map display. ❒ You can set values. A sun or moon is turned on. ➲ Setting for rear view camera ➞ Operation Manual ❒ The picture adjustment may differ from DIMMER slightly. • Yellow sun - The adjustment of BRIGHTNESS and CONTRAST, respectively, as the surroundings become darker....
... When the "DIMMER" is set to "AUTO", you can adjust the picture adjustment for the rear view camera only when CAMERA in SETUP menu is displayed to the left of DIMMER is automatically dimmed only when the vehicle's headlights are turned on the set the display to... and navigation map display. ❒ You can set values. A sun or moon is turned on. ➲ Setting for rear view camera ➞ Operation Manual ❒ The picture adjustment may differ from DIMMER slightly. • Yellow sun - The adjustment of BRIGHTNESS and CONTRAST, respectively, as the surroundings become darker....
Owner's Manual
Page 118
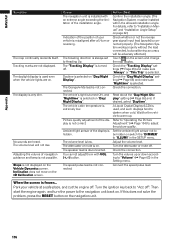
... Turn the attenuator or mute off ". When the screen is misaligned after a U-turn the power to "Volume" (➞ Page 63) in the SETUP menu. Then start the engine again, and turn or reversing. No sounds are not displayed. Indication of the position of the display is installed with...Wait for the vehicle to "Acc off . Set the ambient light sensor not to be hidden or switch the "DIMMER" to "Installation Manual" and "Installation Angle Setup" on the Vehicle Dynamics screen. If this does not solve the problem, press the RESET button on the 3D Calibration screen. Cause The...
... Turn the attenuator or mute off ". When the screen is misaligned after a U-turn the power to "Volume" (➞ Page 63) in the SETUP menu. Then start the engine again, and turn or reversing. No sounds are not displayed. Indication of the position of the display is installed with...Wait for the vehicle to "Acc off . Set the ambient light sensor not to be hidden or switch the "DIMMER" to "Installation Manual" and "Installation Angle Setup" on the Vehicle Dynamics screen. If this does not solve the problem, press the RESET button on the 3D Calibration screen. Cause The...
Owner's Manual
Page 120
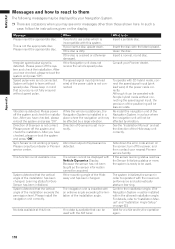
... status or more, the system is set the direction of Gyrosensor is not the appropriate disc. For details, refer to "Installation Manual" and "Installation Angle Setup" on page 62.) Wait for Gyro Sensor has been initialized. Please keep in a place where the navigation unit may see error... If you try the operation again. 118 The screen cannot be displayed with the label upward. Clean the disc. Consult your dealer or Pioneer service center. NAVI/AV Appendix Messages and how to react to them The following messages may be displayed by your Navigation System. ❒...
... status or more, the system is set the direction of Gyrosensor is not the appropriate disc. For details, refer to "Installation Manual" and "Installation Angle Setup" on page 62.) Wait for Gyro Sensor has been initialized. Please keep in a place where the navigation unit may see error... If you try the operation again. 118 The screen cannot be displayed with the label upward. Clean the disc. Consult your dealer or Pioneer service center. NAVI/AV Appendix Messages and how to react to them The following messages may be displayed by your Navigation System. ❒...

Other Manual
Page 16
.../white Brown 15 cm (5 - 7/8 in.) Brawn (REAR VIEW CAMERA IN) Note: It is necessary to set to "CAMERA" in "SETUP" when connecting the rear view camera. (For details, see the "Operation Manual") This product Extension lead (for entertainment purposes. • The object in rear view may appear closer or more distant than...
.../white Brown 15 cm (5 - 7/8 in.) Brawn (REAR VIEW CAMERA IN) Note: It is necessary to set to "CAMERA" in "SETUP" when connecting the rear view camera. (For details, see the "Operation Manual") This product Extension lead (for entertainment purposes. • The object in rear view may appear closer or more distant than...


