Owner's Manual
Page 6
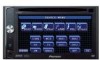
... safe location and make necessary adjustments. 7 Please remember to wear your display and retain them for future reference. 1 Read this unit's DVD features should never be illegal. NECTOR IS DESIGNED TO DETECT PARKED STATUS AND MUST BE CONNECTED TO THE POWER SUPPLY SIDE OF THE PARKING ...carefully be used while the vehicle is being driven. Section 01 Precautions IMPORTANT SAFEGUARDS Please read and understood the operating instructions. 5 Do not install the display where it is a visible distraction to the driver. ! To avoid the risk of accident and the potential violation of front ...
... safe location and make necessary adjustments. 7 Please remember to wear your display and retain them for future reference. 1 Read this unit's DVD features should never be illegal. NECTOR IS DESIGNED TO DETECT PARKED STATUS AND MUST BE CONNECTED TO THE POWER SUPPLY SIDE OF THE PARKING ...carefully be used while the vehicle is being driven. Section 01 Precautions IMPORTANT SAFEGUARDS Please read and understood the operating instructions. 5 Do not install the display where it is a visible distraction to the driver. ! To avoid the risk of accident and the potential violation of front ...
Owner's Manual
Page 7
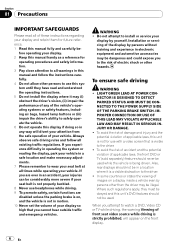
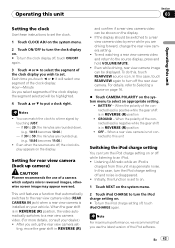
...in a safe place, and (1) apply the parking brake, (2) release the parking brake, and then (3) apply the parking brake again. WARNING NEVER install the rear display in battery drainage. ! To prevent such functions from being used while driving. Do not use this unit is returned to REAR... MONITOR OUTPUT This unit's REAR MONITOR OUTPUT is set. When using a display connected to its initial condition. Precautions Section 01 Precautions To watch the DVD or TV. When using a rear view camera With an optional rear ...
...in a safe place, and (1) apply the parking brake, (2) release the parking brake, and then (3) apply the parking brake again. WARNING NEVER install the rear display in battery drainage. ! To prevent such functions from being used while driving. Do not use this unit is returned to REAR... MONITOR OUTPUT This unit's REAR MONITOR OUTPUT is set. When using a display connected to its initial condition. Precautions Section 01 Precautions To watch the DVD or TV. When using a rear view camera With an optional rear ...
Owner's Manual
Page 13
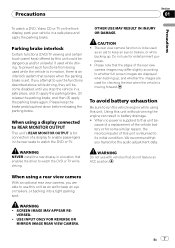
...the bookmark information. What the marks on DVDs indicate The marks below may not appear with a pen tip or other pointed instrument. When this unit for the first time after installation ! Before You Start Section 02 Before You Start For viewing LCD comfortably Due to its construction, the ...viewing angle of the LCD screen is possible. When an operation is prohibited When you can also dim...
...the bookmark information. What the marks on DVDs indicate The marks below may not appear with a pen tip or other pointed instrument. When this unit for the first time after installation ! Before You Start Section 02 Before You Start For viewing LCD comfortably Due to its construction, the ...viewing angle of the LCD screen is possible. When an operation is prohibited When you can also dim...
Owner's Manual
Page 43
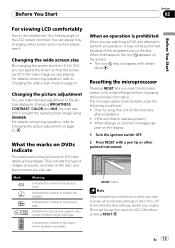
...30 to 59, the minutes are rounded down. (e.g., 10:18 becomes 10:00.) - Setting for rear view camera (back up camera) CAUTION Pioneer recommends the use the latest version of a camera which outputs mirror reversed images, otherwise screen image may generate noise. BATTERY - Note For maximum ...of the clock display: Hour-Minute As you select segments of the clock display you use of the iPod software. When the gear shift is installed on the system menu to select an appropriate setting. ! To do this unit may appear reversed. For details, refer to Selecting a source...
...30 to 59, the minutes are rounded down. (e.g., 10:18 becomes 10:00.) - Setting for rear view camera (back up camera) CAUTION Pioneer recommends the use the latest version of a camera which outputs mirror reversed images, otherwise screen image may generate noise. BATTERY - Note For maximum ...of the clock display: Hour-Minute As you select segments of the clock display you use of the iPod software. When the gear shift is installed on the system menu to select an appropriate setting. ! To do this unit may appear reversed. For details, refer to Selecting a source...
Owner's Manual
Page 74
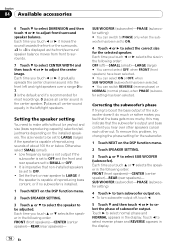
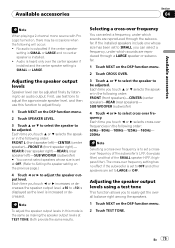
... time you touch a or b selects the speaker in the display. Set the front or rear speaker to LARGE if the speaker is installed. 1 Touch NEXT on the installed speakers. SUB WOOFER (subwoofer)-PHASE (subwoofer setting) # You can switch REVERSE (reverse phase) or NORMAL (normal phase), when PHASE ...touch c or d it gradually spreads the center channel sound into the front left /right speakers. To remove this may indicate that non-installed speakers be adjusted. Section 04 Available accessories 6 Touch b to select DIMENSION and then touch c or d to select the correct size for...
... time you touch a or b selects the speaker in the display. Set the front or rear speaker to LARGE if the speaker is installed. 1 Touch NEXT on the installed speakers. SUB WOOFER (subwoofer)-PHASE (subwoofer setting) # You can switch REVERSE (reverse phase) or NORMAL (normal phase), when PHASE ...touch c or d it gradually spreads the center channel sound into the front left /right speakers. To remove this may indicate that non-installed speakers be adjusted. Section 04 Available accessories 6 Touch b to select DIMENSION and then touch c or d to select the correct size for...
Owner's Manual
Page 75
... to select cross-over frequency is set a crossover frequency of the subwoofer's L.P.F. (low-pass filter) and that of the SMALL speaker H.P.F. (highpass filter). If the installed speakers include one whose size is to be adjusted. Each time you touch a or b selects the speaker in the following order: FRONT L (front speaker left... the speakers. 1 Touch NEXT on , there may be adjusted finely by listening to adjust the speaker output level. The cross-over the center speaker if installed and the center speaker setting is...
... to select cross-over frequency is set a crossover frequency of the subwoofer's L.P.F. (low-pass filter) and that of the SMALL speaker H.P.F. (highpass filter). If the installed speakers include one whose size is to be adjusted. Each time you touch a or b selects the speaker in the following order: FRONT L (front speaker left... the speakers. 1 Touch NEXT on , there may be adjusted finely by listening to adjust the speaker output level. The cross-over the center speaker if installed and the center speaker setting is...

Owner's Manual
Page 81
... sure the remote control selection switch setting and code type setting are not connected correctly. Non compatible video system disc Change to a disc compatible to install a fuse with the disc's organization. Cables are the same. The icon is incorrect. The picture stops (pauses) and Reading of data has become impos- The...
... sure the remote control selection switch setting and code type setting are not connected correctly. Non compatible video system disc Change to a disc compatible to install a fuse with the disc's organization. Cables are the same. The icon is incorrect. The picture stops (pauses) and Reading of data has become impos- The...
Other Manual
Page 1
... not recommend that wires will not obstruct driving. • Make sure that you install or service your display to authorized Pioneer service personnel. • Secure all cables away from the passenger compartment into the engine compartment. Engine vibration may eventually cause the ...(8 pcs.) Binding screw (5 × 6 mm) (8 pcs.) Touch panel pen Do not pass the yellow cable through blue/white cable when this unit's DVD features should never be installed in order to share the power to connect the yellow lead of electric shock or other than the driver may fail to become...
... not recommend that wires will not obstruct driving. • Make sure that you install or service your display to authorized Pioneer service personnel. • Secure all cables away from the passenger compartment into the engine compartment. Engine vibration may eventually cause the ...(8 pcs.) Binding screw (5 × 6 mm) (8 pcs.) Touch panel pen Do not pass the yellow cable through blue/white cable when this unit's DVD features should never be installed in order to share the power to connect the yellow lead of electric shock or other than the driver may fail to become...
Other Manual
Page 2
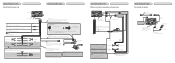
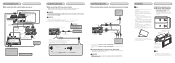
...USB cable Connect to detect the ON/OFF status of the parking brake switch depends on that are not connected to multi-channel processor's installation manual for the connection method. Front speaker Rear speaker or Subwoofer Note: · Change ...these connections when using a subwoofer of 70 W (2 Ω), be connected to lighting switch terminal. Gray 2 m (6 ft.7 in .) Multi-CD player (sold multi-channel processor (e.g., DEQ-P8000) to this unit, do not connect anything to connect with Violet and Violet/black leads of equipment. Orange/white...
...USB cable Connect to detect the ON/OFF status of the parking brake switch depends on that are not connected to multi-channel processor's installation manual for the connection method. Front speaker Rear speaker or Subwoofer Note: · Change ...these connections when using a subwoofer of 70 W (2 Ω), be connected to lighting switch terminal. Gray 2 m (6 ft.7 in .) Multi-CD player (sold multi-channel processor (e.g., DEQ-P8000) to this unit, do not connect anything to connect with Violet and Violet/black leads of equipment. Orange/white...
Other Manual
Page 3
...the one video component with this unit where: - Connection method 1. Note: · It is necessary to set AV INPUT to S-DVD in SYSTEM MENU when connecting a multi-DVD player. Install this product is used as near the heater outlet. • Optimum performance is obtained when the unit is...separately) Rear monitor output To video output Audio input To audio outputs External video component (sold multi-channel processor, the optical cable from the video to rear view image when the gear shift is moved to REVERSE (R). it is possible to automatically switch from DVD player must use...
...the one video component with this unit where: - Connection method 1. Note: · It is necessary to set AV INPUT to S-DVD in SYSTEM MENU when connecting a multi-DVD player. Install this product is used as near the heater outlet. • Optimum performance is obtained when the unit is...separately) Rear monitor output To video output Audio input To audio outputs External video component (sold multi-channel processor, the optical cable from the video to rear view image when the gear shift is moved to REVERSE (R). it is possible to automatically switch from DVD player must use...


