Owner's Manual
Page 3
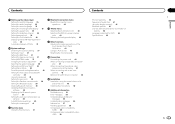
... 43 Selecting the background display 43 Other functions Adjusting the response positions of the touch panels (Touch Panel Calibration) 43 Using an AUX source 43 Resetting the microprocessor 44 Connection Connecting the power cord 46 When connecting to separately sold power amp 47 When connecting the external video component and the...
... 43 Selecting the background display 43 Other functions Adjusting the response positions of the touch panels (Touch Panel Calibration) 43 Using an AUX source 43 Resetting the microprocessor 44 Connection Connecting the power cord 46 When connecting to separately sold power amp 47 When connecting the external video component and the...

Owner's Manual
Page 7
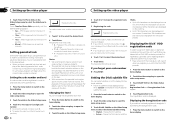
.... 7 c/d (TRK) 8 h (eject) 9 Auto EQ microphone input jack Use to Resetting the microprocessor on page 10. 4 Source off key Turning the source off . AVH-X3500BHS, AVH-X2500BTand AVH-X1500DVD 8 a 1 3 4 5 6 7 1 RESET For details refer to connect an auto EQ microphone. When an iPhone that is running an ... Theme menu. 7 Menu icon Displaying the menu. 8 Source key Displaying the source menu. What's what What's what Section 03 English Head unit AVH-X5500BHS and AVH-X4500BT 3 +/- (VOLUME/VOL) 4 MUTE Press to unmute. 12 3 45 6 7 8 9 a 5 Home button Displaying the home display...
.... 7 c/d (TRK) 8 h (eject) 9 Auto EQ microphone input jack Use to Resetting the microprocessor on page 10. 4 Source off key Turning the source off . AVH-X3500BHS, AVH-X2500BTand AVH-X1500DVD 8 a 1 3 4 5 6 7 1 RESET For details refer to connect an auto EQ microphone. When an iPhone that is running an ... Theme menu. 7 Menu icon Displaying the menu. 8 Source key Displaying the source menu. What's what What's what Section 03 English Head unit AVH-X5500BHS and AVH-X4500BT 3 +/- (VOLUME/VOL) 4 MUTE Press to unmute. 12 3 45 6 7 8 9 a 5 Home button Displaying the home display...
Owner's Manual
Page 36
... Video Setup menu. 36 En 4 Touch 0 to 9 to input the registered code number. 5 Registering the code. Displaying the deregistration code If your code number % Press RESET. Section 19 Setting up the video player Setting up the video player 3 Touch Time Per Photo Slide on the Video Setup menu to select the...
... Video Setup menu. 36 En 4 Touch 0 to 9 to input the registered code number. 5 Registering the code. Displaying the deregistration code If your code number % Press RESET. Section 19 Setting up the video player Setting up the video player 3 Touch Time Per Photo Slide on the Video Setup menu to select the...
Owner's Manual
Page 44
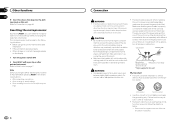
... 8 W (impedance value). Important ! When erasing all stored settings ! Disconnect the negative terminal of this unit with different screws. When resetting the unit to connect the yellow cable of car's body (Another electronic device in a vehicle without changing the bookmark information. Where such ... obeyed and this unit. Refer to 3 W speakers for this unit's DVD features should not be illegal. Resetting the microprocessor By pressing RESET, you can reset the microprocessor to its initial (factory) set the ignition switch to do so may be used. Make sure ...
... 8 W (impedance value). Important ! When erasing all stored settings ! Disconnect the negative terminal of this unit with different screws. When resetting the unit to connect the yellow cable of car's body (Another electronic device in a vehicle without changing the bookmark information. Where such ... obeyed and this unit. Refer to 3 W speakers for this unit's DVD features should not be illegal. Resetting the microprocessor By pressing RESET, you can reset the microprocessor to its initial (factory) set the ignition switch to do so may be used. Make sure ...
Owner's Manual
Page 51
... is incorrect and the image is not connected. This is not possible. Connect a rear view camera. The unit will not rise. Noise and/or Press RESET. Cables are causing the built-in microprocessor to ACC). The icon is displayed, and operation is a normal operation. Firmly secure the unit. Select the appropriate...
... is incorrect and the image is not connected. This is not possible. Connect a rear view camera. The unit will not rise. Noise and/or Press RESET. Cables are causing the built-in microprocessor to ACC). The icon is displayed, and operation is a normal operation. Firmly secure the unit. Select the appropriate...
Owner's Manual
Page 52
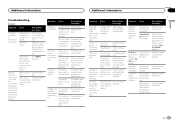
... when viewed on the disc. Appendix Additional information Additional information DVD Symptom Cause Action (Reference page) Playback is displayed, reconnect the iPod and reset it. The code num- Press RESET. is compatible with one featuring the same region number as this unit. DVD does not fea- ture scenes re- Some discs feature...
... when viewed on the disc. Appendix Additional information Additional information DVD Symptom Cause Action (Reference page) Playback is displayed, reconnect the iPod and reset it. The code num- Press RESET. is compatible with one featuring the same region number as this unit. DVD does not fea- ture scenes re- Some discs feature...
Owner's Manual
Page 53
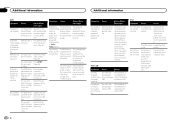
... Subscribed Channel Locked Cause Action The channel Check the conthat you have tent of your requested is dirty. Clean the disc. Press RESET. The inserted disc does not contain any ob- phone. operate or the er connection. switched off /on , vated. If the...correctly. nection between nected cellular this time. to tion is switched off/on the out- contact your dealer or an authorized Pioneer Service Station for assistance. good reception. formation. Message Cause Action Check Tuner The SiriusXM Check the tuner Connect Vehicle connection. ...
... Subscribed Channel Locked Cause Action The channel Check the conthat you have tent of your requested is dirty. Clean the disc. Press RESET. The inserted disc does not contain any ob- phone. operate or the er connection. switched off /on , vated. If the...correctly. nection between nected cellular this time. to tion is switched off/on the out- contact your dealer or an authorized Pioneer Service Station for assistance. good reception. formation. Message Cause Action Check Tuner The SiriusXM Check the tuner Connect Vehicle connection. ...
Owner's Manual
Page 55
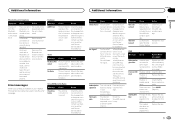
...iPod and try again. ON. Cause Action Communication Disconnect the failed. Once the iPod's main menu is displayed, reconnect the iPod and reset it in the flash. The inserted external storage device contains expired DivX VOD content. ternal storage can be played. ported device contains ... iPod. The tag information on the iPod is still dis- Reconnect your dealer or an authorized Pioneer Service Station. cable from the iPod. played, reconnect the iPod and reset it . This unit's flash memory used for any sound. Format Read Sometimes Wait until the ...
...iPod and try again. ON. Cause Action Communication Disconnect the failed. Once the iPod's main menu is displayed, reconnect the iPod and reset it in the flash. The inserted external storage device contains expired DivX VOD content. ternal storage can be played. ported device contains ... iPod. The tag information on the iPod is still dis- Reconnect your dealer or an authorized Pioneer Service Station. cable from the iPod. played, reconnect the iPod and reset it . This unit's flash memory used for any sound. Format Read Sometimes Wait until the ...


