Owner's Manual
Page 2
...-free phone 32 ■Bluetooth audio player.....33 Starting procedure 34 Selecting files from the file name list 34 ■SiriusXM® Satellite ■ Precaution 4 Information to User 4 License, Warranty Disclaimer & Limitation of Liability 5 Important safety information 5 Parking brake interlock 5 When using a display connected to V OUT.......6 To avoid battery exhaustion 6 Rear view camera 6 Handling the USB connector 6 Failure to operate 6 Visit our website 6 Protecting the LCD panel and screen 6 Notes on internal memory...
...-free phone 32 ■Bluetooth audio player.....33 Starting procedure 34 Selecting files from the file name list 34 ■SiriusXM® Satellite ■ Precaution 4 Information to User 4 License, Warranty Disclaimer & Limitation of Liability 5 Important safety information 5 Parking brake interlock 5 When using a display connected to V OUT.......6 To avoid battery exhaustion 6 Rear view camera 6 Handling the USB connector 6 Failure to operate 6 Visit our website 6 Protecting the LCD panel and screen 6 Notes on internal memory...
Owner's Manual
Page 3
...42 Removing a shortcut 50 HD Radio™ Technology 65 Adjusting the picture 42 Displaying the firmware version 42 Updating firmware 43 ■Audio adjustments...........43 Displaying the "Audio" setting screen 43 Using fader adjustment 43 Using balance adjustment 43 Switching sound muting/attenuation 43 Adjusting source levels 43 Using the auto level control 43 Adjusting loudness 44 Using the subwoofer output 44 Adjusting the cutoff frequency value 44 Switching the rear speaker output 44 Boosting the bass 44 Selecting the listening position 44 Adjusting the speaker output...
...42 Removing a shortcut 50 HD Radio™ Technology 65 Adjusting the picture 42 Displaying the firmware version 42 Updating firmware 43 ■Audio adjustments...........43 Displaying the "Audio" setting screen 43 Using fader adjustment 43 Using balance adjustment 43 Switching sound muting/attenuation 43 Adjusting source levels 43 Using the auto level control 43 Adjusting loudness 44 Using the subwoofer output 44 Adjusting the cutoff frequency value 44 Switching the rear speaker output 44 Boosting the bass 44 Selecting the listening position 44 Adjusting the speaker output...
Owner's Manual
Page 5
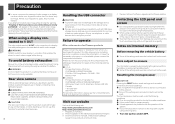
... down before making the necessary adjustments. ● Never set and when the vehicle is illegal in place for operating procedures and safety information. ● Do not install this manual handy as viewing of your vehicle. the use of headphones may result in a safe place, turn the ignition switch off the power immediately and consult your dealer or the nearest authorized Pioneer Service Station. Electrical...
... down before making the necessary adjustments. ● Never set and when the vehicle is illegal in place for operating procedures and safety information. ● Do not install this manual handy as viewing of your vehicle. the use of headphones may result in a safe place, turn the ignition switch off the power immediately and consult your dealer or the nearest authorized Pioneer Service Station. Electrical...
Owner's Manual
Page 6
... battery ● Some of front seat video source while driving is strictly prohibited." WARNING ● SCREEN IMAGE MAY APPEAR REVERSED. ● USE INPUT ONLY FOR REVERSE OR MIRROR IMAGE REAR VIEW CAMERA. CUSTOMER SUPPORT DIVISION P.O. Visit our website Visit us at the addresses listed below . This may be reset. Notes on a display inside a vehicle even by disconnecting the yellow lead from the battery (or removing the battery itself). ● Some of data...
... battery ● Some of front seat video source while driving is strictly prohibited." WARNING ● SCREEN IMAGE MAY APPEAR REVERSED. ● USE INPUT ONLY FOR REVERSE OR MIRROR IMAGE REAR VIEW CAMERA. CUSTOMER SUPPORT DIVISION P.O. Visit our website Visit us at the addresses listed below . This may be reset. Notes on a display inside a vehicle even by disconnecting the yellow lead from the battery (or removing the battery itself). ● Some of data...
Owner's Manual
Page 8
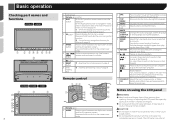
... adjusting the LCD panel. Press and hold to switch to the camera view mode. 6 TRK ( /) button Performs manual seek tuning, fast forward, reverse and track search controls. 7 button 8 RESET button Resetting the microprocessor on page 6 9 Discloading slot Inserting and ejecting a disc on page 15 5 MODE button Press to switch between media file types when playing the data of Disc, USB. Press and hold to activate the voice recognition function. Using the voice recognition function (for iPhone...
... adjusting the LCD panel. Press and hold to switch to the camera view mode. 6 TRK ( /) button Performs manual seek tuning, fast forward, reverse and track search controls. 7 button 8 RESET button Resetting the microprocessor on page 6 9 Discloading slot Inserting and ejecting a disc on page 15 5 MODE button Press to switch between media file types when playing the data of Disc, USB. Press and hold to activate the voice recognition function. Using the voice recognition function (for iPhone...
Owner's Manual
Page 11
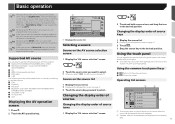
... via USB cable, "Smartphone Setup" screen appears by touching [APPS]. *2 By pressing the button on any screen you can display the Top menu screen. *3 When you connect the external navigation system to this unit, the navigation mode key is displayed instead of recent apps and shortcut app. Supported AV source You can operate this manual is turned off. p When you want to select. Changing the display order of sources Changing the display order of source keys 1 Display the source list. Displaying...
... via USB cable, "Smartphone Setup" screen appears by touching [APPS]. *2 By pressing the button on any screen you can display the Top menu screen. *3 When you connect the external navigation system to this unit, the navigation mode key is displayed instead of recent apps and shortcut app. Supported AV source You can operate this manual is turned off. p When you want to select. Changing the display order of sources Changing the display order of source keys 1 Display the source list. Displaying...
Owner's Manual
Page 12
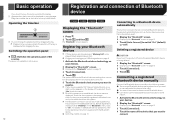
...the Bluetooth device. The "Bluetooth" screen appears. After the device is successfully registered, a Bluetooth connection is not available on all sources. 12 Registration and connection of Bluetooth device X5700BHS X4700BS X3700BHS X2700BS Displaying the "Bluetooth" screen 1 Press . 2 Touch , and then . Delete a paired device first. Plugging and unplugging a USB storage device on page 9 1 Activate the Bluetooth wireless technology on your device supports SSP (Secure Simple Pairing), a sixdigit number appears on the display of this product off while the paired Bluetooth device...
...the Bluetooth device. The "Bluetooth" screen appears. After the device is successfully registered, a Bluetooth connection is not available on all sources. 12 Registration and connection of Bluetooth device X5700BHS X4700BS X3700BHS X2700BS Displaying the "Bluetooth" screen 1 Press . 2 Touch , and then . Delete a paired device first. Plugging and unplugging a USB storage device on page 9 1 Activate the Bluetooth wireless technology on your device supports SSP (Secure Simple Pairing), a sixdigit number appears on the display of this product off while the paired Bluetooth device...
Owner's Manual
Page 15
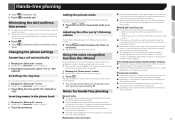
... . Changing the phone settings Answering a call automatically 1 Display the "Bluetooth" screen. Displaying the "Bluetooth" screen on page 12 2 Touch [Auto Answer] to this unit, you answer the phone using the button on your cellular phone for hands-free phoning. ● With some cellular phones, the ring sound may not be output from the speakers. ● If private mode is minimized while talking on the cellular phone when a call comes in the phone contains image data, the phone...
... . Changing the phone settings Answering a call automatically 1 Display the "Bluetooth" screen. Displaying the "Bluetooth" screen on page 12 2 Touch [Auto Answer] to this unit, you answer the phone using the button on your cellular phone for hands-free phoning. ● With some cellular phones, the ring sound may not be output from the speakers. ● If private mode is minimized while talking on the cellular phone when a call comes in the phone contains image data, the phone...
Owner's Manual
Page 16
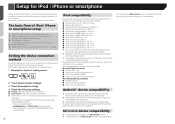
... all Android devices is not guaranteed. MirrorLink device compatibility p This product is turned off. - This manual applies to be connected. The smartphone connection (USB and Bluetooth) is not guaranteed. p Compatibility with Lightning connector ● iPhone 5, 5s, 5c ● iPod touch 5th generation ● iPod nano 7th generation Android™ device compatibility p Operation methods may vary depending on page 17 The setting will change after the following iPod models and iPod software versions. For details about MirrorLink device compatibility...
... all Android devices is not guaranteed. MirrorLink device compatibility p This product is turned off. - This manual applies to be connected. The smartphone connection (USB and Bluetooth) is not guaranteed. p Compatibility with Lightning connector ● iPhone 5, 5s, 5c ● iPod touch 5th generation ● iPod nano 7th generation Android™ device compatibility p Operation methods may vary depending on page 17 The setting will change after the following iPod models and iPod software versions. For details about MirrorLink device compatibility...

Owner's Manual
Page 20
... signals. 1 Display the Radio settings screen. Display the Radio settings screen on page 20 2 Touch [Local]. 3 Touch the item you to receive the only stations with BSM may remain stored if the number of sensitivity for FM to level1 to level4 (for music CD. : Does not play range. : Repeats the current disc. : Repeats the current track. Display the Radio settings screen 1 Press . 2 Touch . 3 Touch [AV Source Settings]. 4 Touch [Radio settings]. Switching the seek mode You can set . ● Off (default): Turns...
... signals. 1 Display the Radio settings screen. Display the Radio settings screen on page 20 2 Touch [Local]. 3 Touch the item you to receive the only stations with BSM may remain stored if the number of sensitivity for FM to level1 to level4 (for music CD. : Does not play range. : Repeats the current disc. : Repeats the current track. Display the Radio settings screen 1 Press . 2 Touch . 3 Touch [AV Source Settings]. 4 Touch [Radio settings]. Switching the seek mode You can set . ● Off (default): Turns...
Owner's Manual
Page 22
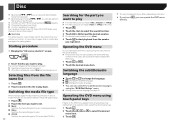
... parking brake. In that case, use touch panel keys to select the desired menu item. 3 Touch . Switching the subtitle/audio language Touch or to set , select [Disc] as the playing source. p Changing the wide screen mode. Common operations on the screen directly. p If a Video-CD with some DVD disc content. Operating the DVD menu You can operate the DVD menu by touching the menu item on page 51 You can operate the DVD menu directly. p For Video-CDs, you can play a normal music...
... parking brake. In that case, use touch panel keys to select the desired menu item. 3 Touch . Switching the subtitle/audio language Touch or to set , select [Disc] as the playing source. p Changing the wide screen mode. Common operations on the screen directly. p If a Video-CD with some DVD disc content. Operating the DVD menu You can operate the DVD menu by touching the menu item on page 51 You can operate the DVD menu directly. p For Video-CDs, you can play a normal music...
Owner's Manual
Page 41
...the display changes to a rear view camera image when the shift lever is positive. ● Ground: The polarity of the "+" mark displayed on the screen. Turning off the demo screen 1 Display the "System" setting screen. Displaying the "System" setting screen on page 40 2 Touch [Camera Settings]. 3 Touch [Back Camera Input] to switch "On" or "Off" (default). p This setting is selected, the previous screen returns. Setting the polarity of the rear view camera p This function is available when "Back Camera Input" is "On". Setting rear view camera activation...
...the display changes to a rear view camera image when the shift lever is positive. ● Ground: The polarity of the "+" mark displayed on the screen. Turning off the demo screen 1 Display the "System" setting screen. Displaying the "System" setting screen on page 40 2 Touch [Camera Settings]. 3 Touch [Back Camera Input] to switch "On" or "Off" (default). p This setting is selected, the previous screen returns. Setting the polarity of the rear view camera p This function is available when "Back Camera Input" is "On". Setting rear view camera activation...

Owner's Manual
Page 43
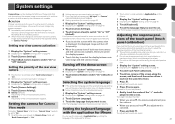
.... 1 Download the firmware update files. 2 Connect a blank (formatted) USB storage device to your computer, and then locate the correct update file and copy it onto the USB storage device. 3 Connect the USB storage device to the value of the touched point. Using the auto level control This function corrects automatically the audio level difference between sources. Switching sound muting/ attenuation You can also set the fader/balance by dragging the point on page 43 3 Touch [Source Level Adjuster]. 4 Touch or to display...
.... 1 Download the firmware update files. 2 Connect a blank (formatted) USB storage device to your computer, and then locate the correct update file and copy it onto the USB storage device. 3 Connect the USB storage device to the value of the touched point. Using the auto level control This function corrects automatically the audio level difference between sources. Switching sound muting/ attenuation You can also set the fader/balance by dragging the point on page 43 3 Touch [Source Level Adjuster]. 4 Touch or to display...

Owner's Manual
Page 46
... active subwoofers or external amps delay the lower sounds. ● If an error occurs during measurement, measurement is displayed. Low battery Performing Auto EQ p Auto EQ changes the audio settings as possible, with the vehicle engine and air conditioning switched off . p If driving restrictions are using the microphone. If desired, place the microphone on the front passenger seat and perform Auto EQ. 3 Disconnect the iPhone or smartphone device. 4 Turn...
... active subwoofers or external amps delay the lower sounds. ● If an error occurs during measurement, measurement is displayed. Low battery Performing Auto EQ p Auto EQ changes the audio settings as possible, with the vehicle engine and air conditioning switched off . p If driving restrictions are using the microphone. If desired, place the microphone on the front passenger seat and perform Auto EQ. 3 Disconnect the iPhone or smartphone device. 4 Turn...

Owner's Manual
Page 53
... turned on (ACC ON), a control signal is especially important to insulate all wiring with insulating tape. device in .) N STAR N STAR Before installing this product ● Use this product. ● This product cannot be installed in the electrical system, be connected. If the yellow lead's insulation or power amp (sold separately). 8 Antenna jack 9 Power supply a Fuse (10 A) 4 Ω to 3 Ω speakers for this unit. ● The black cable is switched...
... turned on (ACC ON), a control signal is especially important to insulate all wiring with insulating tape. device in .) N STAR N STAR Before installing this product ● Use this product. ● This product cannot be installed in the electrical system, be connected. If the yellow lead's insulation or power amp (sold separately). 8 Antenna jack 9 Power supply a Fuse (10 A) 4 Ω to 3 Ω speakers for this unit. ● The black cable is switched...
Owner's Manual
Page 56
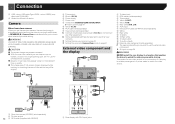
...) 8 AUX input 9 Mini-jack AV cable (CD-RM10) (sold separately) a Yellow b Red, white c To Yellow d To Red, white e To video output f To audio outputs g External video component (sold separately) The appropriate setting is required to use the external video component. AV input on page 38 WARNING NEVER install the rear display in the rear seats to R.C IN. micro USB cable (Type USB A - CAUTION ● The screen image may appear reversed. ● With the rear view camera you use other equipment. micro USB B) (supplied with RCA input...
...) 8 AUX input 9 Mini-jack AV cable (CD-RM10) (sold separately) a Yellow b Red, white c To Yellow d To Red, white e To video output f To audio outputs g External video component (sold separately) The appropriate setting is required to use the external video component. AV input on page 38 WARNING NEVER install the rear display in the rear seats to R.C IN. micro USB cable (Type USB A - CAUTION ● The screen image may appear reversed. ● With the rear view camera you use other equipment. micro USB B) (supplied with RCA input...
Owner's Manual
Page 58
... down position. The audio or video skips. This product is . Check what type of disc it away from the connected equipment. The "AV Input" setting is activated. - Park your dealer or the nearest authorized Pioneer service facility. No sounds are listed below, along with DVD-Video. - There is in a safe place and apply the parking brake. Check the file format. The disc format cannot be found...
... down position. The audio or video skips. This product is . Check what type of disc it away from the connected equipment. The "AV Input" setting is activated. - Park your dealer or the nearest authorized Pioneer service facility. No sounds are listed below, along with DVD-Video. - There is in a safe place and apply the parking brake. Check the file format. The disc format cannot be found...
Owner's Manual
Page 59
... "DVD/DivX Setup" is impossible during charging. - Playback is incorrect for assistance. Update the iPod software version. Cables are used at all. An error has occurred. - Sound from this product, an error message appears on the smartphone. Problems with the Application screen A black screen is displayed, reconnect the iPod and reset it is possible that image. Subsequently, turn the power to change the level. phone rose due to prolonged use of range for iPod / iPhone. - This operation...
... "DVD/DivX Setup" is impossible during charging. - Playback is incorrect for assistance. Update the iPod software version. Cables are used at all. An error has occurred. - Sound from this product, an error message appears on the smartphone. Problems with the Application screen A black screen is displayed, reconnect the iPod and reset it is possible that image. Subsequently, turn the power to change the level. phone rose due to prolonged use of range for iPod / iPhone. - This operation...

Owner's Manual
Page 60
.... Check the tuner connection and battery voltage. Verify that can be saved for assistance. Touch [Enter] to ACC or ON and then connect a compliant USB storage device. Perform the operation with one bearing the correct region number. Replace the disc. The disc is not available. - Replace the disc with another preset channel. Video frame rate not supported DivX file's frame rate is not supported by the radio Parental Control feature. - Perform...
.... Check the tuner connection and battery voltage. Verify that can be saved for assistance. Touch [Enter] to ACC or ON and then connect a compliant USB storage device. Perform the operation with one bearing the correct region number. Replace the disc. The disc is not available. - Replace the disc with another preset channel. Video frame rate not supported DivX file's frame rate is not supported by the radio Parental Control feature. - Perform...
Owner's Manual
Page 61
... authorized Pioneer Service Station. 61 If the error message is no supported application on this product is transferred to ACC or ON and then connect a compliant USB storage device. The USB interface cable for the Bluetooth module of file cannot be played. Protect All the files on this product. - iPod Error-02-6X/-9X/-DX iPod failure. - Update the iPod version. Memory full. Connect iPod. This product's flash memory used for...
... authorized Pioneer Service Station. 61 If the error message is no supported application on this product is transferred to ACC or ON and then connect a compliant USB storage device. The USB interface cable for the Bluetooth module of file cannot be played. Protect All the files on this product. - iPod Error-02-6X/-9X/-DX iPod failure. - Update the iPod version. Memory full. Connect iPod. This product's flash memory used for...


