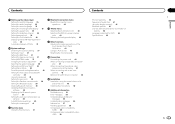
Owner's Manual
Page 3
... the Bluetooth audio 39 Clearing Bluetooth memory 39 Updating Bluetooth connection software 39 Displaying the Bluetooth system version 39 Setting the rear view camera (back up camera) 39 Auto EQ (auto-equalizing) 40 Setting the video signal 41 Favorite menu Using the Favorite menu 41 Bluetooth connection... When connecting to separately sold power amp 47 When connecting the external video component and the display 47 When connecting with a rear view camera 48 Optional SiriusXM Tuner connection 48 Installation Installation using the screw holes on the side of the unit 49 Installing the microphone...
... the Bluetooth audio 39 Clearing Bluetooth memory 39 Updating Bluetooth connection software 39 Displaying the Bluetooth system version 39 Setting the rear view camera (back up camera) 39 Auto EQ (auto-equalizing) 40 Setting the video signal 41 Favorite menu Using the Favorite menu 41 Bluetooth connection... When connecting to separately sold power amp 47 When connecting the external video component and the display 47 When connecting with a rear view camera 48 Optional SiriusXM Tuner connection 48 Installation Installation using the screw holes on the side of the unit 49 Installing the microphone...
Owner's Manual
Page 4
... times while operating your injuries can be used while driving. If you are ever in an accident, your vehicle. When using the rear view camera With an optional rear view camera, this unit can watch videos. Do not use , please read all of these instructions regarding your vehicle. To ensure proper use ... safety features, including air bags, hazard lamp buttons or (iii) impair the driver's ability to safely operate the vehicle. 2 Do not operate this PIONEER product. will divert your attention from being replaced, the microcomputer of this unit (V OUT) is used for checking the...
... times while operating your injuries can be used while driving. If you are ever in an accident, your vehicle. When using the rear view camera With an optional rear view camera, this unit can watch videos. Do not use , please read all of these instructions regarding your vehicle. To ensure proper use ... safety features, including air bags, hazard lamp buttons or (iii) impair the driver's ability to safely operate the vehicle. 2 Do not operate this PIONEER product. will divert your attention from being replaced, the microcomputer of this unit (V OUT) is used for checking the...
Owner's Manual
Page 10
...(R) position. ! You cannot operate this key again. Use of the rear view camera feature requires a rear view camera sold separately, to this unit allows images and videos to be setup to the rear view image. When the rear view image is enlarged in the same proportion both vertically and horizontally; Touch...'47'' 1 1 Tab key Switching the touch keys on CD media - Camera for rear view mode The rear view can be turned on the author's rights protected by turning the rear view image on page 39. Using the rear view key to the source display by touching the display. Images and video...
...(R) position. ! You cannot operate this key again. Use of the rear view camera feature requires a rear view camera sold separately, to this unit allows images and videos to be setup to the rear view image. When the rear view image is enlarged in the same proportion both vertically and horizontally; Touch...'47'' 1 1 Tab key Switching the touch keys on CD media - Camera for rear view mode The rear view can be turned on the author's rights protected by turning the rear view image on page 39. Using the rear view key to the source display by touching the display. Images and video...
Owner's Manual
Page 37
...or off , touch DVD Auto Play again. Setting MIXTRAX mode Refer to iPhone. You cannot adjust Color, Hue and Contrast for each source and rear view camera. ! Completing Picture Adjustment for the Navigation system when the RGB input setting is not fully operated, turn this function is set to Setting MIXTRAX ... deregistration, touch Cancel. 5 Touch OK. Automatic playback of the first title. ! Some DVDs may not operate properly. Source Adjusting the Picture Adjustment for the rear view camera. The deregistration is complete. Adjusting the Picture Adjustment for the source.
...or off , touch DVD Auto Play again. Setting MIXTRAX mode Refer to iPhone. You cannot adjust Color, Hue and Contrast for each source and rear view camera. ! Completing Picture Adjustment for the Navigation system when the RGB input setting is not fully operated, turn this function is set to Setting MIXTRAX ... deregistration, touch Cancel. 5 Touch OK. Automatic playback of the first title. ! Some DVDs may not operate properly. Source Adjusting the Picture Adjustment for the rear view camera. The deregistration is complete. Adjusting the Picture Adjustment for the source.
Owner's Manual
Page 38
...adjustments can be made .) ! Setting the rear output and subwoofer controller This unit's rear output (rear speaker leads output and RCA rear output) can be used for the follow- Initially, the unit is set to NTSC. # With some rear view cameras, picture adjustment may not be adjusted. ...Color - Dimmer - Multi language setting for a rear full-range speaker connection (Full). 1 Turn the source off . ! If text information such ...
...adjustments can be made .) ! Setting the rear output and subwoofer controller This unit's rear output (rear speaker leads output and RCA rear output) can be used for the follow- Initially, the unit is set to NTSC. # With some rear view cameras, picture adjustment may not be adjusted. ...Color - Dimmer - Multi language setting for a rear full-range speaker connection (Full). 1 Turn the source off . ! If text information such ...
Owner's Manual
Page 39
... menu. 3 Touch Camera Polarity on page 8. 1 Press the home button to switch to the home display. 2 Touch the system key to open the system menu. 4 Touch Bluetooth Version Information to display to the version of the Bluetooth module of AVH-X5500BHS/AVH-X4500BT/AVHX3500BHS/AVH-X2500BT) You need to...set up camera) CAUTION Pioneer recommends the use a Bluetooth audio player. 1 Press the home button to switch to the home display. 2 Touch the system key to open the system menu. 3 Touch Ever Scroll on the system menu to the rear view camera video (R.C IN) when a rear view camera is installed...
... menu. 3 Touch Camera Polarity on page 8. 1 Press the home button to switch to the home display. 2 Touch the system key to open the system menu. 4 Touch Bluetooth Version Information to display to the version of the Bluetooth module of AVH-X5500BHS/AVH-X4500BT/AVHX3500BHS/AVH-X2500BT) You need to...set up camera) CAUTION Pioneer recommends the use a Bluetooth audio player. 1 Press the home button to switch to the home display. 2 Touch the system key to open the system menu. 3 Touch Ever Scroll on the system menu to the rear view camera video (R.C IN) when a rear view camera is installed...
Owner's Manual
Page 41
... EQ measurement to Understanding auto EQ error messages on page 32. Please disconnect the microphone and then push HOME key. Adjusts the rear view camera video signal Using the Favorite menu 1 Display menu columns to select the desired video signal appears. Refer to Menu operations on page...registration, touch the star icon in the glove compartment or another safe place. As this unit, select the suitable video signal setting. ! Camera - Section 20 21 En 41 English System settings Favorite menu When auto EQ is completed, The measurement has finished. Setting the video signal ...
... EQ measurement to Understanding auto EQ error messages on page 32. Please disconnect the microphone and then push HOME key. Adjusts the rear view camera video signal Using the Favorite menu 1 Display menu columns to select the desired video signal appears. Refer to Menu operations on page...registration, touch the star icon in the glove compartment or another safe place. As this unit, select the suitable video signal setting. ! Camera - Section 20 21 En 41 English System settings Favorite menu When auto EQ is completed, The measurement has finished. Setting the video signal ...
Owner's Manual
Page 48
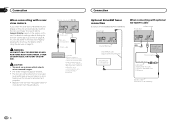
... To video output Rear view camera (sold separately) Dock connector 1.5 m (4 ft. 11 in the rear view may appear reversed. ! For details, refer to the rear view image by pressing the Touch key. CAUTION ! Connection Optional SiriusXM Tuner connection (Function of AVH-X5500BHS/AVH-X3500BHS) This product... in which outputs mirror reversed images. ! You must use for entertainment purposes. ! Section 25 Connection When connecting with a rear view camera If you switch the shift lever to REVERSE (R), the display on this unit) Connect to separately sold separately) 48 En ...
... To video output Rear view camera (sold separately) Dock connector 1.5 m (4 ft. 11 in the rear view may appear reversed. ! For details, refer to the rear view image by pressing the Touch key. CAUTION ! Connection Optional SiriusXM Tuner connection (Function of AVH-X5500BHS/AVH-X3500BHS) This product... in which outputs mirror reversed images. ! You must use for entertainment purposes. ! Section 25 Connection When connecting with a rear view camera If you switch the shift lever to REVERSE (R), the display on this unit) Connect to separately sold separately) 48 En ...
Owner's Manual
Page 51
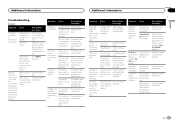
...range again. Select the repeat range again. The type of the disc. The volume level is no image displayed. The rear view camera is at incorrect setting. Camera Polarity is not connected. Press the home button to return to the source display and then select the correct setting for ... and the unit cannot be played on this video system. The unit is confirming whether or not a disc is not possible. Connect a rear view camera. Select the repeat range again. En 51 Cables are above recommended rates. Rectify the cause and then replace the fuse. The volume level ...
...range again. Select the repeat range again. The type of the disc. The volume level is no image displayed. The rear view camera is at incorrect setting. Camera Polarity is not connected. Press the home button to return to the source display and then select the correct setting for ... and the unit cannot be played on this video system. The unit is confirming whether or not a disc is not possible. Connect a rear view camera. Select the repeat range again. En 51 Cables are above recommended rates. Rectify the cause and then replace the fuse. The volume level ...


